Ir para o conteúdo principal

Motorola Moto G5 Plus Motherboard Replacement

O que você precisa

  1. Motorola Moto G5 Plus Motherboard Replacement, Display Assembly: passo 1, imagem 1 %32 Motorola Moto G5 Plus Motherboard Replacement, Display Assembly: passo 1, imagem 2 %32 Motorola Moto G5 Plus Motherboard Replacement, Display Assembly: passo 1, imagem 3 %32
    • Be sure to power off your phone before you begin.

    • Use a SIM eject bit, SIM eject tool, or paper clip to remove the SIM card from your phone.

  2. Motorola Moto G5 Plus Motherboard Replacement: passo 2, imagem 1 %32
    • Prepare an iOpener and heat the front of the phone along its left edge for about two minutes, or until it's slightly too hot to touch. This will help soften the adhesive securing the display.

    • You may need to reheat and reapply the iOpener several times to get the phone warm enough to cut the adhesive. Follow the iOpener instructions to avoid overheating.

    • A hair dryer, heat gun, or hot plate may also be used, but be careful not to overheat the phone—the display and internal battery are both susceptible to heat damage.

  3. Motorola Moto G5 Plus Motherboard Replacement: passo 3, imagem 1 %32 Motorola Moto G5 Plus Motherboard Replacement: passo 3, imagem 2 %32 Motorola Moto G5 Plus Motherboard Replacement: passo 3, imagem 3 %32
    • In the following steps you will be cutting through the adhesive around the edge of the display assembly.

    • Refer to the second and third images and familiarize yourself with the width of the adhesive around edges of the display.

    • If you plan to re-use the display assembly, be particularly careful as you cut the adhesive on the sides of the phone. Don't insert your tool more than 2 mm into the phone, and angle it down (away from the display assembly) as much as possible.

  4. Motorola Moto G5 Plus Motherboard Replacement: passo 4, imagem 1 %32 Motorola Moto G5 Plus Motherboard Replacement: passo 4, imagem 2 %32 Motorola Moto G5 Plus Motherboard Replacement: passo 4, imagem 3 %32
    • Apply a suction cup to the display, near the middle of the left edge.

    • Pull the suction cup with firm, constant pressure to create a slight gap between the display panel and the rear case.

    • If the screen is cracked, the suction cup may not stick. In that case, try lifting with strong tape, or superglue the suction cup in place and allow it to cure so you can proceed.

    • If the display doesn't separate even with significant force, apply more heat to further soften the adhesive and try again. The adhesive cools quickly, so you may need to heat it repeatedly.

  5. Motorola Moto G5 Plus Motherboard Replacement: passo 5, imagem 1 %32 Motorola Moto G5 Plus Motherboard Replacement: passo 5, imagem 2 %32 Motorola Moto G5 Plus Motherboard Replacement: passo 5, imagem 3 %32
    • Slide the tool along the left edge of the phone, cutting through the adhesive securing the display.

    • As you move on to cutting the adhesive around the rest of the display, it may help to leave an opening pick in place here and grab another for the following steps.

  6. Motorola Moto G5 Plus Motherboard Replacement: passo 6, imagem 1 %32 Motorola Moto G5 Plus Motherboard Replacement: passo 6, imagem 2 %32
    • Slide the opening pick down and cut the adhesive around the bottom of the display.

    • If the adhesive is too tough to cut, continue to heat it until it softens enough to cut fairly easily. Excessive prying or force used here could permanently damage the display or other components.

    • Be careful as you slide your pick around the top and bottom edges of the display. The display cables, fingerprint sensor, and fingerprint sensor cable are all housed fairly close to the edge of the display and can easily be damaged. Refer to this image to see the exact location of the cables.

  7. Motorola Moto G5 Plus Motherboard Replacement: passo 7, imagem 1 %32 Motorola Moto G5 Plus Motherboard Replacement: passo 7, imagem 2 %32 Motorola Moto G5 Plus Motherboard Replacement: passo 7, imagem 3 %32
    • Continue cutting through the adhesive on the top and right sides of the phone.

    • The proximity sensor, earpiece speaker, and front-facing camera are all located along the top edge of the phone, but are housed beneath the display unit. You shouldn't come into contact with any of them as you insert your pick to cut the adhesive.

  8. Motorola Moto G5 Plus Motherboard Replacement: passo 8, imagem 1 %32 Motorola Moto G5 Plus Motherboard Replacement: passo 8, imagem 2 %32 Motorola Moto G5 Plus Motherboard Replacement: passo 8, imagem 3 %32
    • Once all the adhesive is cut, carefully lift open the display from the left edge.

    • Don't fully remove the display yet. There are still cables connecting the display assembly that can rip easily.

    • Prop the display unit at a 90 degree angle against a box to prevent the display and fingerprint cables from bending or tearing.

  9. Motorola Moto G5 Plus Motherboard Replacement: passo 9, imagem 1 %32 Motorola Moto G5 Plus Motherboard Replacement: passo 9, imagem 2 %32
    • Remove the yellow sticker covering two of the black Phillips screws below the earpiece.

  10. Motorola Moto G5 Plus Motherboard Replacement: passo 10, imagem 1 %32
    • Remove the following Phillips screws from the midframe:

    • Sixteen 3.8 mm black screws

    • Three 2.4 mm silver screws

  11. Motorola Moto G5 Plus Motherboard Replacement: passo 11, imagem 1 %32 Motorola Moto G5 Plus Motherboard Replacement: passo 11, imagem 2 %32
    • Insert the flat end of a spudger between the midframe and the left edge of the phone and carefully pry to release the two clips holding the midframe in place.

  12. Motorola Moto G5 Plus Motherboard Replacement: passo 12, imagem 1 %32 Motorola Moto G5 Plus Motherboard Replacement: passo 12, imagem 2 %32
    • Lift the midframe up and away from the phone.

  13. Motorola Moto G5 Plus Motherboard Replacement: passo 13, imagem 1 %32 Motorola Moto G5 Plus Motherboard Replacement: passo 13, imagem 2 %32
    • Use the point of a spudger to disconnect the larger of the two display cable connectors.

  14. Motorola Moto G5 Plus Motherboard Replacement: passo 14, imagem 1 %32 Motorola Moto G5 Plus Motherboard Replacement: passo 14, imagem 2 %32 Motorola Moto G5 Plus Motherboard Replacement: passo 14, imagem 3 %32
    • Disconnect the smaller display cable connector.

    • This cable houses a display controller chip encased in yellow tape. You do not need to remove the yellow tape. The chip is lightly adhered to the motherboard, but should come up with minimal effort.

    • Gently continue lifting the cable to break the adhesive seal and pull the cable away from the motherboard.

  15. Motorola Moto G5 Plus Motherboard Replacement: passo 15, imagem 1 %32 Motorola Moto G5 Plus Motherboard Replacement: passo 15, imagem 2 %32
    • At the opposite end of the phone, disconnect the fingerprint sensor cable.

    • The fingerprint sensor cable is taped to a shield above it. As you lift the cable, lift the tape up with it. You can also remove the tape before disconnecting the cable.

  16. Motorola Moto G5 Plus Motherboard Replacement: passo 16, imagem 1 %32 Motorola Moto G5 Plus Motherboard Replacement: passo 16, imagem 2 %32
    • Remove the display assembly from the phone.

    • Before you reinstall the display assembly, thoroughly remove any remaining adhesive and glass from the frame of the device with isopropyl alcohol.

    • Be sure to turn on your phone and test your repair before installing new adhesive and sealing the display assembly.

    • If your replacement display doesn't have touch functionality and you're sure that it has been installed correctly, back up your data and perform a factory reset.

  17. Motorola Moto G5 Plus Motherboard Replacement, Battery: passo 17, imagem 1 %32 Motorola Moto G5 Plus Motherboard Replacement, Battery: passo 17, imagem 2 %32
    • Remove the yellow tape covering the battery connector.

  18. Motorola Moto G5 Plus Motherboard Replacement: passo 18, imagem 1 %32 Motorola Moto G5 Plus Motherboard Replacement: passo 18, imagem 2 %32
    • Use the point of a spudger to disconnect the battery by prying its connector straight up from the motherboard.

  19. Motorola Moto G5 Plus Motherboard Replacement: passo 19, imagem 1 %32 Motorola Moto G5 Plus Motherboard Replacement: passo 19, imagem 2 %32 Motorola Moto G5 Plus Motherboard Replacement: passo 19, imagem 3 %32
    • Peel back the black pull tab from the top of the battery and pull straight up with firm, steady pressure to break the adhesive holding the battery in place.

    • The battery is held in place by mulitiple strips of adhesive. You may be able to break the adhesive using the pull tab, but if not, apply an iOpener to the back of the device to soften the adhesive and proceed to the next step.

  20. Motorola Moto G5 Plus Motherboard Replacement: passo 20, imagem 1 %32 Motorola Moto G5 Plus Motherboard Replacement: passo 20, imagem 2 %32
    • If your pull tab breaks or the adhesive is too strong to break, use an opening pick to gently pry the battery out of the case.

    • Only pry from the edge of the device. Prying from any other side can cause severe damage to exposed components.

  21. Motorola Moto G5 Plus Motherboard Replacement: passo 21, imagem 1 %32 Motorola Moto G5 Plus Motherboard Replacement: passo 21, imagem 2 %32
    Ferramenta utilizada nesse passo:
    Tesa 61395 Tape
    $5.99
    Comprar
    • Once the battery is loose, remove it from the phone.

    • Do not reuse the battery after it has been removed. The stress of removal can cause hidden damage to the battery cell, creating a potential safety hazard. Replace it with a new battery.

    • To install a new battery:

    • Remove any remaining adhesive from the phone, and clean the entire area under the battery with isopropyl alcohol.

    • Apply a few new strips of pre-cut adhesive or Tesa tape.

    • If you are attaching the battery with a custom-cut adhesive, follow this guide.

    • Press the new battery firmly into place for 5-10 seconds.

  22. Motorola Moto G5 Plus Motherboard Replacement, Motherboard Disassembly: passo 22, imagem 1 %32
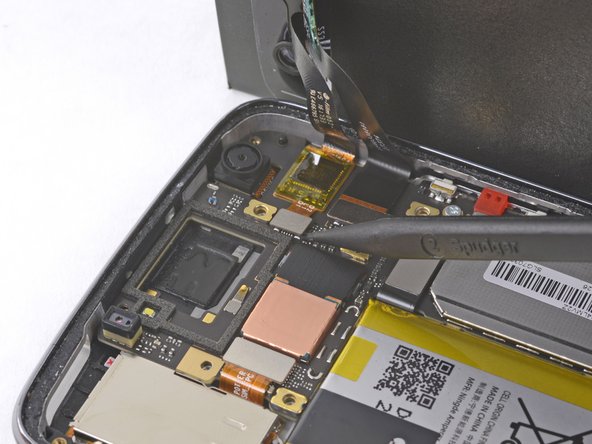
    • Using the Philips 000 Screwdriver, unscrew the 3.1 mm screw.

  23. Motorola Moto G5 Plus Motherboard Replacement: passo 23, imagem 1 %32
    • Using the plastic opening tool, unplug the oscillating vibration motor.

  24. Motorola Moto G5 Plus Motherboard Replacement: passo 24, imagem 1 %32
    • Unplug the flat-top connector with the plastic opening tool.

  25. Motorola Moto G5 Plus Motherboard Replacement: passo 25, imagem 1 %32
    • Using the plastic opening tool, pry open the two tabs that hold the motherboard to the phone frame.

  26. Motorola Moto G5 Plus Motherboard Replacement: passo 26, imagem 1 %32
    • Remove the motherboard from the phone by prying it up with the plastic opening tool.

  27. Motorola Moto G5 Plus Motherboard Replacement, Motherboard: passo 27, imagem 1 %32
    • The rear facing camera is in the upper center of the phone, with a gold covered back.

    • Gently pry the 12-megapixel G5 Plus rear-facing camera up using the plastic opening tool, exposing the ZIF connector.

  28. Motorola Moto G5 Plus Motherboard Replacement: passo 28, imagem 1 %32 Motorola Moto G5 Plus Motherboard Replacement: passo 28, imagem 2 %32
    • Release the ZIF connector and remove the camera from the board.

    • Store the camera in a safe location.

  29. Motorola Moto G5 Plus Motherboard Replacement: passo 29, imagem 1 %32
    • The front facing camera is in the upper right of the phone, above the power button and volume rocker.

    • Flip the motherboard over.

    • Detach the flat-top connector for the front facing camera.

  30. Motorola Moto G5 Plus Motherboard Replacement: passo 30, imagem 1 %32
    • Flip the motherboard back over.

    • Gently pull the front facing camera off the adhesive that holds the camera to the motherboard, feeding the cable through the small hole.

    • Store the camera in a safe location.

Conclusão

To reassemble your device, follow these instructions in reverse order.

10 outras pessoas executaram este guia.

Nicole Klukowski

Membro desde: 10/09/17

1.534 Reputação

Autoria de 5 guias

Equipe

USF Tampa, Team S1-G6, Leahy Fall 2017 Membro de USF Tampa, Team S1-G6, Leahy Fall 2017

USFT-LEAHY-F17S1G6

Membros da 5

Autoria de 21 guias

11 comentários

The power button broke off the motherboard on my G5 plus, so I would like to solder it back into place. I think I need a large, high magnification lens to see the details during the process. Any suggestions?

JUSTIN BERRY - Responder

My phone get into the water so its now dead. i would like to chnage the motherboard. SO could you please share the website from there i can get the whole motherboard in lowest price. I had contact to service centre but they are asking a 80% of the phone cast. Please give me a detail on below email id- ankitkulhade123@gmail.com

Ankit Kulhade - Responder

Is your problem solved now? I’m also facing same problem, they are asking 80% of mobile cost.. what to do now?

Shashank chinnu -

I am facing the same issue with my Moto G5 Plus. The mobile was drawn into water and instantly I pulled it back. I tried drying the phone with raw rice and sunlight. After 3-4 days the phone started working. I used it a whole day but as the better was discharged, the phone was switched off and unlimately dead. The moto service center declared that the motherboard is dead now. Please suggest if it can be fixed?

Manish Kumar -

Sir my moto g5s plus mother board damage due to water and it's only 6 month old so what I do.

Service centre says that repairing not posible because it is not in warranty.

How I get new mother at affordable price.

Kuwar Verma - Responder

Adicione um comentário

Exibir estatísticas:

Últimas 24 horas: 4

Últimos 7 dias: 13

Últimos 30 dias: 50

Duração total: 23,914