Esta versão pode conter edições incorretas. Mude para o último instantâneo verificado.
O que você precisa
-
Este passo não foi traduzido. Ajude a traduzi-lo
-
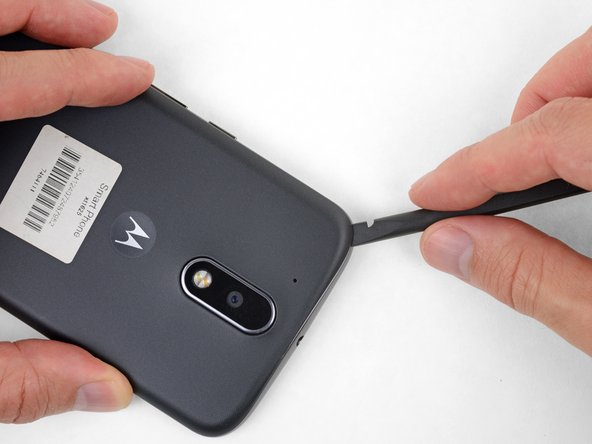
Insert a fingernail or a spudger into the notch on the bottom edge of the phone, near the charge port.
-
Gently twist or pry to open a small gap between the back cover and the body of the phone.
-
While keeping your tool (or fingernail) inserted into the gap between the back cover and the body of the phone, slide it around the corner to begin loosening the plastic clips holding the cover in place.
-
-
Este passo não foi traduzido. Ajude a traduzi-lo
-
Slide your tool all along the side of the phone to separate more of the clips securing the back cover.
-
-
Este passo não foi traduzido. Ajude a traduzi-lo
-
Keep your tool inserted slightly under the back cover, and slide it around the top corner.
-
If necessary, continue prying around the remaining edges of the phone until the back cover comes free.
-
-
Este passo não foi traduzido. Ajude a traduzi-lo
-
Push to eject and remove the MicroSD and SIM cards (if installed).
-
-
Este passo não foi traduzido. Ajude a traduzi-lo
-
Use a spudger to pry up the rubber cover for the camera flash connector.
-
-
-
Este passo não foi traduzido. Ajude a traduzi-lo
-
Use a spudger to disconnect the camera flash connector by prying it straight up.
-
-
Este passo não foi traduzido. Ajude a traduzi-lo
-
Use a T3 Torx driver to remove the nineteen identical 3.1 mm screws securing the midframe.
-
-
Este passo não foi traduzido. Ajude a traduzi-lo
-
Insert a spudger under the midframe at the top left corner, and gently twist to separate it from the body of the phone.
-
-
Este passo não foi traduzido. Ajude a traduzi-lo
-
Peel up and remove any tape connecting the battery to the main board.
-
-
Este passo não foi traduzido. Ajude a traduzi-lo
-
Insert a thin tool (such as one of your tweezer tips) under the red and black battery wires, and slide it underneath the battery connector.
-
Gently pry straight up to disconnect the battery.
-
-
Este passo não foi traduzido. Ajude a traduzi-lo
-
Push the battery wires towards the battery to de-route them from the black bracket on the motherboard.
-
-
Este passo não foi traduzido. Ajude a traduzi-lo
-
Peel up the black pull tab at the top of the battery, and pull slowly but firmly to separate the battery from the adhesive holding it in place.
-
If the pull tab breaks, use a spudger or an old credit card to pry up carefully on the edges of the battery until it comes loose.
-
Cancelar: não concluí este guia.
45 outras pessoas executaram este guia.
17 comentários
Bought the battery from Ifixit because I’ve enjoyed your videos. I changed the battery, all seemed well, but now I get no sound out of the speakers! They are not mentioned on any of the topics. Help!?
See the comment on this step. Make sure the two little copper prongs on the back of the speaker make good contact with their respective pads on the back of the midframe. It’s okay to (very gently) bend them up slightly if needed.
bought battery and kit from ifixit. replacement went pretty well. Careful with those tiny little screws. They do not like to come out after loosening. I worked over a small tray and still had two get away from me. I also had some tape on the sim card side of battery not mentioned in instructions. I tore it pulling it back. Was concerned as it seemed to be foil faced on back side which sepperated when pulling up. All works though so no worries.
Bonjour,
Etes-vous sûr pour le modèle du tournevis ?
J’ai échoué avec le Torx T3, mais réussi avec le Torx T4
It definitely should be a T3, but not all driver kits are created equal. If a T4 works better for you, go with that ;)


