Ir para o conteúdo principal

Motorola Moto E4 Screen Assembly Replacement

O que você precisa

  1. Motorola Moto E4 Screen Assembly Replacement, Back Cover: passo 1, imagem 1 %32 Motorola Moto E4 Screen Assembly Replacement, Back Cover: passo 1, imagem 2 %32 Motorola Moto E4 Screen Assembly Replacement, Back Cover: passo 1, imagem 3 %32
    • Power off your phone before beginning disassembly.

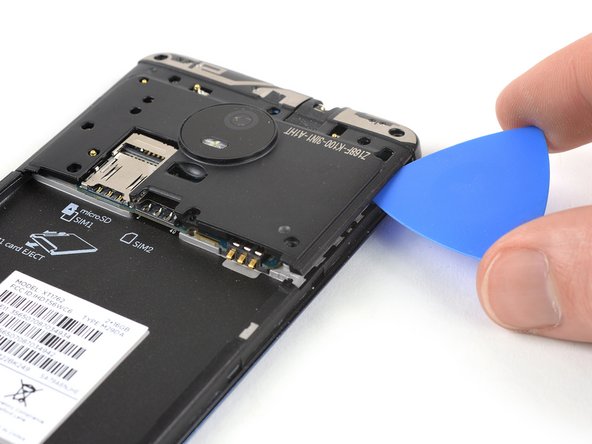
    • Insert a fingernail, or spudger, into the notch on the bottom right corner to start separating the phone unit from the back cover.

    • Move to the bottom left corner to pry the phone out of the back cover.

  2. Motorola Moto E4 Screen Assembly Replacement: passo 2, imagem 1 %32 Motorola Moto E4 Screen Assembly Replacement: passo 2, imagem 2 %32
    • Lift the phone out of the back cover.

  3. Motorola Moto E4 Screen Assembly Replacement, Battery: passo 3, imagem 1 %32 Motorola Moto E4 Screen Assembly Replacement, Battery: passo 3, imagem 2 %32 Motorola Moto E4 Screen Assembly Replacement, Battery: passo 3, imagem 3 %32
    • Use a fingernail or spudger to pry at the notch at the bottom end of the battery.

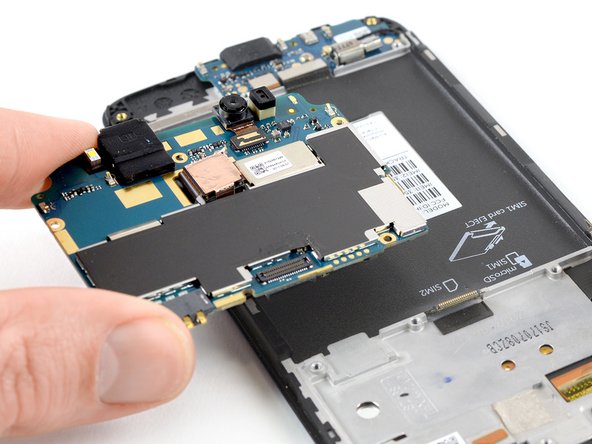
    • Lever the battery out of its recess and remove it.

  4. Motorola Moto E4 Screen Assembly Replacement, Loudspeaker: passo 4, imagem 1 %32
    • Remove the six 3.3 mm long Phillips #00 screws.

  5. Motorola Moto E4 Screen Assembly Replacement: passo 5, imagem 1 %32 Motorola Moto E4 Screen Assembly Replacement: passo 5, imagem 2 %32
    • Insert an opening pick between the loudspeaker and the frame to pry it up by twisting the opening pick.

    • Remove the loudspeaker unit.

  6. Motorola Moto E4 Screen Assembly Replacement, Motherboard Cover: passo 6, imagem 1 %32
    • Remove the seven 3.3 mm Phillips #00 screws.

  7. Motorola Moto E4 Screen Assembly Replacement: passo 7, imagem 1 %32 Motorola Moto E4 Screen Assembly Replacement: passo 7, imagem 2 %32
    • Insert an opening pick between the cover and the motherboard at the bottom right corner.

    • Slide the opening pick upwards to open the plastic clips.

  8. Motorola Moto E4 Screen Assembly Replacement: passo 8, imagem 1 %32 Motorola Moto E4 Screen Assembly Replacement: passo 8, imagem 2 %32
    • Insert an opening pick between the cover and the motherboard at the bottom left corner.

    • Slide the opening pick upwards to open the plastic clips.

    • Pry up the motherboard cover by twisting the opening pick.

  9. Motorola Moto E4 Screen Assembly Replacement: passo 9, imagem 1 %32
    • Remove the motherboard cover.

  10. Motorola Moto E4 Screen Assembly Replacement, Motherboard Assembly: passo 10, imagem 1 %32 Motorola Moto E4 Screen Assembly Replacement, Motherboard Assembly: passo 10, imagem 2 %32
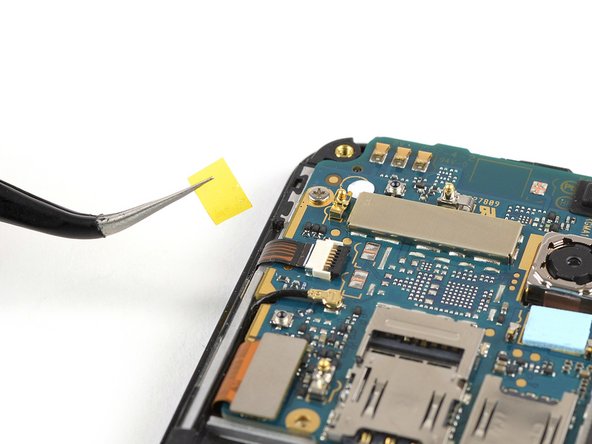
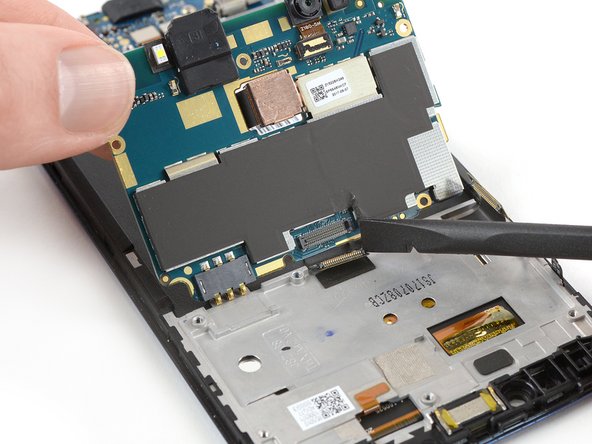
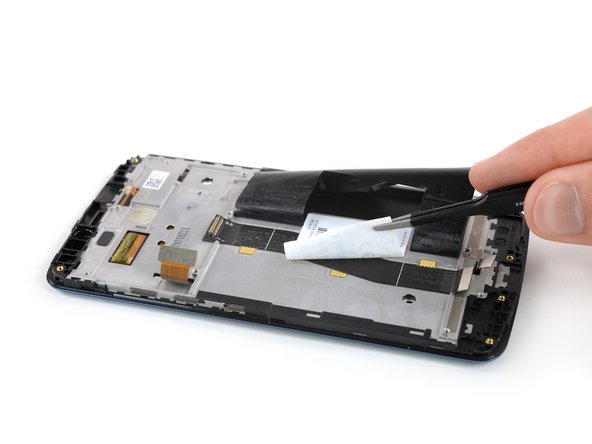
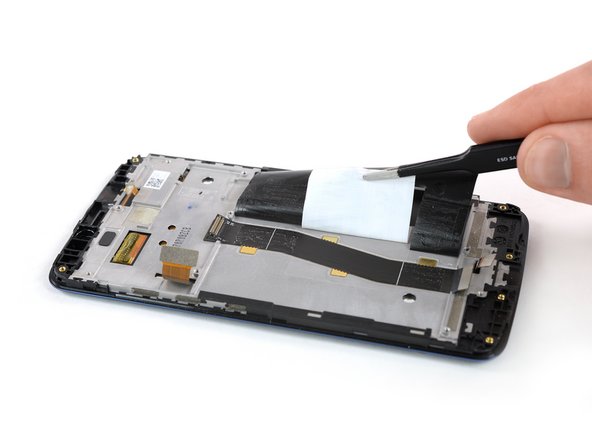
    • Use a pair of tweezers to peel off the yellow tape of the ZIF connector located on the left of the motherboard.

  11. Motorola Moto E4 Screen Assembly Replacement: passo 11, imagem 1 %32 Motorola Moto E4 Screen Assembly Replacement: passo 11, imagem 2 %32
    • Use the edge of a spudger to open the black flap of the ZIF connector.

  12. Motorola Moto E4 Screen Assembly Replacement: passo 12, imagem 1 %32 Motorola Moto E4 Screen Assembly Replacement: passo 12, imagem 2 %32
    • Slide the volume button flex cable out of the ZIF connector to disconnect it.

  13. Motorola Moto E4 Screen Assembly Replacement: passo 13, imagem 1 %32 Motorola Moto E4 Screen Assembly Replacement: passo 13, imagem 2 %32
    • Use a pair of tweezers to pry up and disconnect the antenna cable located on the left of the motherboard.

    • Fold the antenna cable out of the way.

  14. Motorola Moto E4 Screen Assembly Replacement: passo 14, imagem 1 %32 Motorola Moto E4 Screen Assembly Replacement: passo 14, imagem 2 %32
    • Use the edge of a spudger to pry up and disconnect the display flex cable located on the bottom left of the motherboard.

  15. Motorola Moto E4 Screen Assembly Replacement: passo 15, imagem 1 %32
    • Remove the two 2.9 mm long Phillips #00 screws securing the motherboard.

  16. Motorola Moto E4 Screen Assembly Replacement: passo 16, imagem 1 %32 Motorola Moto E4 Screen Assembly Replacement: passo 16, imagem 2 %32
    • Don't try to remove the motherboard all the way yet. The interconnect flex cable is still connected to its rear side.

    • Use a spudger to carefully lift the motherboard from the top and fold it towards the battery compartment.

    • Be careful not to damage any components underneath the motherboard.

  17. Motorola Moto E4 Screen Assembly Replacement: passo 17, imagem 1 %32 Motorola Moto E4 Screen Assembly Replacement: passo 17, imagem 2 %32 Motorola Moto E4 Screen Assembly Replacement: passo 17, imagem 3 %32
    • Use the edge of a spudger to disconnect the interconnect cable from the motherboard.

    • Remove the motherboard.

  18. Motorola Moto E4 Screen Assembly Replacement, Charging Board: passo 18, imagem 1 %32 Motorola Moto E4 Screen Assembly Replacement, Charging Board: passo 18, imagem 2 %32
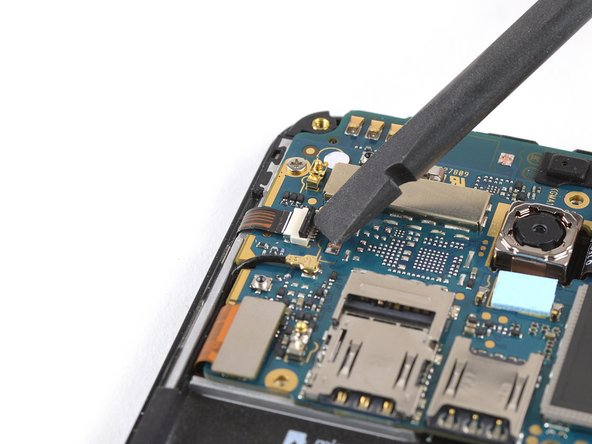
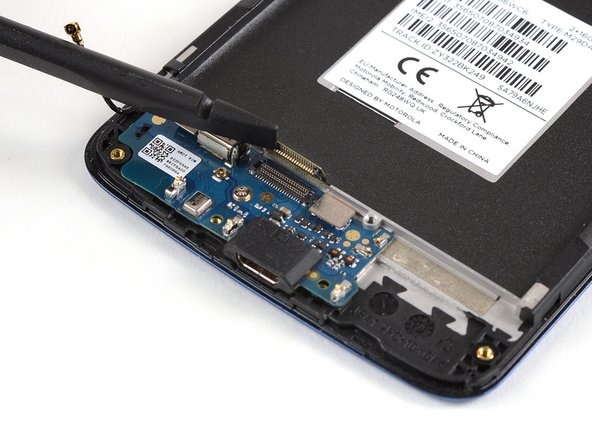
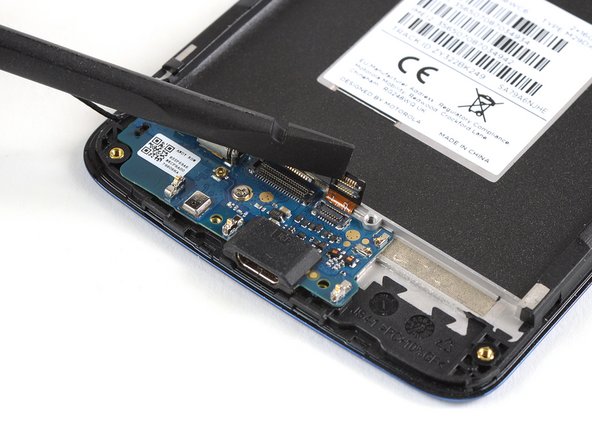
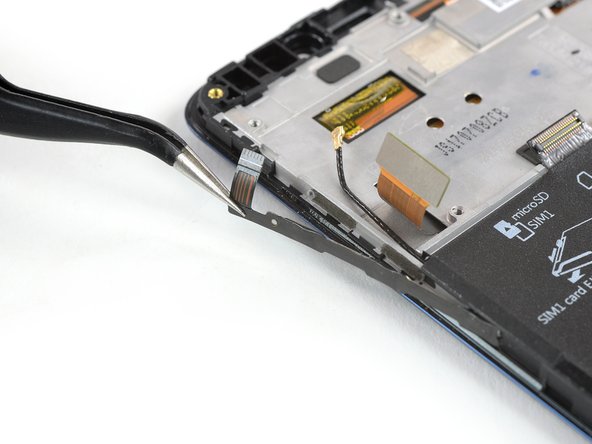
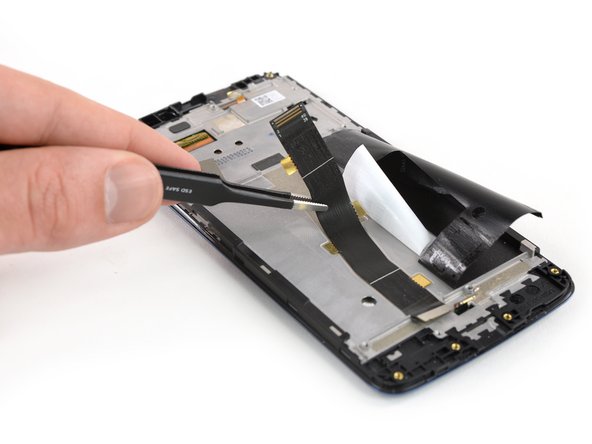
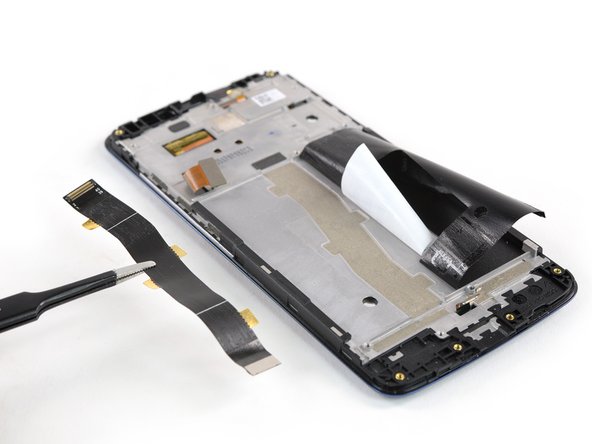
    • Use a pair of tweezers to pry up and disconnect the antenna cable.

  19. Motorola Moto E4 Screen Assembly Replacement: passo 19, imagem 1 %32 Motorola Moto E4 Screen Assembly Replacement: passo 19, imagem 2 %32
    • Use the edge of a spudger to pry up and disconnect the interconnect flex cable.

  20. Motorola Moto E4 Screen Assembly Replacement: passo 20, imagem 1 %32 Motorola Moto E4 Screen Assembly Replacement: passo 20, imagem 2 %32
    • Use the edge of a spudger to pry up and disconnect the fingerprint sensor flex cable.

  21. Motorola Moto E4 Screen Assembly Replacement: passo 21, imagem 1 %32
    • Remove the 2.9 mm long Phillips #00 screw securing the daughterboard.

  22. Motorola Moto E4 Screen Assembly Replacement: passo 22, imagem 1 %32 Motorola Moto E4 Screen Assembly Replacement: passo 22, imagem 2 %32
    • Pry under the bottom end of the charging board and lift it upwards.

    • Remove the charging board.

  23. Motorola Moto E4 Screen Assembly Replacement, Earpiece Speaker: passo 23, imagem 1 %32
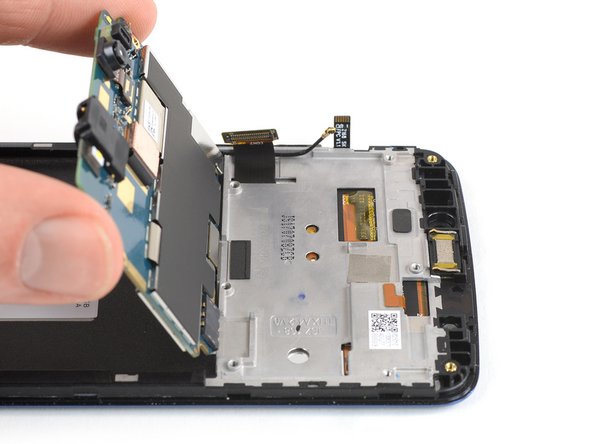
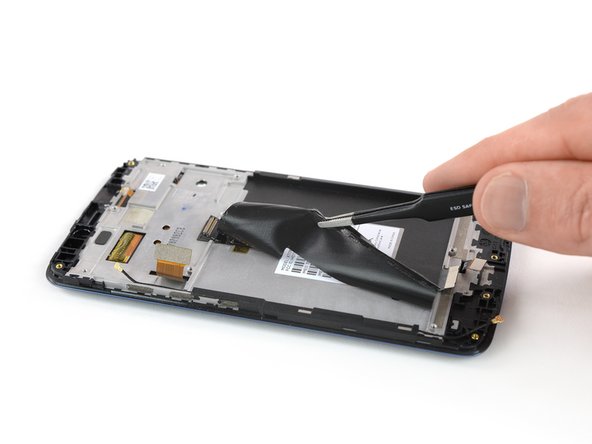
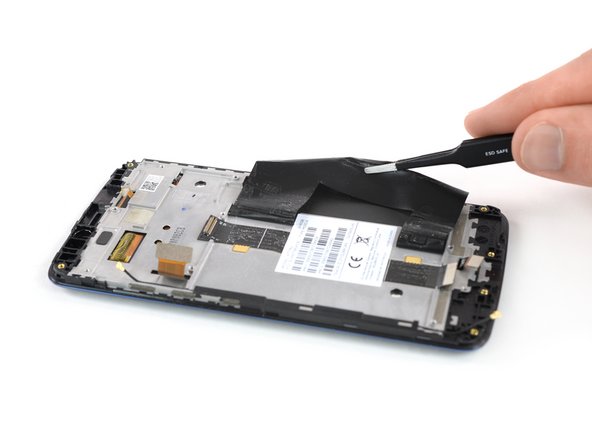
    • Apply a heated iOpener for about one minute to the upper part of the display to loosen the adhesive beneath the earpiece speaker.

  24. Motorola Moto E4 Screen Assembly Replacement: passo 24, imagem 1 %32 Motorola Moto E4 Screen Assembly Replacement: passo 24, imagem 2 %32
    • Use a pair of tweezers to lift the earpiece speaker out of its recess and remove it.

    • When reassembling, be sure to properly orient the earpiece speaker such that the gold contacts are pointing away from the top edge.

  25. Motorola Moto E4 Screen Assembly Replacement, Screen Assembly: passo 25, imagem 1 %32
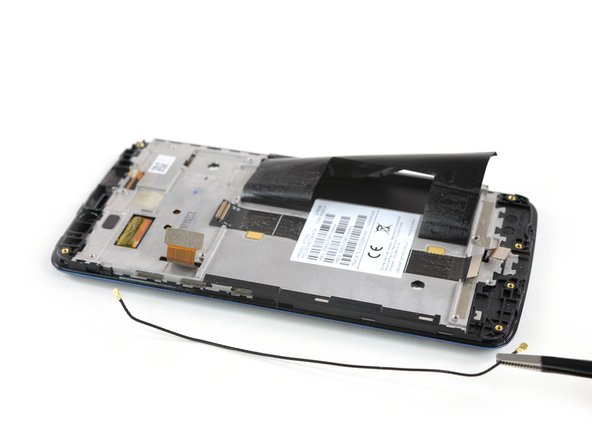
    • Apply a heated iOpener to the left edge of the phone for about 30 seconds to loosen the adhesive beneath power and volume button unit.

  26. Motorola Moto E4 Screen Assembly Replacement: passo 26, imagem 1 %32 Motorola Moto E4 Screen Assembly Replacement: passo 26, imagem 2 %32 Motorola Moto E4 Screen Assembly Replacement: passo 26, imagem 3 %32
    • Use a pair of tweezers to gently peel the power and volume button unit off the left edge of the phone.

    • Remove the power and volume button unit.

  27. Motorola Moto E4 Screen Assembly Replacement: passo 27, imagem 1 %32
    • Apply the iOpener for about two minutes on the black adhesive tape that covers the antenna and the interconnect cable.

  28. Motorola Moto E4 Screen Assembly Replacement: passo 28, imagem 1 %32 Motorola Moto E4 Screen Assembly Replacement: passo 28, imagem 2 %32 Motorola Moto E4 Screen Assembly Replacement: passo 28, imagem 3 %32
    • Use a pair of tweezers to gently peel the adhesive tape off the antenna and interconnect cable and fold it out of the way.

  29. Motorola Moto E4 Screen Assembly Replacement: passo 29, imagem 1 %32 Motorola Moto E4 Screen Assembly Replacement: passo 29, imagem 2 %32
    • Use a pair of tweezers to thread the antenna cable out of its routing.

    • Remove the antenna cable.

  30. Motorola Moto E4 Screen Assembly Replacement: passo 30, imagem 1 %32 Motorola Moto E4 Screen Assembly Replacement: passo 30, imagem 2 %32 Motorola Moto E4 Screen Assembly Replacement: passo 30, imagem 3 %32
    • Use a pair of tweezers to gently peel the product sticker off the interconnect cable.

    • In case you can't remove the sticker or it starts to rip apart you can re-apply an iOpener to loosen the adhesive.

  31. Motorola Moto E4 Screen Assembly Replacement: passo 31, imagem 1 %32 Motorola Moto E4 Screen Assembly Replacement: passo 31, imagem 2 %32 Motorola Moto E4 Screen Assembly Replacement: passo 31, imagem 3 %32
    • Use a pair of tweezers to grab and carefully peel up the interconnect flex cable.

    • Remove the interconnect flex cable.

  32. Motorola Moto E4 Screen Assembly Replacement: passo 32, imagem 1 %32
    • Check your replacement part for any other components that might need to be transferred before reassembly.

Conclusão

If possible, turn on your phone and test your repair before installing new adhesive and resealing the phone.

To reassemble your device, follow these instructions in reverse order.

Repair didn’t go as planned? Check out our Answers community for troubleshooting help.

Take your e-waste to an R2 or e-Stewards certified recycler.

3 outras pessoas executaram este guia.

Tobias Isakeit

Membro desde: 03/31/14

116.767 Reputação

Autoria de 188 guias

Equipe

Master Techs Membro de Master Techs

Community

Membros da 322

Autoria de 2.506 guias

0 comentários

Adicione um comentário

Exibir estatísticas:

Últimas 24 horas: 0

Últimos 7 dias: 0

Últimos 30 dias: 12

Duração total: 3,321