Introdução
Use this guide to replace a cracked or broken screen on a Microsoft Surface Pro 5.
There is a significant chance that you may break the unreinforced and fragile display panel during this procedure. Be sure to apply plenty of heat and be extremely careful during the prying stage.
O que você precisa
-
Passo 1 Heat the screen
Cuidado: os passos de 1 a 22 são provenientes de um guia marcado como em andamento.
-
If the screen's glass is cracked, keep further breakage contained and prevent bodily harm during your repair by taping over the glass. Lay overlapping strips of clear packing tape over the display until all the glass is covered. Wear safety glasses to protect your eyes.
-
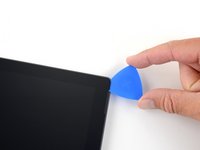
Heat an iOpener and apply it to the right edge of the Surface's screen for two minutes.
-
-
-
Take note of the screen adhesive layout before continuing:
-
These areas only contain adhesive and are safe to cut.
-
The display board and flex cables sit here close to the edge. Cut very carefully and do not insert the pick as deep under the display.
-
Fragile antenna cables lie under this part of the screen. Carefully follow the procedure to avoid damaging them. The adhesive is also the thickest here.
Be careful at the bottom of the screen also. If you put the picks in too far, you can severe the screen ribbon cables which happened to me. I successfully removed the screen without breaking it but severed those cables.
-
-
-
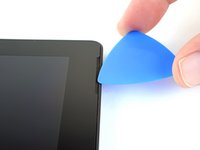
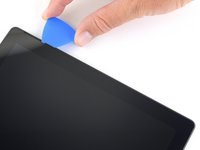
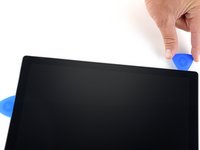
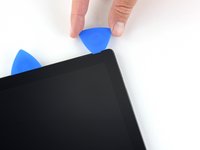
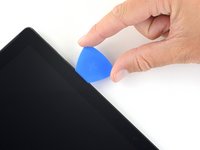
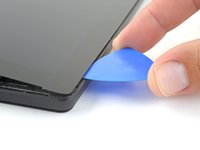
Insert an opening pick into the speaker opening on the screen and slide the pick under the glass. Do not press the pick into the speaker grille, as the grille is easily torn.
-
-
-
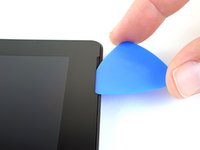
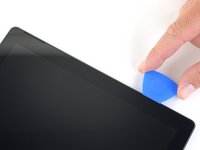
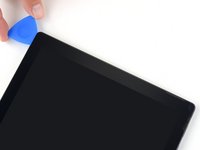
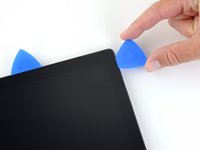
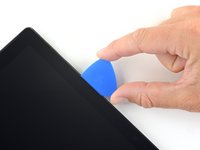
Rotate the pick toward the bottom of the Surface to slide it underneath the lower edge of the speaker cutout.
-
-
-
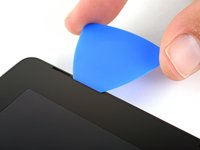
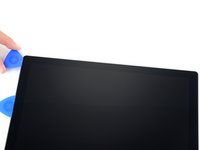
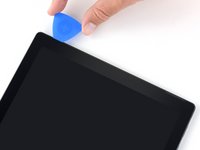
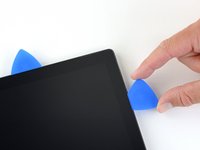
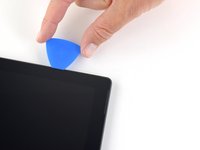
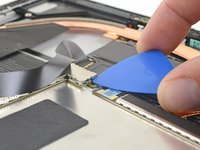
Slide the pick down the right edge of the Surface to slice through the adhesive under the screen.
-
Leave this opening pick in the right edge to prevent the adhesive from resealing.
-
-
-
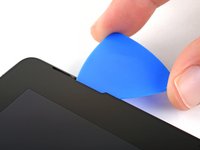
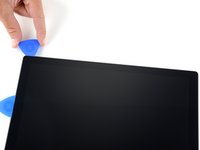
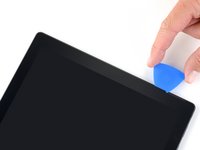
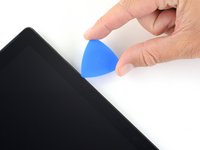
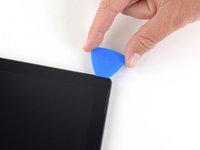
Insert a new opening pick into the bottom right corner and slide it around the corner toward the bottom edge.
-
Slide the pick along the bottom edge of the Surface to cut through the screen adhesive.
-
Leave this pick in the bottom edge to prevent the adhesive from resealing.
Avoid pressing the pick more than 5mm into the lower edge. Driving the pick in as far as the edge of the bezel on the lower edge will damage ribbon cables.
-
-
-
-
Insert the point of a pick under the display where you just stopped cutting. Do not insert the pick deeper than the edge of the bezel.
-
Carefully roll the pick to the right, pressing the long edge of the pick into the screen adhesive underneath the bezel, cutting the adhesive as you go. Do not slide the pick along the edge of the Surface.
-
Repeat this motion of inserting the point of the pick where you just cut, and rolling to the right all along the top edge of the Surface, until the pick is 2.5 inches (64 mm) from the right edge of the Surface.
-
-
-
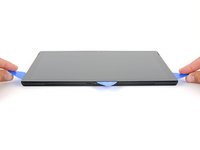
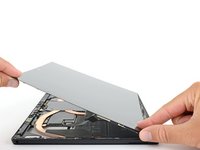
Very slowly lift the screen assembly away from the Surface case. If you encounter any resistance, stop and check that all the adhesive is separated.
-
Use an opening pick to cut through any remaining adhesive.
-
-
-
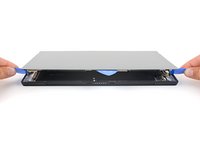
Lift the top of the screen assembly away from the case while sliding the bottom of the screen closer to the motherboard display connectors.
-
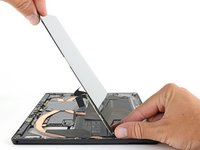
Gently lay the screen down on the case with the connectors facing up. Take care to avoid creasing the display cables.
No llega el cable derecho de la pantalla, al voltear la Tablet y este se romperá, lo ideal sera levantar la pantalla un poco y desconectar el cable de la tablet no de la pantalla.
-
-
-
Use an opening pick to pry up one edge of the EMI shield covering the display board.
-
Repeat this procedure at different points around the shield until it is free.
I had better results using the black spudger to free the shields without damaging them.
-
-
Ferramenta utilizada neste passo:Tweezers$4.99
-
Insert one point of a pair of pointed tweezers into a gap in the edge of the EMI shield covering the digitizer connector.
-
Use the tweezers to pry the EMI shield away from the display as much as you can without bending it.
-
Repeat this procedure at different points around the shield until it is free. Remove the shield.
-
-
-
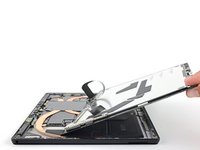
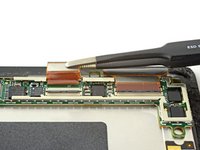
Remove the screen assembly from the Surface.
-
During reassembly, pause here and follow this guide to replace the screen adhesive.
-
-
-
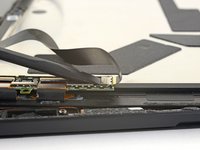
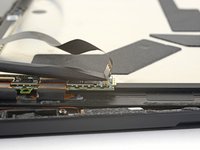
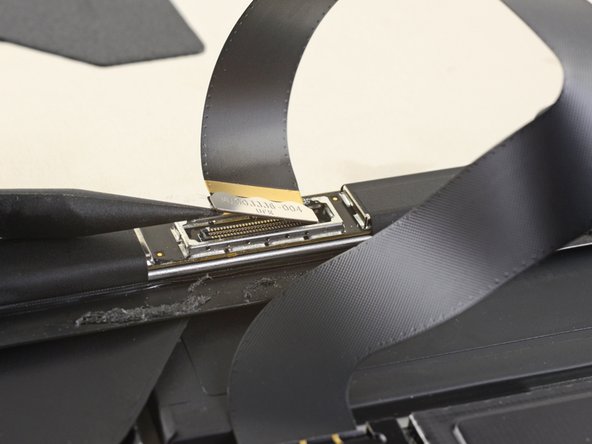
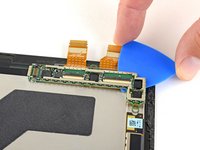
Use a spudger to flip up the small locking flaps on the display cable ZIF connectors.
-
-
-
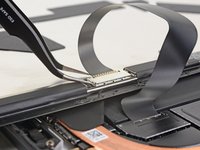
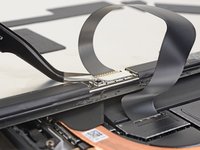
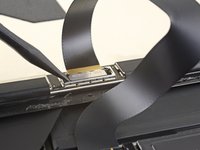
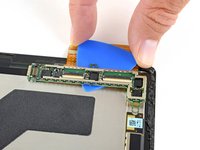
Slide an opening pick under the display board to separate the adhesive holding it onto the back of the screen.
-
-
-
Only the screen remains.
Note, on the flex connectors of the new screen are blue strips of protective plastic covering factory applied conductive adhesive. These must be removed and the adhesive must bond to the display board in order for the touch screen digitizer to function reliably.
-


Compare your new replacement part to the original part—you may need to transfer remaining components or remove adhesive backings from the new part before installing.
To reassemble your device, follow the above steps in reverse order.
Take your e-waste to an R2 or e-Stewards certified recycler.
Repair didn’t go as planned? Try some basic troubleshooting, or ask our Answers community for troubleshooting help.
Cancelar: não concluí este guia.
41 outras pessoas executaram este guia.

7 comentários
These instructions are very detailed. I followed them exactly. For the most part, they are great. Unfortunately, I bricked the original screen during removal process. After successfully removing the old screen without damaging the glass, I noticed that I had cut through one of the LCD screen connectors at the bottom left of the screen. The ifixit instructions on screen removal depicts this area as a "safe zone". It states "these areas only contain adhesive and are safe to cut." It does mention to avoid inserting the removal pick beyond the black screen bezel. Unfortunately, wires to the LCD screen, at least on my screen, extended a few mm into the black bezel area and were damaged by the removal pick. Therefore, the lower edge of the screen is not completely a "safe zone". Since the adhesive does not extend beyond about half way into the black bezel, I would recommend not inserting the pick more than half way into the black bezel, at least along the bottom edge.
I just had the same experience :(
Moin, kann mir einer sagen, wo ich einen guten ersatz bildschirm für das 7 pro bekomme. die range geht ja von 84 bis weit über 400euro. hatte 1 aus italien für 104 gekauft, da geht der touch nicht und es wird gelegentlich dunkel und dann später geht es wieder und am unterern rand gibt es verfärbungen, je wärmer es ist ? wer billig kauft kauf 2x. nur wer sagt das die 400 euro display nicht auch mist sind....
I just completed this repair with an entirely cracked screen and no prior tech repair experience, so here is my advice for anyone in a similar situation:
- It was better for me to use a hairdryer rather than the iopener - the heat didn't transfer well enough.
-The plastic pick will not slide easily no matter how heated the adhesive is (if your screen is cracked into small sections on the edges). Use a razor blade and be extra careful.
-Be prepared to spend a few hours on the screen removal alone.
-The cables that you had to snap out go directly onto their part (lay flat and press down). Be gentle at first so you don't mess them up if they are positioned wrong.
-When removing the adhesive on the 'antennas', I was very gentle and still punctured them once or twice. It doesn't seem to have any effect on the device working.
-Refer to the adhesive layout on the adhesive replacement guide (step 1, 3rd picture) rather than the general guide for more accuracy.
-I used a flat screwdriver to remove the adhesive
GLHF!
Also, the metal frame was bent in the top right corner in my case, so the new screen wouldn't lay flat. I tried to preserve it at first, so - prying using screwdrivers, hitting a screwdriver with a hammer to push it out, and chipping + prying with needlenose pliers - none of this worked. I ended up using a dremel-like tool with a fine tip and grinding it down little by little until the screen would fit right, which worked perfectly (of course it's a minor cosmetic defect, but I don't care)
TLDR; if the case's frame is bent + preventing your new screen from fitting, drilling/grinding it down may be easier and work better rather than trying to bend it back
You may want to discharge the battery completely as I found it quite easy to accidentally bump the power button and turn the surface on while cutting through the screen adhesive.
Emma Strainis - Responder
I used my Mrs heat pad (a small electric blanket thing) just lay the tablet face down and fold the excess blanket over the back, in an hour its toasty .I also cleverly tore off the antenna which came off with the screen but found replacement at Aliexpress
david granger - Responder