Essa tradução foi gerada por um programa e ainda não foi revisada por uma pessoa. Falas essa língua? Dá uma olhada.
Introdução
Use este guia para substituir um disco rígido que parou de funcionar.
Se o seu novo disco rígido parecer lento ou não funcionar corretamente, tente substituir o cabo do disco rígido. O cabo é um ponto comum de falha que pode diminuir a velocidade ou impedir a transferência de dados de e para um disco rígido. Isso é frequentemente considerado um problema com SSDs devido às suas altas velocidades de leitura e gravação.
O que você precisa
Vídeo de Apresentação
-
-
-
Remova os dez parafusos a seguir:
-
Três parafusos Phillips #00 de 14,4 mm
-
Três parafusos Phillips #00 de 3,5 mm
-
Quatro parafusos Phillips #00 com ressalto de 3,5 mm
 Pergunte ao FixBot
-
-
-
Use os dedos para afastar a estrutura inferior do corpo do MacBook perto da saída de ar.
-
Remova a estrutura inferior.
-
-
-
-
-
Com a borda de uma espátula, levante o conector da bateria de seu soquete na placa lógica.
-
-
-
-
Dobre o cabo da bateria ligeiramente para fora de seu soquete na placa lógica para que ele não se conecte acidentalmente enquanto você trabalha.
-
-
-
-
-
Remova os dois parafusos Phillips que prendem o suporte do disco rígido à caixa superior.
-
-
-
Remova o suporte do disco rígido.
-
-
-
Use a aba de puxar anexada para levantar o disco rígido da parte superior da carcaça.
-
-
-
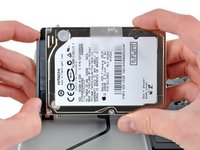
Desconecte o cabo do disco rígido do corpo do disco rígido.
-
Remova o disco rígido.
-
-
-
-
-
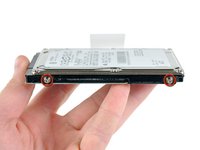
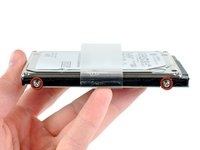
Remova os quatro pinos de retenção do disco rígido Torx T6 de 6,0 mm das laterais do disco rígido.
-
Transfira os pinos de retenção do disco rígido para o seu novo disco rígido.
-
-




Para a remontagem de seu dispositivo, siga estas instruções na ordem inversa.
Cancelar: não concluí este guia.
858 outras pessoas executaram este guia.


47Comentários do guia
You saved me $150 by helping me replace my hard drive on my own! Thank you!!! I know where to turn when my mac acts up now!!
In case you need to install/reinstall your OS, the new MBPs no longer come with an install disc. To install your OS you will need to hold down CMD + R while booting up until it chimes. It will then walk you through the process.
After holding command + R during start up I ran into a problem using Time Machine trying to restore all the files in my system. Apparently the Samsung solid state SSD 859 EVO drive I put in first needs to be formatted before Time Machine can even recognize it! No error message appeared, but no destination disk could be located. Apparently that's what happens with an unformatted hard drive. The solution is to select Disk Utilities in the first window seen after pressing command +R. Then In the left sidebar I could see all the drives including the external hard drive with my Time Machine back up and also the Samsung solid state hard drive I installed. With the newly installed hard drive selected, use the default erase and re-formating options and click on ERASE (this will also format the erased drive). This operation was very quick. I then returned to Time Machine and voila, the hard drive was locatable as a destination disk.
To the people that this still doesn’t work, try pressing cmd+alt+R, after connecting to WiFi go to Disk Utilities, format the new hard drive, and then you can proceed to restore or clean install iOS.
I needed to install the OS X in the new HD using a USB (manual in applesfera), then I was surprised when after do all this guide I see a message "Can't verified the copy...." I fixed reinstalling my old HD, and run the old OS, changed the date and time, I change again the HD, but (this is the important) don't pull off the battery connector. If you disconnect the battery, the system lost the date and time and yo can't install the OS X with and USB. I don't test the cmd + R option.
