Essa tradução foi gerada por um programa e ainda não foi revisada por uma pessoa. Falas essa língua? Dá uma olhada.
Introdução
Use este guia para substituir uma ventoinha barulhenta ou queimada.
O que você precisa
-
-
-
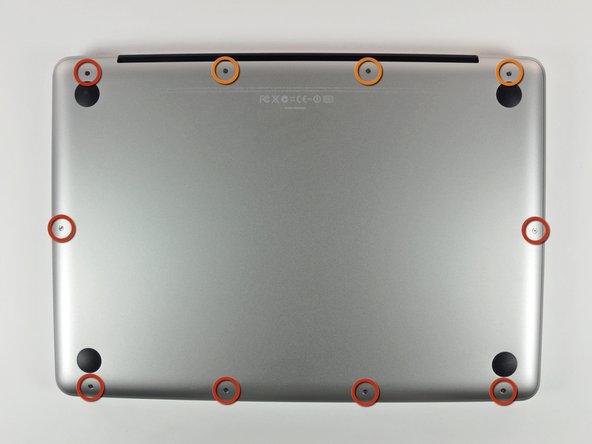
Remova os 10 parafusos a seguir que fixam a estrutura inferior ao MacBook Pro 13" Monobloco:
-
Sete parafusos Phillips de 3 mm.
-
Três parafusos Phillips de 13,5 mm.
 Pergunte ao FixBot
-
-
-
Levante ligeiramente a estrutura inferior e empurre-a em direção à parte traseira do computador para liberar as linguetas de montagem.
-
-
-
-
-
-
Use a ponta chata de uma espátula para levantar o conector da bateria para fora do seu soquete na placa lógica.
-
-
-
-
-
Use uma espátula para alavancar o conector da ventoinha para fora do soquete na placa lógica.
-
-
-
Remova os três parafusos a seguir:
-
Um parafuso Torx T6 de 7 mm
-
Dois parafusos Torx T6 de 5,4 mm
-
-


Para a remontagem de seu dispositivo, siga estas instruções na ordem inversa.
Cancelar: não concluí este guia.
133 outras pessoas executaram este guia.
Um agradecimento especial a esses tradutores:
100%

Sandra Hiller está nos ajudando a consertar o mundo! Quer contribuir?
Comece a traduzir ›

4Comentários do guia
Thanks Walter Galan for this guide its my first repair using fixit.
So I noticed MacBook Pro’s Fan is not working leaving the equipment very hot.
I bought a new part in Ifixit and repair my laptop.
The trickiest part is removing the motherboard connector. I did this using spudger tool with success but spend some time with careful.
Just I noticed again before install new part that is noising when spinning. So I force a little the the metal case to put away propellers that was contacting with her.
Another suggestion is clean fan before with a hair dryer for example, same to the place where will put the new fan.
So repair made with sucess!!!
The repair was quick and simple with the use of an iFixit toolkit that I conveniently already had. The fan works well. Thank you to Walter Galan for this easy-to-follow guide and thank you to the guys at the iFixit store for the speedy shipment.
Image #4 is very misleading. This is why many people are breaking their connectors. Please correct this and make it VERY clear that one has to put the spudger straight behind the cables, NOT behind the connector, as shown in the pic.
Yea I broke my connector thanks to you guys that was very misleading!!!! 😡
