Introdução
hi :)
This was originally supposed to be a video of the full repair, but I screwed up and recorded my hands instead, also it’s very difficult to repair this and hold a phone to record at the same time. that’s why some steps may have been skipped, but I did what I could at the moment.
I am not a repair specialist, I was, however, after many failed attempts gave this one last shot and was successful! But maybe someone can follow this tutorial and make a video, with proper instructions.
I’m sorry for any bad English, punctuation, grammar, or unclear instructions, this is my first forum, and don’t usually do this kind of thing.
Another reason I made this was that Apple's repair service won’t last for long, ending in 2020 for my model, and when it comes to an end, a lot of people are screwed.
Tips
1) Take your time and do-not rush this
2) I’m sorry for any bad English, punctuation, grammar or unclear instructions, this is my first forum and don’t usually do this kind off things.
3) DO NOT bend the hinges!
Here’s a link for the plastic clips and spacebar, on Ali-express.
https://www.aliexpress.com/item/40007997...
O que você precisa
-
-
Loctite super-glue remover, to remove any superglue residue, be careful its like water.
-
Loctite super-glue, for sticking down the clips.
-
A toothpick to spread the glue. You need something long and thin. Please avoid metal if possible.
-
-
-
Clean the middle mechanical bit with a cloth to make sure that it is working when you place the peg in.
-
Ignore the superglue if you see it, that was removed later on.
-
Use a dry kitchen towel and rub over the gold mechanical bits, then place the middle clip.
-
Don't glue it yet, this is just to check that the space function is working.
-
Open up Word and see if the spacebar works.
-
-
-
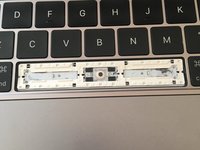
It Should look like this.
-
The top part of the hinges should have a slightly bigger gap for the silver bars, the bottom gap is in the lower left.
-
-
-
-
Only use a seriously small amount of glue. place in 2 dots and spread it with a pencil etc. something long and thin.
-
Make sure you spread it enough like I did, this can effect the space-bar when pressing,
-
The orange highlighted bit is the amount of glue I used.
-
-
-
Now do the exact same for the left-clip. You only need a little bit of glue, and make sure you spread it left & right.
-
-
-
Make sure that the middle-peg is in the correct direction, at the back is a "U" like symbol, it needs to be facing down.
-
Now when placing in the middle-clip, only apply small dots of glue in each corner and do-not spread it.
-
Then place on-top, the middle-clip, make sure its facing the right way.
-
-
-
This part is tricky.
-
First clip in the bottom 4 hooks like I did, and then you're going to close it likes its a book.
-
-
-
Push in where I have drawn in the yellow arrows, you should hear 4 clicks.
-
Push each clip in 1 by 1.
-


I’m not paying apple or another local repair store £500 to repair this. And neither should you, keep trying until successful, it’s very easy when you know what you’re doing/screwed up alot.
thanks for reading
Cancelar: não concluí este guia.
4 outras pessoas executaram este guia.

7Comentários do guia
Bonjour, J'écrisavec monclavier défectueux. Donc pas d'espaces :) après avoir cru que j'avaisun pc bienrobuste j'ai tentédetout démonter ettadammm j'ai tout cassé. Jevais suivre votretuto qui àl'air fortbien expoliqué. Jecommande ensuivantvoslien après avoir eu aussi un devis à490 eurosXD
Je reviendraiici,si letexteestlisible,c'estqueçaauramarché !!!
Alors non...c'est un chouette tuto mais ça nemarchepas. Aucun rebond. Je nesaispascequia foiré mais ça m'énerve fort
@vivianelampion Je suis désolée d'apprendre que votre réparation n'a pas marché. Je vous conseille de poser une question sur notre Forum, afin que les autres membres de la communauté puissent vous aider à résoudre votre problème. Bonne chance !
Merci à tous, j'ai réussi ça marche super bien! J'ai cassé en deux une des deux pièces transparentes, attention au milieu c'est super fragile. Je l'ai collé quand même et ça marche très bien, j'ai commencé par coller les autres pièces et j'ai collé la cassé à la fin. Quel satisfaction !