Esta versão pode conter edições incorretas. Mude para o último instantâneo verificado.
O que você precisa
-
Este passo não foi traduzido. Ajude a traduzi-lo
-
If your MacBook is running Big Sur v11.1 or later, disabling Auto Boot may not work. You can proceed normally, but make sure to disconnect the battery as soon as you're inside.
-
Use a P5 driver to remove the following screws:
-
Two 7.9 mm screws
-
Two 7.1 mm screws
-
Six 2.6 mm screws
-
-
Este passo não foi traduzido. Ajude a traduzi-lo
-
Wedge your fingers between the display and the lower case and pull upward to pop the lower case off the Air.
-
Remove the lower case.
-
-
Este passo não foi traduzido. Ajude a traduzi-lo
-
Peel back the tape covering the battery connector enough to reveal the connector underneath.
-
-
-
Este passo não foi traduzido. Ajude a traduzi-lo
-
Use a spudger to slide the battery connector parallel to the logic board and out of its socket on the logic board.
-
-
Este passo não foi traduzido. Ajude a traduzi-lo
-
Use a T3 Torx driver to remove the two 1.4 mm screws securing the USB-C connector bracket.
-
Remove the USB-C connector bracket.
-
-
Este passo não foi traduzido. Ajude a traduzi-lo
-
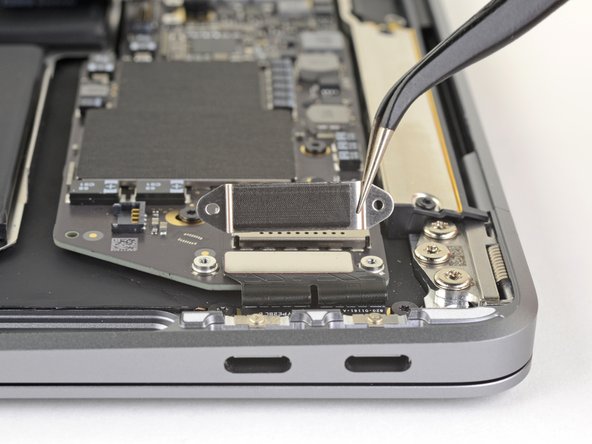
Use the flat end of a spudger to pry the USB-C cable connector up and out of its socket on the logic board.
-
-
Este passo não foi traduzido. Ajude a traduzi-lo
-
Use a T4 Torx driver to remove the two 2.9 mm screws securing the USB-C board.
-


Cancelar: não concluí este guia.
5 outras pessoas executaram este guia.

Um comentário
would the steps be the same for late 2016 13 inchs? i don't see a guide for that. also why this so much easier than 2015 guide which is 37 steps lol