Ir para o conteúdo principal

MacBook Air 11" Mid 2012 Heat Sink Replacement

O que você precisa

  1. MacBook Air 11" Mid 2012 Heat Sink Replacement, Lower Case: passo 1, imagem 1 %32
    Ferramenta utilizada nesse passo:
    P5 Pentalobe Screwdriver Retina MacBook Pro and Air
    $5.99
    Comprar
    • Shut down and close your computer. Lay it on a soft surface top-side down.

    • Remove the following ten screws:

    • Two 8 mm 5-point Pentalobe screws

    • Eight 2.5 mm 5-point Pentalobe screws

    • The special screwdriver needed to remove the 5-point Pentalobe screws can be found here.

  2. MacBook Air 11" Mid 2012 Heat Sink Replacement: passo 2, imagem 1 %32
    • Wedge your fingers between the display and the lower case and pull upward to pop the lower case off the Air.

  3. MacBook Air 11" Mid 2012 Heat Sink Replacement, Battery: passo 3, imagem 1 %32 MacBook Air 11" Mid 2012 Heat Sink Replacement, Battery: passo 3, imagem 2 %32
    • In this step you will disconnect the battery to help avoid shorting out any components during service.

    • Use the flat end of a spudger to pry both short sides of the battery connector upward to disconnect it from its socket on the logic board.

    • Bend the battery cable slightly away from the logic board so the connector will not accidentally contact its socket.

  4. MacBook Air 11" Mid 2012 Heat Sink Replacement, Solid-State Drive: passo 4, imagem 1 %32
    • Remove the single 2.9 mm T5 Torx screw securing the SSD to the logic board.

  5. MacBook Air 11" Mid 2012 Heat Sink Replacement: passo 5, imagem 1 %32 MacBook Air 11" Mid 2012 Heat Sink Replacement: passo 5, imagem 2 %32
    • Use a spudger to help lift the free end of the SSD just enough to grab it with your other hand.

    • Do not lift the end of the SSD excessively.

    • Pull the drive straight out of its socket and remove it from the logic board.

    • When reinstalling the SSD, be sure it is properly seated before reinstalling its retaining screw.

  6. MacBook Air 11" Mid 2012 Heat Sink Replacement, I/O Board Cable: passo 6, imagem 1 %32
    • Use the flat end of a spudger to pry the I/O board cable up from its socket on the I/O board.

  7. MacBook Air 11" Mid 2012 Heat Sink Replacement: passo 7, imagem 1 %32
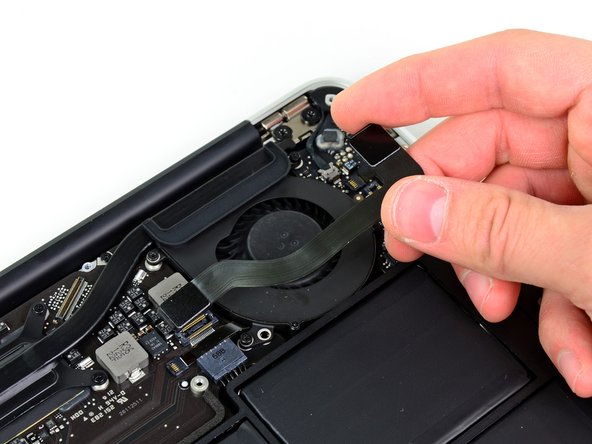
    • Peel the I/O board cable up from the adhesive securing it to the fan.

  8. MacBook Air 11" Mid 2012 Heat Sink Replacement: passo 8, imagem 1 %32 MacBook Air 11" Mid 2012 Heat Sink Replacement: passo 8, imagem 2 %32
    • Use the flat end of a spudger to lift the I/O board connector up and out of its socket on the logic board

    • Be sure to lift straight up on the connector as you disconnect it from its socket. The socket is very deep on the logic board and prying it from side to side may damage the logic board

    • Remove the I/O board cable.

  9. MacBook Air 11" Mid 2012 Heat Sink Replacement, Fan: passo 9, imagem 1 %32
    • Use the tip of a spudger to carefully flip up the retaining flap on the fan cable ZIF socket.

    • Be sure you are prying up on the hinged retaining flap, not the socket itself.

  10. MacBook Air 11" Mid 2012 Heat Sink Replacement: passo 10, imagem 1 %32
    • Remove the following three screws securing the fan to the upper case:

    • Two 5.2 mm T5 Torx screws

    • One 3.6 mm T5 Torx screw

  11. MacBook Air 11" Mid 2012 Heat Sink Replacement: passo 11, imagem 1 %32
    • Lift the fan out of the upper case and carefully pull the fan ribbon cable out of its socket as you remove it from the Air.

  12. MacBook Air 11" Mid 2012 Heat Sink Replacement, Heat Sink: passo 12, imagem 1 %32
    • Remove the four 2.5 mm T5 Torx screws securing the heat sink to the logic board.

  13. MacBook Air 11" Mid 2012 Heat Sink Replacement: passo 13, imagem 1 %32
    • If the heat sink seems to be stuck to the logic board after removing all four screws, use a spudger to carefully separate the heat sink from the faces of the CPU and GPU.

    • Remove the heat sink from the logic board.

    • When reinstalling the heat sink, be sure to apply a new layer of thermal paste. If you have never applied thermal paste before, we have a guide that makes it easy.

Conclusão

To reassemble your device, follow these instructions in reverse order.

12 outras pessoas executaram este guia.

Andrew Optimus Goldheart

Membro desde: 10/17/09

502.275 Reputação

Autoria de 407 guias

Equipe

iFixit Membro de iFixit

Staff

Membros da 136

Autoria de 16.573 guias

5 comentários

I did this last night to my macbook air 11" mid 2012. I had been running at 100 to 105°C, and had up to 10 minute delays coming back from a sleep, while the CPU hit 100% with high temps. When I got into the macbook, it was pretty easy... though the parts are small. Getting to the heatsink was easier than I have found on most desktop ATX case machines. The thermal paste on the CPU was dried and cake-like. I gently removed the paste with the spudger, and it came off easily. I cleaned it up with Arctic paste remover and cleaner, and then reassembled with arctic silver 5. I used the long, rice grain - like bead of grease approach, rather than the recommended smearing technique. Right now, I have a number apps open, and am running at 60°C (vs. the mid 90°C range), and it comes back from sleep immediatly. I don't see the dreaded kernal_task, and i have loaded up the machine and it only hits about 85°. I think in general, I am running about 30°C cooler, and the machine is performing like new again.

Keith Elliston - Responder

I just finished replacing the thermal paste on my CPU . I put a 1 mm-wide vertical line on a clean CPU and put the cleaned copper plate back. I think I’ll buy a new battery set too. I’m glad I made that maintenance on my MacBook Air because it was hot and the fan was draining the battery. (The Mac is still working… :P )

Philippe Morin - Responder

Successful re-application of Heat Sink Paste on 110 month old Macbook Air 2012 in October 2021… this Machine has been a champ.

For those playing along at home you don’t really need to remove the Fan Ribbon.. you can just move the fan off the the side… and so no need to pop the SSD.

Excellent guide as usual… took 30 mins tops.

dagmarfraser - Responder

I’m curious as to which idle and/or load temps would be considered ‘normal’!? Mine are in the ballpark of Mr. Elliston (first comment here). TIA

frank.pepplinkhuizen - Responder

Mine is a mid 2012, and was idling at 170 F and running any app caused it to hit 200+ F. After following this guide to replace thermal compound and clean out the fan I’m now idling at about 130 F and running apps I hit about 160 F (iTunes playing and a PowerPoint running). It took me about 20 mins.

Russell Aberer - Responder

Adicione um comentário

Exibir estatísticas:

Últimas 24 horas: 2

Últimos 7 dias: 11

Últimos 30 dias: 39

Duração total: 7,796