Introdução
Use this guide to replace your MacBook Air's internal lithium polymer battery.
Note: If there is a thin plastic film on your replacement battery, do not attempt to remove it. It is glued on and protects the battery pack while it is inside the MacBook.
O que você precisa
-
Ferramenta utilizada neste passo:P5 Pentalobe Screwdriver Retina MacBook Pro and Air$5.99
-
Remove the following ten screws:
-
Two 8 mm 5-point Pentalobe screws
-
Eight 2.5 mm 5-point Pentalobe screws
 Pergunte ao FixBot
-
-
-
Wedge your fingers between the display and the lower case and pull upward to pop the lower case off the Air.
-
Remove the lower case and set it aside.
-
-
-
-
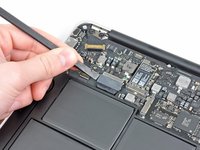
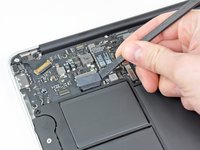
Use the flat end of a spudger to pry both short sides of the battery connector upward to disconnect it from its socket on the logic board.
-
Bend the battery cable slightly away from the logic board so the connector will not accidentally contact its socket.
-
-
-
Remove the following five screws securing the battery to the upper case:
-
Two 5.2 mm T5 Torx screws
-
One 6 mm T5 Torx screw
-
Two 2.6 mm T5 Torx screws
-
-
-
Lift the battery from its edge nearest the logic board and remove it from the upper case.
-
Charge it to 100%, and then keep charging it for at least 2 more hours. Next, unplug and use it normally to drain the battery. When you see the low battery warning, save your work, and keep your laptop on until it goes to sleep due to low battery. Wait at least 5 hours, then charge your laptop uninterrupted to 100%.
-
If you notice any unusual behavior or problems after installing your new battery, you may need to reset your MacBook's SMC.
-


To reassemble your device, follow these instructions in reverse order.
Cancelar: não concluí este guia.
119 outras pessoas executaram este guia.

21Comentários do guia
This looks like an excellent how-to! Especially liked the location illustration of different length battery screws.
My only comment would be to have a tray ready to put the screws in - looks like they could easily be lost.
Now my touchpad isn't working as well as before. Any ideas why?
Dead on Accurate. Was very easy. I would change the rating from moderate to easy. The hardest part is getting the correct screw drivers.
hello, is there any difference between A1370 (late 2010) battery part and a A1370 (2011) battery?
I'm also wondering the same thing. Did you find the answer to your question? Thank you.