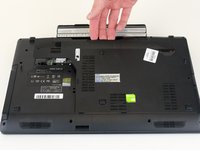
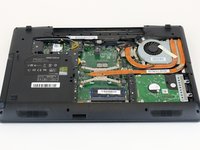
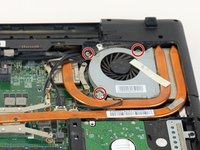
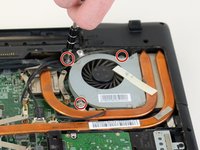
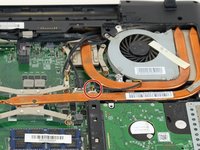
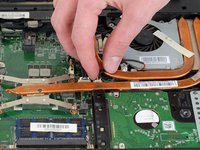
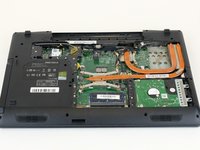
Ir para o conteúdo principal

MSI GP60 2PE Leopard Fan Replacement

O que você precisa

  1. MSI GP60 2PE Leopard Fan Replacement, Back Panel: passo 1, imagem 1 %32
    • Flip the device over so the back is facing up.

  2. MSI GP60 2PE Leopard Fan Replacement: passo 2, imagem 1 %32 MSI GP60 2PE Leopard Fan Replacement: passo 2, imagem 2 %32
    • Remove the four 5mm screws from the back of the device using a Phillips #00 screwdriver.

    • There is a screw located under the battery; lift the battery up to access it.

  3. MSI GP60 2PE Leopard Fan Replacement: passo 3, imagem 1 %32 MSI GP60 2PE Leopard Fan Replacement: passo 3, imagem 2 %32
    • Once all four screws are removed, lift the back off.

  4. MSI GP60 2PE Leopard Fan Replacement, Fan: passo 4, imagem 1 %32 MSI GP60 2PE Leopard Fan Replacement, Fan: passo 4, imagem 2 %32
    • Remove the three 5 mm screws from the fan with a Phillips #00 screwdriver.

  5. MSI GP60 2PE Leopard Fan Replacement: passo 5, imagem 1 %32 MSI GP60 2PE Leopard Fan Replacement: passo 5, imagem 2 %32 MSI GP60 2PE Leopard Fan Replacement: passo 5, imagem 3 %32
    • Pull the wire on the bottom left of the fan out of the socket.

    • Pull the wire gently; pulling too hard could damage the wire.

  6. MSI GP60 2PE Leopard Fan Replacement: passo 6, imagem 1 %32 MSI GP60 2PE Leopard Fan Replacement: passo 6, imagem 2 %32
    • Remove the fan.

Conclusão

To reassemble your device, follow these instructions in reverse order.

2 outras pessoas executaram este guia.

0 comentários

Adicione um comentário

Exibir estatísticas:

Últimas 24 horas: 0

Últimos 7 dias: 0

Últimos 30 dias: 9

Duração total: 1,605