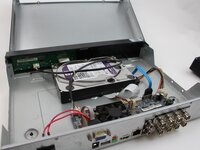
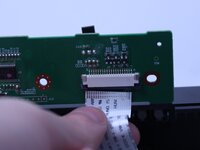
Ir para o conteúdo principal

Lorex LHV210800 Button Panel Replacement

O que você precisa

  1. Lorex LHV210800 Button Panel Replacement, Upper Case: passo 1, imagem 1 %32 Lorex LHV210800 Button Panel Replacement, Upper Case: passo 1, imagem 2 %32 Lorex LHV210800 Button Panel Replacement, Upper Case: passo 1, imagem 3 %32
    • Before beginning, disconnect the DVR from power and unplug all peripheries.

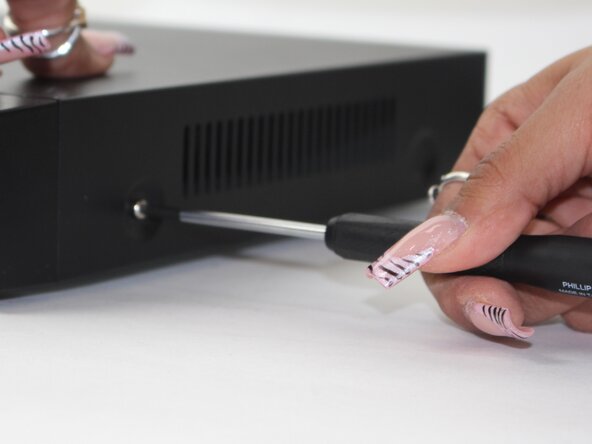
    • Remove each of the two 1 cm screws on the right and left sides of the DVR with a Phillips screwdriver.

  2. Lorex LHV210800 Button Panel Replacement: passo 2, imagem 1 %32 Lorex LHV210800 Button Panel Replacement: passo 2, imagem 2 %32
    • Remove the four 1 cm Phillips screws on the rear panel.

    • Do not unscrew the screw connected to the lower case.

  3. Lorex LHV210800 Button Panel Replacement: passo 3, imagem 1 %32
    • Lift up and remove the top cover.

  4. Lorex LHV210800 Button Panel Replacement, Button Panel: passo 4, imagem 1 %32 Lorex LHV210800 Button Panel Replacement, Button Panel: passo 4, imagem 2 %32
    • Unplug the two cables from the HDD.

    • These plugs will have a BLUE and R/B/B/Y color scheme.

  5. Lorex LHV210800 Button Panel Replacement: passo 5, imagem 1 %32
    • Flip the DVR over so the underside is facing up.

    • Remove the 1 cm Phillips screws on the lower case.

  6. Lorex LHV210800 Button Panel Replacement: passo 6, imagem 1 %32
    • Lift the HDD up and out of the chassis.

  7. Lorex LHV210800 Button Panel Replacement: passo 7, imagem 1 %32
    • Remove the five Phillips screws that secure the button panel.

  8. Lorex LHV210800 Button Panel Replacement: passo 8, imagem 1 %32
    • Depress the white clip that secures the button panel connector.

    • Disconnect the white button panel connector.

  9. Lorex LHV210800 Button Panel Replacement: passo 9, imagem 1 %32 Lorex LHV210800 Button Panel Replacement: passo 9, imagem 2 %32
    • Release the retaining tabs that secure the button panel ribbon cable.

    • Disconnect the ribbon cable.

    • Remove the button panel.

Conclusão

To reassemble your device, follow the above steps in reverse order.
Take your e-waste to an R2 or e-Stewards certified recycler.
Repair didn’t go as planned? Try some basic troubleshooting or ask our Answers community for help.

Maxwell Cash

Membro desde: 02/19/25

387 Reputação

Autoria de 3 guias

Equipe

2Comentários do guia

In the details section, there is no time estimation. It took our group 13 minutes to disassemble the dvr and put it back together.

Joshua Anderson - Responder

In the details section it does not list the tools needed.

Anthony - Responder

Comentar

Visualizações:

Últimas 24 horas: 1

Últimos 7 dias: 3

Últimos 30 dias: 22

Ao todo: 141