Introdução
Use this guide to learn how to readjust a dislodged spring in the Logitech M310 mouse wheel. A dislodged spring can cause the mouse wheel to spin freely without any resistance, rather than the default ratcheting behavior.
If the mouse wheel spins freely, the sensor inside the mouse cannot detect the wheel accurately. Inaccurate detection of the mouse wheel will cause screens or web pages to move up and down randomly. This repair guide will help you take the mouse apart and push the spring back to its correct position. You are not required to have any repair experience. You should not encounter any damage to both yourself or the mouse if you follow the steps in this repair guide.
O que você precisa
-
-
Check if the scroll wheel is spinning freely without resistance.
 Pergunte ao FixBot
-
-
-
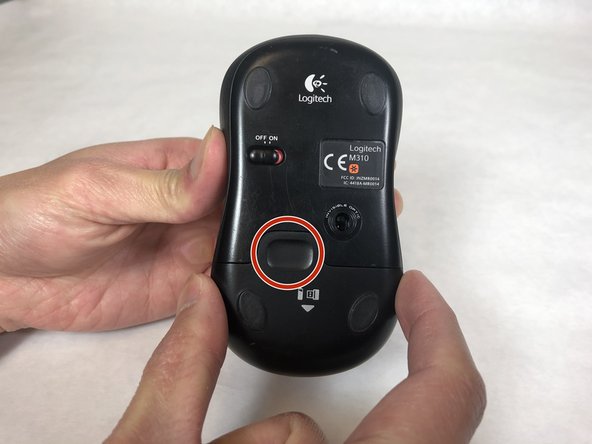
Use your thumb to press the indentation on the bottom battery cover.
-
Slide down the battery cover and fully remove the battery cover.
-
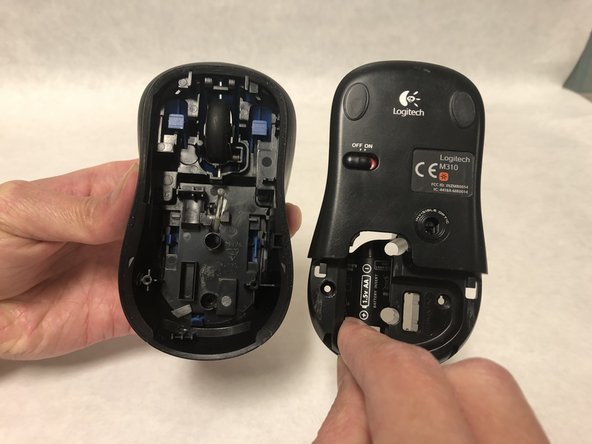
Remove the battery.
-
-
-
-
Remove the bottom board plate from the mouse body by pulling it down and away.
-
-
-
Use the 2mm flat head to lift up the spring leg.
-
Use the screwdriver as a lever to pry the spring leg back into the scroll wheel
-
-
-
Before reassembling the mouse, confirm if the scroll wheel is fixed appropriately.
-
Gently place the mouse down on the table and scroll the wheel. There should now be a noticeable difference in resistance, and it should no longer freely spin.
-






To reassemble your device, follow these instructions in reverse order.
Cancelar: não concluí este guia.
12 outras pessoas executaram este guia.

Equipe

UC Davis, Team S2-G2, Andersen Winter 2020 Membro de UC Davis, Team S2-G2, Andersen Winter 2020
UCD-ANDERSEN-W20S2G2
4 Membros
Autoria de 3 guias
9Comentários do guia
Great tutorial. I thought I needed to buy another one. With this I managed to fix it under 2 minutes. Thanks! :)
Excellent instructions, I searched the web for days looking for the solution. I could not determine if it was software or hardware, the mouse wheel has always spun free, no clicking. After following your instructions, it clicks when I scroll and the spontaneous jumping is gone. Thanks a million!
Fantastic instructions! I was struggling to find out how the spring should be placed for the proper ratcheting behavior. This walk-through got me there in less than a minute. Thank you very much!
Is there any way to replace the spring if lost?
Thanks so much for the great tutorial. The pictures really helped.
