Ir para o conteúdo principal

Lenovo Yoga 6 13ALC6 Lower Case Replacement

O que você precisa

  1. Lenovo Yoga 6 13ALC6 Lower Case Replacement, Unfasten the lower case: passo 1, imagem 1 %32 Lenovo Yoga 6 13ALC6 Lower Case Replacement, Unfasten the lower case: passo 1, imagem 2 %32
    • Use a T5 Torx screwdriver to remove the six 7.2 mm screws securing the lower case.

  2. Lenovo Yoga 6 13ALC6 Lower Case Replacement, Insert the opening pick: passo 2, imagem 1 %32 Lenovo Yoga 6 13ALC6 Lower Case Replacement, Insert the opening pick: passo 2, imagem 2 %32
    • Insert an opening pick between the lower case and the chassis at a hinge corner.

    • Pry up with the pick to release the clips securing the lower case.

    • Repeat the process on the other hinge corner.

  3. Lenovo Yoga 6 13ALC6 Lower Case Replacement, Release the clips: passo 3, imagem 1 %32 Lenovo Yoga 6 13ALC6 Lower Case Replacement, Release the clips: passo 3, imagem 2 %32 Lenovo Yoga 6 13ALC6 Lower Case Replacement, Release the clips: passo 3, imagem 3 %32
    • Slide the pick along the right edge to release the clips securing the lower case.

  4. Lenovo Yoga 6 13ALC6 Lower Case Replacement, Release the remaining clips: passo 4, imagem 1 %32 Lenovo Yoga 6 13ALC6 Lower Case Replacement, Release the remaining clips: passo 4, imagem 2 %32 Lenovo Yoga 6 13ALC6 Lower Case Replacement, Release the remaining clips: passo 4, imagem 3 %32
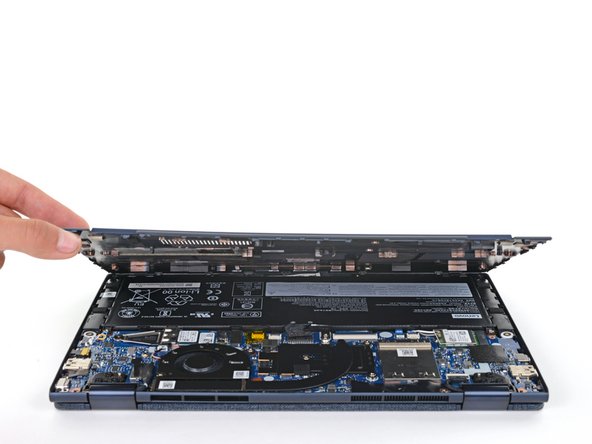
    • Continue sliding the opening pick along the front and left edges to release the remaining clips.

  5. Lenovo Yoga 6 13ALC6 Lower Case Replacement: passo 5, imagem 1 %32 Lenovo Yoga 6 13ALC6 Lower Case Replacement: passo 5, imagem 2 %32 Lenovo Yoga 6 13ALC6 Lower Case Replacement: passo 5, imagem 3 %32
    • Insert the pick on the hinge edge and slide along the entire edge to release all of the clips.

  6. Lenovo Yoga 6 13ALC6 Lower Case Replacement: passo 6, imagem 1 %32 Lenovo Yoga 6 13ALC6 Lower Case Replacement: passo 6, imagem 2 %32 Lenovo Yoga 6 13ALC6 Lower Case Replacement: passo 6, imagem 3 %32
    • Lift the lower case from the chassis and remove it.

    • During reassembly, this is a good point to power on your laptop and test all functions before sealing it up. Be sure to power your laptop back down before you continue working.

Conclusão

To reassemble your device, follow these instructions in reverse order.

Take your e-waste to an R2 or e-stewards certified recycler.

Repair didn't go as planned? Try some basic troubleshooting, or ask our Lenovo Yoga answers community for help.

Spencer Day

Membro desde: 09/14/22

55.203 Reputação

Autoria de 408 guias

Equipe

iFixit Membro de iFixit

Staff

Membros da 136

Autoria de 17.430 guias

0 comentários

Adicione um comentário

Exibir estatísticas:

Últimas 24 horas: 0

Últimos 7 dias: 17

Últimos 30 dias: 71

Duração total: 1,379