Introdução
I've had this small pocket light for 10 years and even after 3 moths left under the snow I've only ever had one problem (twice). The button can stop working, however this was easily fixed by disassembling the button and removing dirt from inside. Here's how I did it.
O que você precisa
-
-
-
This is exactly how you would do it if you were changing the battery.
 Pergunte ao FixBot
-
-
-
Remove the small O-Ring, I used a plastic toothpick.
-
-
-
Now we will unscrew the aluminum cap from the plastic lower part. I used a pair of pliers to carefully hold the plastic part while unscrewing the aluminum part with my finger. Left-hand thread.
-
-
-
-
The plastic housing holds the actual button assembly and is made from two halves, These can carefully be pried apart wit a knife.
-
-
-
Button assembly mark in red circle. This is held together by 4 plastic "rivets" on the connector side, marked in green. Cafully cut these flush like in the picture.
-
-
-
You can then pry of the "lid" like in the third picture.
-
Carefully remove the inner springs and plungers. In the picture one small plunger is still in the top of the button.
-
In my case the problem was a tiny plastic "!shaving" inside the button blocking it from making a connection, Market with yellow arrow.
-
-
-
Is reversed of disassembly but you don't need to glue the button together (the small plastic "rivets" are now broken) because the two part plastic housing will keep it together when assembled.
-
I have used it like this for years until the same problem happen again, so added some new images while fixing it again.
-
-


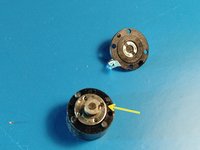


To reassemble your device, follow these instructions in reverse order.
Cancelar: não concluí este guia.
Uma outra pessoa concluiu este guia.

3Comentários do guia
Dear Hans.
I have used the same P3 LED for many years in bad switch condition.
Today I cleared this problem with your solution.
Very thank you & I'm appreciate to you.
DS2DDE
from Seoul, Korea.
can you show how to take the front part apart?
@ericsecreve Sadly I lost the light on an exercise, it's somewhere out in the woods now, all alone, cold and wet.
