Introdução
This follows the battery replacement guide, so make sure to do that first. This guide will help you continue into future repair guides and act as a pre-requisite for future steps on the device page.
O que você precisa
-
-
Once you have access to the phone, there is a small indent on the bottom left side. Use your fingernail or a plastic opening tool to pry from here and pull off the back casing.
 Pergunte ao FixBot
-
-
-
Once you have properly removed the outer casing, the back should look as so.
-
To remove the battery, pull up from the red mark using your finger. The battery should come up at an angle, and easily be able to be removed.
-
Once the battery is removed you may safely proceed to the next step.
-
-
-
-
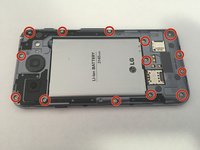
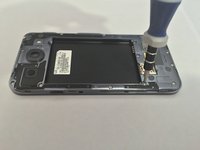
Make sure you remove the battery first. You will see that there are 14 screws on the back of the inner case. Use the Phillips head screwdriver to remove each of the screws, make sure to put the screws in a safe place where they will not get lost.
-
-
-
Once you have removed all the screws, you can begin removing the inside cover.
-
Insert the opening tool using a sliding motion into one of the corners and move it along the edges of the inside cover. This will loosen the edges and the inside cover will pry apart from the shell.
-
-
-
The inner cover is now removed, you now have access to the many parts on the inside of the phone.
-




To reassemble your device, follow these instructions in reverse order.
Cancelar: não concluí este guia.
3 outras pessoas executaram este guia.

Equipe

USF Tampa, Team 15-5, Remmell Fall 2014 Membro de USF Tampa, Team 15-5, Remmell Fall 2014
USFT-REMMELL-F14S15G5
3 Membros
Autoria de 7 guias
