Introdução
If your LG G8 ThinQ’s screen is experiencing symptoms described in our troubleshooting page such as dead pixels or irregular touch response, this guide will help to replace the screen and access some functions and/or displays that may be obsolete with a damaged screen.
The LG G8 ThinQ requires disassembly of the entire interior of the device to completely replace the screen.
Before disassembling your device, discharge the battery below 25%.
This phone uses a strong adhesive on the battery and back panel; iFixit’s adhesive remover or high concentration (90% or higher) isopropyl alcohol can be used to make the process easier.
Adhesive can be replaced to closer replicate factory fit and finish.
O que você precisa
-
-
Unplug and power off your phone before you begin.
-
Insert the SIM card eject tool into the pinhole in the lower right side of the phone.
-
Remove the SIM card and tray.
-
-
-
Place the phone so that the screen is facing down.
-
Insert opening cards between the back panel and frame of the phone to loosen the clips and adhesive.
-
Using equal pressure, carefully pry the back panel away from the phone.
-
Once enough space has been created, use an opening tool to completely separate the back panel from the phone.
-
-
-
Remove all 14 screws from the midframe using a Phillips #000 screwdriver.
-
Work an opening tool around the perimeter of the midframe to pry and remove it from the phone.
-
-
-
Using an opening tool, carefully pry out remove the speaker system from the phone.
-
-
-
Using an opening tool, carefully disconnect the ribbon cables from both cameras.
-
-
-
-
Using an opening tool, carefully disconnect the ribbon cable connecting the 3.5mm audio jack to the motherboard.
-
Remove the screw holding the 3.5 mm audio jack in place using a Phillips #000 screwdriver.
-
Remove the audio jack from the phone.
-
-
-
Flip phone so that screen is facing up.
-
Using a heating pad, hairdryer, or heat gun, apply heat to loosen the adhesive beneath the battery.
-
-
-
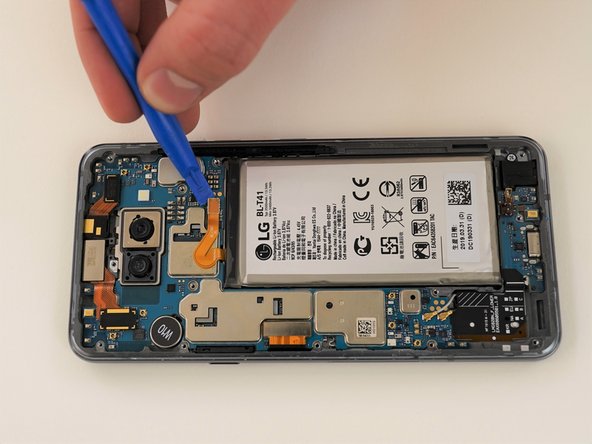
Use an opening tool to disconnect the two coaxial cables from the motherboard.
-
-
-
Remove the vibration motor from the phone casing using an opening tool.
-
-
-
Using a plastic spudger, carefully pry up and remove the charging daughter board from the case.
-
Reinstall removed components onto new phone casing and screen.
-


To reassemble your device, follow these instructions in reverse order, installing the components on your new screen.
To reassemble your device, follow these instructions in reverse order, installing the components on your new screen.
Cancelar: não concluí este guia.
5 outras pessoas executaram este guia.

Equipe

Western Carolina University, Team 1-4, Virtue Fall 2021 Membro de Western Carolina University, Team 1-4, Virtue Fall 2021
WCU-VIRTUE-F21S1G4
Membros da 4
Autoria de 5 guias
2 comentários
I did not do this myself, but I now see the labor involved, in addition to the rarity of LG phones. Meaning, I understand why it costs what it does for a professional to do this.