Ir para o conteúdo principal
Participe da comunidade de reparos - Criar conta

Konica Minolta DiMAGE Z3 LCD Screen Replacement

O que você precisa

    1. Konica Minolta DiMAGE Z3 LCD Screen Replacement, Open the battery chamber: passo 1, imagem 1 %32 Konica Minolta DiMAGE Z3 LCD Screen Replacement, Open the battery chamber: passo 1, imagem 2 %32
      • Open the battery chamber door by sliding the door to the side of the camera to release the safety catch.

      • Lift the door up to open.

      Pergunte ao FixBot

      Comentar

    2. Konica Minolta DiMAGE Z3 LCD Screen Replacement, Insert the batteries: passo 2, imagem 1 %32
      • Insert the four batteries inside of the battery chamber door.

      • Make sure the positive and negative battery terminals are in the correct position.

      Pergunte ao FixBot

      Comentar

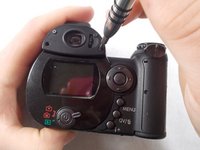
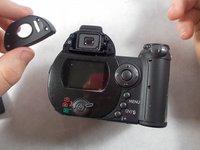
    1. Konica Minolta DiMAGE Z3 LCD Screen Replacement, Remove the viewfinder cover: passo 3, imagem 1 %32 Konica Minolta DiMAGE Z3 LCD Screen Replacement, Remove the viewfinder cover: passo 3, imagem 2 %32
      • Use a screwdriver to remove the four viewfinder cover screws.

      Pergunte ao FixBot

      Comentar

    2. Konica Minolta DiMAGE Z3 LCD Screen Replacement, Remove viewfinder screws: passo 4, imagem 1 %32
      • Remove the 2 small screws under the viewfinder.

      Pergunte ao FixBot

      Comentar

    3. Konica Minolta DiMAGE Z3 LCD Screen Replacement, Remove the screen cover: passo 5, imagem 1 %32
      • Remove the screen cover by applying slight pressure at the top, then pulling the screen protector away from the camera.

      • Do not apply pressure to the surface of the LCD screen or it may be permanently damaged. If fingerprints are on the LCD monitor, gently wipe with a soft, clean, dry cloth.

      Pergunte ao FixBot

      Comentar

    4. Konica Minolta DiMAGE Z3 LCD Screen Replacement, Remove screws from the bottom panel: passo 6, imagem 1 %32
      • Remove 6 screws on the bottom panel.

      Pergunte ao FixBot

      Comentar

    5. Konica Minolta DiMAGE Z3 LCD Screen Replacement, Remove screw from battery chamber: passo 7, imagem 1 %32
      • Remove 1 screw on the outer side of the battery chamber.

      • This will be under the rubber grip.

      Pergunte ao FixBot

      Comentar

    6. Konica Minolta DiMAGE Z3 LCD Screen Replacement: passo 8, imagem 1 %32
      • Remove 1 screw inside the battery chamber.

      Pergunte ao FixBot

      Comentar

    7. Konica Minolta DiMAGE Z3 LCD Screen Replacement: passo 9, imagem 1 %32
      • Pull the wrist strap away from the front of the camera to remove it.

      • Then carefully pull the back casing apart from the camera.

      Pergunte ao FixBot

      Comentar

    8. Konica Minolta DiMAGE Z3 LCD Screen Replacement: passo 10, imagem 1 %32
      • Remove the 3 screws that attach the LCD screen to the circuit board.

      Pergunte ao FixBot

      Comentar

    9. Konica Minolta DiMAGE Z3 LCD Screen Replacement: passo 11, imagem 1 %32
      • Gently remove the LCD screen from the circuit board.

      • There will be a ribbon cable and some wires attached to the LCD screen.

      Pergunte ao FixBot

      Comentar

    10. Konica Minolta DiMAGE Z3 LCD Screen Replacement: passo 12, imagem 1 %32
      Ferramenta utilizada neste passo:
      Tweezers
      $4.99
      • Use tweezers to carefully pull the ribbon cable from the circuit board, not from the LCD screen.

      • Peel back tape on LCD screen to reveal where the wires are attached. Use tweezers to detach the wires from the LCD screen.

      Pergunte ao FixBot

      Comentar

Conclusão

To reassemble your device, follow these instructions in reverse order.

Cancelar: não concluí este guia.

Hieu Ngo

Membro desde: 03/22/17

431 Reputação

Autoria de 4 guias

Equipe

0Comentários do guia

Comentar

Visualizações:

Últimas 24 horas: 3

Últimos 7 dias: 9

Últimos 30 dias: 40

Ao todo: 1,238