Ir para o conteúdo principal

Karcher Pressure Washers 15209900 2018 Switch Replacement

O que você precisa

  1. Karcher Pressure Washers 15209900 2018 Switch Replacement, Safety precautions: passo 1, imagem 1 %32 Karcher Pressure Washers 15209900 2018 Switch Replacement, Safety precautions: passo 1, imagem 2 %32 Karcher Pressure Washers 15209900 2018 Switch Replacement, Safety precautions: passo 1, imagem 3 %32
    • Before you begin, make sure to power off and unplug the device from the outlet.

    • Unscrew the output hose from the pressure washer.

  2. Karcher Pressure Washers 15209900 2018 Switch Replacement, Remove the rubber strap: passo 2, imagem 1 %32 Karcher Pressure Washers 15209900 2018 Switch Replacement, Remove the rubber strap: passo 2, imagem 2 %32 Karcher Pressure Washers 15209900 2018 Switch Replacement, Remove the rubber strap: passo 2, imagem 3 %32
    • Unlatch and remove the yellow rubber strap.

  3. Karcher Pressure Washers 15209900 2018 Switch Replacement, Unscrew the hand grip: passo 3, imagem 1 %32
    • Use a T20 driver to remove the two 55mm-long screws securing the hand grip.

  4. Karcher Pressure Washers 15209900 2018 Switch Replacement, Remove the hand grip: passo 4, imagem 1 %32 Karcher Pressure Washers 15209900 2018 Switch Replacement, Remove the hand grip: passo 4, imagem 2 %32
    • Remove the hand grip from the extension bars.

  5. Karcher Pressure Washers 15209900 2018 Switch Replacement, Unscrew the top panels: passo 5, imagem 1 %32 Karcher Pressure Washers 15209900 2018 Switch Replacement, Unscrew the top panels: passo 5, imagem 2 %32
    • Use a T15 driver to remove the six screws securing the top black plastic panels on either side of the device.

  6. Karcher Pressure Washers 15209900 2018 Switch Replacement, Remove the top panels: passo 6, imagem 1 %32 Karcher Pressure Washers 15209900 2018 Switch Replacement, Remove the top panels: passo 6, imagem 2 %32 Karcher Pressure Washers 15209900 2018 Switch Replacement, Remove the top panels: passo 6, imagem 3 %32
    • Remove the two plastic panels.

  7. Karcher Pressure Washers 15209900 2018 Switch Replacement, Unscrew the plastic feet: passo 7, imagem 1 %32 Karcher Pressure Washers 15209900 2018 Switch Replacement, Unscrew the plastic feet: passo 7, imagem 2 %32
    • Remove the two T15 screws securing the plastic feet—one screw on either side.

  8. Karcher Pressure Washers 15209900 2018 Switch Replacement, Remove the plastic feet: passo 8, imagem 1 %32 Karcher Pressure Washers 15209900 2018 Switch Replacement, Remove the plastic feet: passo 8, imagem 2 %32 Karcher Pressure Washers 15209900 2018 Switch Replacement, Remove the plastic feet: passo 8, imagem 3 %32
    • Unclip and remove the plastic feet.

  9. Karcher Pressure Washers 15209900 2018 Switch Replacement, Unscrew the housing: passo 9, imagem 1 %32 Karcher Pressure Washers 15209900 2018 Switch Replacement, Unscrew the housing: passo 9, imagem 2 %32
    • Use a T15 driver to remove the ten screws securing the housing halves together.

    • Remove the T15 screw underneath the wheel axle.

  10. Karcher Pressure Washers 15209900 2018 Switch Replacement, Remove the housing: passo 10, imagem 1 %32 Karcher Pressure Washers 15209900 2018 Switch Replacement, Remove the housing: passo 10, imagem 2 %32
    • Set the device on its side.

    • Lift the housing half away from the body.

    • If the housing half does not separate, check to make sure you removed all the body screws.

    • Remove the housing.

    • Screws may get stuck inside the plastic housing. Be careful not to lose any screws.

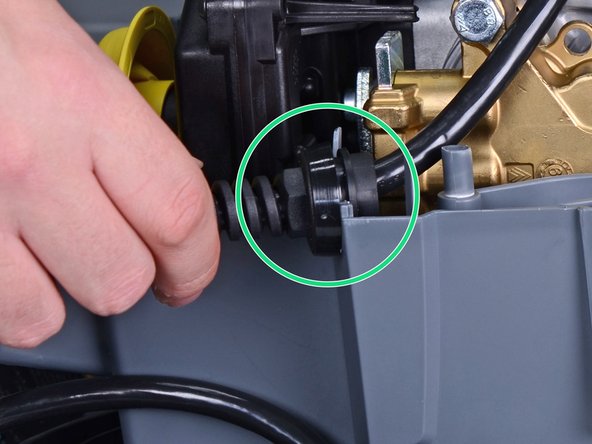
  11. Karcher Pressure Washers 15209900 2018 Switch Replacement, Release the cord strain relief: passo 11, imagem 1 %32 Karcher Pressure Washers 15209900 2018 Switch Replacement, Release the cord strain relief: passo 11, imagem 2 %32
    • Slide the power cord strain relief out its notch on the plastic housing.

  12. Karcher Pressure Washers 15209900 2018 Switch Replacement, Remove the motor: passo 12, imagem 1 %32 Karcher Pressure Washers 15209900 2018 Switch Replacement, Remove the motor: passo 12, imagem 2 %32
    • Lift the motor assembly out of the plastic housing and set it aside.

  13. Karcher Pressure Washers 15209900 2018 Switch Replacement, Reassembly tip: passo 13, imagem 1 %32 Karcher Pressure Washers 15209900 2018 Switch Replacement, Reassembly tip: passo 13, imagem 2 %32 Karcher Pressure Washers 15209900 2018 Switch Replacement, Reassembly tip: passo 13, imagem 3 %32
    • Reassembly tip: Use these images to help reassemble the housing back around the motor.

    • Make sure that all five bushings are in place.

    • In order for the housing to fit properly, the bushings must fit in their respective mounts.

    • Make sure that the yellow tube is properly notched onto the housing.

    • Make sure that the power cord strain relief sits correctly in the housing notch.

  14. Karcher Pressure Washers 15209900 2018 Switch Replacement, Unscrew the electrical box cover: passo 14, imagem 1 %32
    • Use a T20 driver to remove the four screws securing the electrical box cover.

  15. Karcher Pressure Washers 15209900 2018 Switch Replacement, Remove the electrical box cover: passo 15, imagem 1 %32 Karcher Pressure Washers 15209900 2018 Switch Replacement, Remove the electrical box cover: passo 15, imagem 2 %32
    • Lift the cover off of the electrical box.

  16. Karcher Pressure Washers 15209900 2018 Switch Replacement, Remove the plate spring: passo 16, imagem 1 %32 Karcher Pressure Washers 15209900 2018 Switch Replacement, Remove the plate spring: passo 16, imagem 2 %32
    • Remove the plate spring from the electrical box.

  17. Karcher Pressure Washers 15209900 2018 Switch Replacement: passo 17, imagem 1 %32 Karcher Pressure Washers 15209900 2018 Switch Replacement: passo 17, imagem 2 %32
    • Pull the switch out of the electrical box.

    • Disconnect the four spade connectors from the the switch.

  18. Karcher Pressure Washers 15209900 2018 Switch Replacement, Remove the switch: passo 18, imagem 1 %32 Karcher Pressure Washers 15209900 2018 Switch Replacement, Remove the switch: passo 18, imagem 2 %32
    • Remove the switch.

    • Reassembly tip: Use the second photo as a reference to help you properly re-wire the switch.

Conclusão

To reassemble your device, follow these instructions in reverse order.

5 outras pessoas executaram este guia.

Arthur Shi

Membro desde: 01/03/18

249.876 Reputação

Autoria de 503 guias

Equipe

iFixit Membro de iFixit

Staff

Membros da 135

Autoria de 16.734 guias

0 comentários

Adicione um comentário

Exibir estatísticas:

Últimas 24 horas: 1

Últimos 7 dias: 17

Últimos 30 dias: 109

Duração total: 5,001