Ir para o conteúdo principal

Installing MacBook Pro 15" Unibody Mid 2010 Dual Hard Drive

O que você precisa

  1. Installing MacBook Pro 15" Unibody Mid 2010 Dual Hard Drive, Lower Case: passo 1, imagem 1 %32
    • Remove the following ten screws securing the lower case to the upper case:

    • Three 13.5 mm (14.1 mm) Phillips screws.

    • Seven 3 mm Phillips screws.

    • When removing these screws, note how they come out at a slight angle. They must be reinstalled the same way.

  2. Installing MacBook Pro 15" Unibody Mid 2010 Dual Hard Drive: passo 2, imagem 1 %32
    • Using both hands, lift the lower case near the vent to pop it off two clips securing it to the upper case.

    • Remove the lower case and set it aside.

  3. Installing MacBook Pro 15" Unibody Mid 2010 Dual Hard Drive, Battery: passo 3, imagem 1 %32
    • Remove the two 7.4 mm Tri-point screws securing the battery to the upper case.

    • Note: For certain repairs (e.g. hard drive), removing the battery is not necessary but it prevents any accidental shorting of electronics on the motherboard. If you do not remove the battery, please be careful as parts of the motherboard might be electrified.

    • You do not necessarily have to follow steps 3-6 to remove the battery in order to replace the hard drive. However it is recommended to remove all power sources from electronics before working on them.

  4. Installing MacBook Pro 15" Unibody Mid 2010 Dual Hard Drive: passo 4, imagem 1 %32
    • Use the tip of your finger to carefully peel back the corner of the warning label to reveal a hidden Tri-point screw.

    • Remove the last 7.4 mm Tri-point screw securing the battery to the upper case.

  5. Installing MacBook Pro 15" Unibody Mid 2010 Dual Hard Drive: passo 5, imagem 1 %32 Installing MacBook Pro 15" Unibody Mid 2010 Dual Hard Drive: passo 5, imagem 2 %32
    • Lift the battery by its plastic pull tab and slide it away from the long edge of the upper case.

    • Do not try to completely remove the battery just yet.

  6. Installing MacBook Pro 15" Unibody Mid 2010 Dual Hard Drive: passo 6, imagem 1 %32
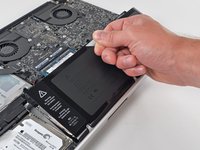
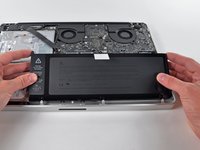
    • Tilt the battery away from the logic board enough to access the battery cable connector.

    • Pull the battery cable connector away from its socket on the logic board and remove the battery from the upper case.

    • Pull the battery cable connector away from the center of the logic board.

    • If you're installing a new battery, you should calibrate it after installation:

    • Charge it to 100%, and then keep charging it for at least 2 more hours. Next, unplug and use it normally to drain the battery. When you see the low battery warning, save your work, and keep your laptop on until it goes to sleep due to low battery. Wait at least 5 hours, then charge your laptop uninterrupted to 100%.

    • If you notice any unusual behavior or problems after installing your new battery, you may need to reset your MacBook's SMC.

  7. Installing MacBook Pro 15" Unibody Mid 2010 Dual Hard Drive, Optical Drive: passo 7, imagem 1 %32
    • Use the flat end of a spudger to pry the AirPort/Bluetooth ribbon cable connector up off the logic board.

  8. Installing MacBook Pro 15" Unibody Mid 2010 Dual Hard Drive: passo 8, imagem 1 %32
    • Disconnect the camera cable by pulling its connector away from the socket (toward the optical drive) on the logic board.

  9. Installing MacBook Pro 15" Unibody Mid 2010 Dual Hard Drive: passo 9, imagem 1 %32
    • Use the flat end of a spudger to pry the optical drive connector up off the logic board.

  10. Installing MacBook Pro 15" Unibody Mid 2010 Dual Hard Drive: passo 10, imagem 1 %32 Installing MacBook Pro 15" Unibody Mid 2010 Dual Hard Drive: passo 10, imagem 2 %32
    • Remove the two Phillips screws securing the AirPort/Bluetooth board housing.

    • Carefully rotate the AirPort/Bluetooth board housing (with AirPort/Antenna cables still attached) out of the lower case.

  11. Installing MacBook Pro 15" Unibody Mid 2010 Dual Hard Drive: passo 11, imagem 1 %32
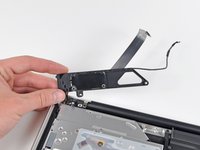
    • Remove the following three Phillips screws securing the optical drive to the upper case:

    • One 4.5 mm Phillips screw securing the optical drive bracket to the upper case near the fan.

    • Two 2.5 mm Phillips screws securing the optical drive to the upper case near the optical drive opening.

  12. Installing MacBook Pro 15" Unibody Mid 2010 Dual Hard Drive: passo 12, imagem 1 %32
    • Lift the optical drive near its connector and pull it away from the upper case to remove it from the computer.

  13. Installing MacBook Pro 15" Unibody Mid 2010 Dual Hard Drive, Optical Drive: passo 13, imagem 1 %32
    • Pull the optical drive cable out of the optical drive.

    • Be sure to pull by the edges of the connector, not by the cable itself.

    • Optical drive remains.

    • If you have a CD or any other object jammed in your optical drive, we have an optical drive repair guide.

  14. Installing MacBook Pro 15" Unibody Mid 2010 Dual Hard Drive: passo 14, imagem 1 %32
    • Remove the two black Phillips #0 screws securing the small metal mounting bracket. Transfer this bracket to your new optical drive or hard drive enclosure.

  15. Installing MacBook Pro 15" Unibody Mid 2010 Dual Hard Drive, Dual Hard Drive: passo 15, imagem 1 %32 Installing MacBook Pro 15" Unibody Mid 2010 Dual Hard Drive, Dual Hard Drive: passo 15, imagem 2 %32
    • Remove the plastic spacer from the optical bay hard drive enclosure by pressing in on one of the clips on either side and lifting it up and out of the enclosure.

  16. Installing MacBook Pro 15" Unibody Mid 2010 Dual Hard Drive: passo 16, imagem 1 %32 Installing MacBook Pro 15" Unibody Mid 2010 Dual Hard Drive: passo 16, imagem 2 %32 Installing MacBook Pro 15" Unibody Mid 2010 Dual Hard Drive: passo 16, imagem 3 %32
    • Make sure that the hard drive connectors are facing down before placing it into the enclosure.

    • Gently place the hard drive into the enclosure's hard drive slot.

    • While firmly holding the enclosure in place with one hand, use your other hand to press the hard drive into the enclosure connectors.

  17. Installing MacBook Pro 15" Unibody Mid 2010 Dual Hard Drive: passo 17, imagem 1 %32 Installing MacBook Pro 15" Unibody Mid 2010 Dual Hard Drive: passo 17, imagem 2 %32
    • Once the hard drive is snug, reinsert the plastic spacer while holding the hard drive against the bottom of the enclosure.

  18. Installing MacBook Pro 15" Unibody Mid 2010 Dual Hard Drive: passo 18, imagem 1 %32 Installing MacBook Pro 15" Unibody Mid 2010 Dual Hard Drive: passo 18, imagem 2 %32
    • Use two Phillips #1 screws to secure the drive to its enclosure.

  19. Installing MacBook Pro 15" Unibody Mid 2010 Dual Hard Drive: passo 19, imagem 1 %32
    • Attach the optical drive bracket to the new enclosure with two Phillips #0 screws.

    • Reconnect any cables you have removed from the original optical drive onto the optical bay enclosure.

  20. Installing MacBook Pro 15" Unibody Mid 2010 Dual Hard Drive: passo 20, imagem 1 %32 Installing MacBook Pro 15" Unibody Mid 2010 Dual Hard Drive: passo 20, imagem 2 %32 Installing MacBook Pro 15" Unibody Mid 2010 Dual Hard Drive: passo 20, imagem 3 %32
    • Don't ditch that drive! You can still use your optical drive externally with the help of our SATA Optical Drive USB Cable.

    • Align the cable's SATA connector with the drive's port and plug in securely.

    • Plug the USB connector into your laptop and your optical drive is ready for use.

Conclusão

To reassemble your device, follow these instructions in reverse order.

130 outras pessoas executaram este guia.

Brittany McCrigler

Membro desde: 03/05/12

88.901 Reputação

Autoria de 131 guias

Equipe

iFixit Membro de iFixit

Staff

Membros da 135

Autoria de 16.476 guias

7 comentários

Step 8: The cable needs quite a hard pull to come out, be careful to pull straight! When reconnecting I used 2 wooden sate stick to push the connector back in.

Now running an sad for startup and the old HD as capacity storage. Thanks for the great manual on how to do these!

Bart - Responder

After finishing this guide, it occurred to me to test out a little known feature in MacBooks...

The MacBook has sensors that detect motion. When the sensors detect motion that is violent enough to risk damaging the spinning hard drive (and it doesn't have to be much), the head gets temporarily disengaged from the disk so that the risk of damage decreases. If you ever pick up your laptop quickly and hear a click, that is what is happening.

After installing a hard drive where the computer only ever expected an optical drive, that safety feature is lost. Now when I pick up my MacBook when the drive is spinning, there is no click. I put an SSD in place of the old drive, so I can't confirm if it still works in the actual hard drive area of the computer... but the one in the optical drive area definitely no longer can protect itself from rapid movement.

Still a fantastic upgrade, but remember to treat the hard drive in the optical bay as slightly more prone to failure than before.

dentondon - Responder

The fact that we can still use the optical drive (step 20, now external) is nice, but I would like to put it into some enclosure/caddy/case as well instead of having it bare naked . Don't you sell anything for this?

Alexandre Drouin - Responder

Great instruction found it very useful and worked for me all the way. Thank you

Ishaaq Ahmed - Responder

Hi there,

I followed the guide without problems but weeks after that I am experiencing sudden reboots when there is a change in the Graphic card (even when using forcing programs as gfxCardStatus). After looking for many patches or updates, I think it may be a problem of the SSD (a Crucial BX100 250gb), but I wanted to ask you first if anyone have had this same problem and if there’s any recommendation before buying another SSD drive.

Hug - Responder

Adicione um comentário

Exibir estatísticas:

Últimas 24 horas: 5

Últimos 7 dias: 14

Últimos 30 dias: 60

Duração total: 95,888