Ir para o conteúdo principal

How to Sew a Whip Stitch

O que você precisa

  1. How to Sew a Whip Stitch, How to Sew a Whip Stitch: passo 1, imagem 1 %32 How to Sew a Whip Stitch, How to Sew a Whip Stitch: passo 1, imagem 2 %32
    • Align the two pieces of material you will be stitching together.

    • Thread your needle and tie a knot in the end of the thread.

    • We'll use a bright-colored thread for better contrast, but you may want to select a thread that matches the color of your fabric.

    • Drive the needle into the bottom layer of material from the back side.

  2. How to Sew a Whip Stitch: passo 2, imagem 1 %32 How to Sew a Whip Stitch: passo 2, imagem 2 %32 How to Sew a Whip Stitch: passo 2, imagem 3 %32
    • Pull the needle through the bottom layer of material.

    • Pull the thread taut.

  3. How to Sew a Whip Stitch: passo 3, imagem 1 %32 How to Sew a Whip Stitch: passo 3, imagem 2 %32 How to Sew a Whip Stitch: passo 3, imagem 3 %32
    • Drive the needle down through the top and bottom layers of fabric, close to where the needle came up.

    • The distance between where the needle comes up and goes down will be your stitch length. The smaller the stitch length, the more stitches required—and the stronger the seam.

    • Pull the thread taut on the backside of the bottom material.

  4. How to Sew a Whip Stitch: passo 4, imagem 1 %32 How to Sew a Whip Stitch: passo 4, imagem 2 %32
    • Continue bringing the needle up and down through both layers of fabric, as in steps 2 and 3 of this guide, working your way around the material.

    • If you are using this stitch as a repair where a stitch already exists, be sure to overlap the existing stitching by several stitches to help prevent it from unraveling.

  5. How to Sew a Whip Stitch: passo 5, imagem 1 %32 How to Sew a Whip Stitch: passo 5, imagem 2 %32
    • For the final stitch, come up from the back of the bottom material once again.

    • Draw the needle between the two layers of material through the stitch closest to where the needle came up.

  6. How to Sew a Whip Stitch: passo 6, imagem 1 %32 How to Sew a Whip Stitch: passo 6, imagem 2 %32 How to Sew a Whip Stitch: passo 6, imagem 3 %32
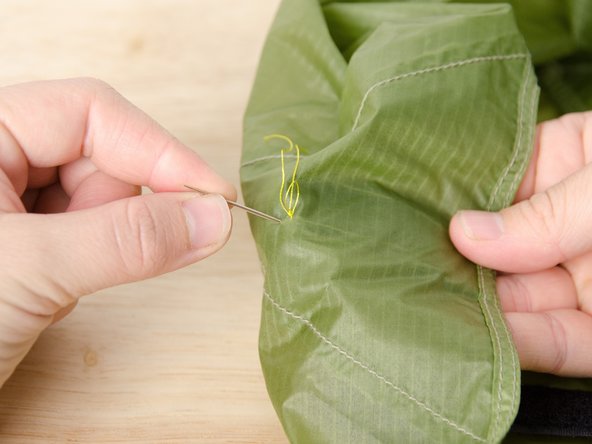
    • Slowly start to pull the thread taut. As you pull, you will see a loop form.

    • Draw the needle through the loop.

    • Pull the thread taut, forming a knot.

    • Repeat the process of driving the needle up from behind, drawing it through the stitch, and pulling it through the loop as described in steps 5 and 6 of this guide one more time.

  7. How to Sew a Whip Stitch: passo 7, imagem 1 %32
    • Ensure that the stitches are tight.

    • Cut any remaining thread, and admire your handiwork.

Linha de Chegada

19 outras pessoas executaram este guia.

Brittany McCrigler

Membro desde: 03/05/12

88.898 Reputação

Autoria de 131 guias

Equipe

iFixit Membro de iFixit

Staff

Membros da 136

Autoria de 16.573 guias

0 comentários

Adicione um comentário

Exibir estatísticas:

Últimas 24 horas: 3

Últimos 7 dias: 19

Últimos 30 dias: 59

Duração total: 39,663