Introdução
Does your screen have cracks or did you recently shatter your display? Use this guide to replace the display assembly on your HTC One M9. This assembly includes the touchscreen (digitizer) and the LCD panel. Click the following link for more information about obtaining these parts.
O que você precisa
-
-
The microSD card tray is located on the upper right hand side of the phone, above the volume buttons. To open the tray, insert a microSD card eject tool, or a paperclip, into the small hole in the microSD card tray.
-
Then press the tool or paperclip to eject the microSD card tray.
-
-
-
Insert a SIM card eject tool or a paperclip into the small hole besides the SIM card tray, located on the upper section of the left edge of the phone.
-
Press to eject the tray.
-
-
-
Using a plastic opening pick or a spudger, gently pry and remove the cover on top of the case.
-
Remove the two 4 mm T5 Torx screws on the top of the case.
-
-
-
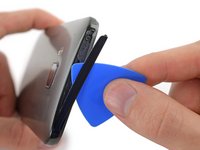
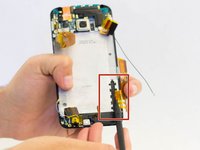
Work a plastic opening pick around the perimeter of the device to separate the rear case from the display assembly.
The SIM Card and SD Card's need to be removed before the case will come apart.
I found a video showing someone using a 2 to 3 inch length scraper razor blade around the perimeter. On my second HTCM9 battery swap I found that leading with a square tipped X-Acto blade to begin the opening, and leaving the trailing, “already opened” gap “wedged” open with the scraper blade helped smoothly open from top (IR header) to bottom (micro USB charger port). A conventional spudger pries open too quickly and can damage and misshape the LCD’s soft bezel. The bezel surround is a much softer compound than the rear case. You can work the rear case loose by gently prying the back’s perimeter outward and occasionally inward as you progress. There are four tabs on the LCD assembly (i.e. nearby and under the pliers in step 5) on each side that protrude into the rear case. Push in toward the back, and pry outward on the back case seam around the vicinity of the tabs. This action provides clearance for the tab to loose from the case tab slot.
-
-
Ferramenta utilizada neste passo:Tweezers$4.99
-
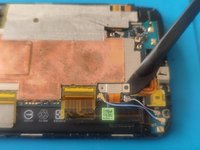
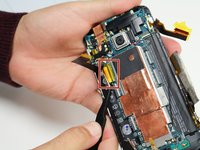
Use a pair of tweezers to get underneath the white and blue cable connectors and gently push them upwards to disconnect them.
-
-
-
-
Remove the two 1.5 mm screws that secure the battery connector to the motherboard, using a Phillips #00 screwdriver.
-
Use a spudger to gently pry up the battery connector from its socket.
On my new battery the connector was not aligned precisely so the battery was not connected properly to the motherboard after screwing it in. The connector is supposed to hold on it’s own without the screws. If the connector does not hold to the motherboard without the screws, make sure that the connector is actually plugged in properly and only screw it in once it holds by itself.
-
-
-
Peel back the Kapton tape from the ZIF connectors.
-
Use a spudger or your fingernail to lift the hinged retainer clips on the ZIF connectors, and gently slide the cables out.
-
-
-
Peel back the Kapton tape from the remaining three ZIF connectors, then use a spudger or your fingernail to lift the hinged retainer clips on the ZIF connectors, and slide the cables out from each.
the third connector what is that one for? my screen was sometimes flicker and that connector is loose from underneath the motherboard
-
-
-
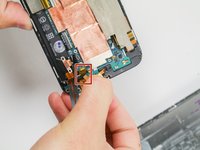
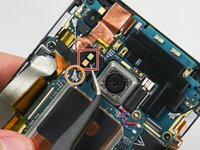
Remove the three 4 mm T5 Torx screws that secure the motherboard.
Great guide just one crucial warning missing! When removing the battery which is underneath the power/SD/volume cable make sure you see that and carefully remove the battery without tearing it apart! Had to learn the hard way. Fortunately it's replaceable..
-
-
-
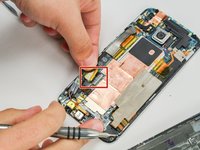
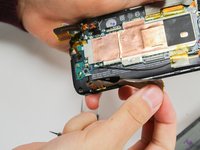
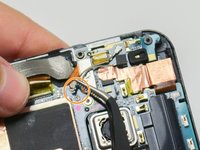
Use a pair of tweezers to lift the vibrator out of its slot.
-
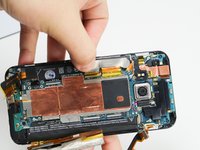
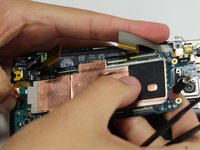
Use an iOpener or heat gun to loosen the adhesive at the bottom of the motherboard.
-
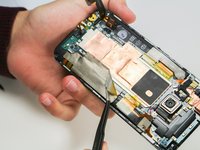
Use a plastic opening tool, or a spudger, along the edges of the case to gently pry the motherboard out of the case.
-
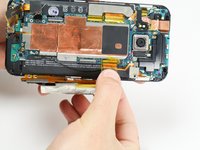
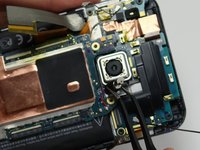
Gently lift the motherboard out of the case, beginning from the top corner (near the camera).
-
-
Ferramenta utilizada neste passo:Tweezers$4.99
-
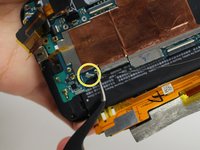
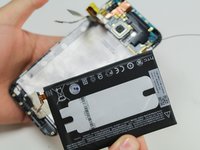
Using tweezers, remove the tape from the bottom of the battery.
-
Use a spudger to carefully pry the battery up from the display assembly.
Bei mir war der Akku fest verkebt, mit Klebesteifen ganz rechts und ganz links. Auch direkt unter dem Flachbandkabel zur Einschalt- und Lautstärketaste. Um den Akku auszubauen musste ich deshalb richtig Kraft aufwänden und das sehr empfindliche Kabel ist dabei gerissen. nachher habe ich gesehen, dass man die Leiste mit Einschalt- und Lautstärketaste hätte lösen können, sodass das Flachabndkabel nicht im Weg liegt.
Ich empfehle das Lösen der Leiste VOR dem Ausbau des Akkus!
Falls es doch schief geht: HTC One M9 Plus Laut Leise Ein Aus Taste Power Button Volume Flex Kabel kann man online erwerben.
Na perfekt, den Tipp hätte ich ganz zu Anfang gebrauchen können. Zeigt mal wieder, dass man Anleitungen erstmal komplett lesen sollte bevor man loslegt. Hab das Kabel richtig schön abgerissen weil es nirgendwo erwähnt wird. Mal sehen wie ich weiter mache, ich tendiere gerade dazu mich dem M9 geschlagen zu geben und bei Bedarf meiner Lebensgefährtin den Akku in das M8S zu setzen, passt da ja auch…nie wieder HTC.
Just reiterating the comments above, the battery is held on by glue strips on the left and right. I used a spludger to slowly prise the battery away from the glue on both sides, and was then able to get the battery out.
Take extreme care near the power and volume buttons. It's better to move this out of the way while doing this.
-
-
-
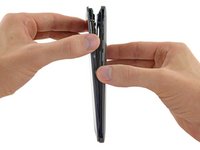
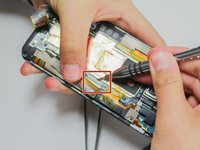
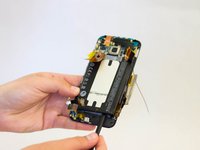
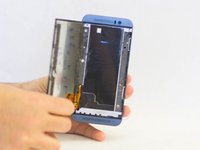
Gently pry around the display assembly to separate the display from the rest of the device.
-
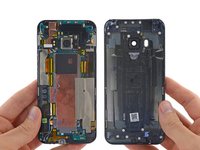
After a visible gap has appeared between the screen and phone, gently pull off the screen from the casing.
-
Carefully pull the display cable through the rest of the device.
-


To reassemble your device, follow these instructions in reverse order.
To reassemble your device, follow these instructions in reverse order.
Cancelar: não concluí este guia.
18 outras pessoas executaram este guia.
Equipe

Cal Poly, Team 6-16, Maness Spring 2015 Membro de Cal Poly, Team 6-16, Maness Spring 2015
CPSU-MANESS-S15S6G16
Membros da 4
Autoria de 16 guias
3 comentários
half this guide can be skipped, all you need to do is:
disconnect the battery
disconnect LCD flex and peel off the conductive tape
heat LCD up
Slide a thin plastic tool in under the LCD (can be anything, like the hard-ish plastic used in blister packs), there is only tape along the sides, start at the top center of the lcd. Seriously just slide it down and cut the tape (it's super strong!)
Now just lift the battery up about 3mm (on the same side as the lcd flex) and slide the lcd out, flex and all..
Total repair time is HALVED and you don't mess up the rest of the RF shielding tape.
Total of just 4 screws need to be removed!
:)
hope this helps :)