Ir para o conteúdo principal

Gateway NV52 Motherboard Replacement

O que você precisa

  1. Gateway NV52 Motherboard Replacement, Battery: passo 1, imagem 1 %32
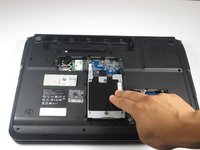
    • Turn the laptop on its backside with the stickers and barcode facing you.

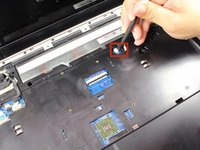
    • Locate the latches on the top left corner.

  2. Gateway NV52 Motherboard Replacement: passo 2, imagem 1 %32
    • In order to unlock the battery, slide the vertical latch downward where it indicates the unlocking icon.

  3. Gateway NV52 Motherboard Replacement: passo 3, imagem 1 %32
    • Slide the horizontal latch to the right to pop open the battery pack.

  4. Gateway NV52 Motherboard Replacement, Motherboard: passo 4, imagem 1 %32
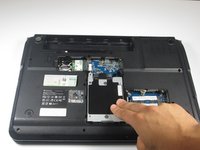
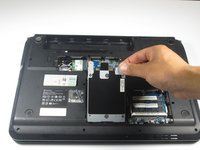
    • Remove the five identical 3/16" Phillips #0 screws that secure the hard drive and memory cover.

  5. Gateway NV52 Motherboard Replacement: passo 5, imagem 1 %32
    • Lift up the base cover from the the top with your hands to a 90 degree angle.

    • Remove the base cover.

  6. Gateway NV52 Motherboard Replacement: passo 6, imagem 1 %32
    • Remove the 1/4" Phillips #0 screw located at the top right of the hard drive.

  7. Gateway NV52 Motherboard Replacement: passo 7, imagem 1 %32 Gateway NV52 Motherboard Replacement: passo 7, imagem 2 %32 Gateway NV52 Motherboard Replacement: passo 7, imagem 3 %32
    • Remove the hard drive component from its compartment. To do so, slide the component downward away from the battery pack.

    • Lift the hard drive to a 90 degree angle and out of its slot.

  8. Gateway NV52 Motherboard Replacement: passo 8, imagem 1 %32
    • Remove the 3/16" Phillips #0 screw located at the bottom left corner of the WiFi card.

  9. Gateway NV52 Motherboard Replacement: passo 9, imagem 1 %32
    • Locate the black and white cables attached to the WiFi card.

    • Gently wiggle the black cable until it detaches from the WiFi card.

    • Repeat the previous step for the white cable.

  10. Gateway NV52 Motherboard Replacement: passo 10, imagem 1 %32
    • Gently, remove the Wifi card from its slot, and place it in a dry and safe place.

    • Turn the laptop with the keyboard compartment facing up.

  11. Gateway NV52 Motherboard Replacement: passo 11, imagem 1 %32
    • Remove the five identical 9/32" Phillips #0 screws located under the battery and both upper corners.

    • Remove the 9/32" Phillips #0 screw fastening the optical disc drive.

  12. Gateway NV52 Motherboard Replacement: passo 12, imagem 1 %32
    • Using your hands, gently slide the optical drive out of the slot.

  13. Gateway NV52 Motherboard Replacement: passo 13, imagem 1 %32
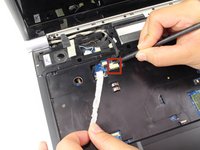
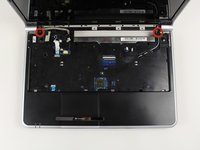
    • Flip the device so the keyboard and display screen are faced upright.

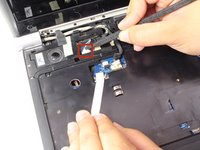
    • Lift up the media button board cover using the heavy duty spudger. Apply a minimum amount of upward force to the media button board cover at the right bottom corner. Starting from the right, continuously lift the cover to the left edge until completely separated.

    • Do not lift up the media button board cover too much, it’s still connected to the motherboard. Set the media button board cover upside down on the keyboard.

  14. Gateway NV52 Motherboard Replacement: passo 14, imagem 1 %32
    • Disconnect the dark colored locking tab by pulling at a 90 degree angle, and then slightly pull away the ribbon from the locking tab.

  15. Gateway NV52 Motherboard Replacement: passo 15, imagem 1 %32
    • Lift up the keyboard with the spudger. Rotate the keyboard until its face down on top of its base.

    • The keyboard is still connected to the access keyboard connector, so do not attempt to detach the keyboard from the laptop, yet.

  16. Gateway NV52 Motherboard Replacement: passo 16, imagem 1 %32
    • Disconnect the brown-colored locking tab by pulling at a 90 degree angle and slightly pulling away from the locking tab.

    • Do not apply too much force to the locking tab, because a damaged connector will disable the keyboard.

    • Remove the keyboard.

  17. Gateway NV52 Motherboard Replacement: passo 17, imagem 1 %32
    • Locate the three LCD connectors.

  18. Gateway NV52 Motherboard Replacement: passo 18, imagem 1 %32 Gateway NV52 Motherboard Replacement: passo 18, imagem 2 %32 Gateway NV52 Motherboard Replacement: passo 18, imagem 3 %32
    • Use the pointy end of the spudger to gently pry each side of the LCD connector until they are detached from their respective ports.

    • Do not pull with excessive force, since it could damage the LCD cable plug-in.

  19. Gateway NV52 Motherboard Replacement: passo 19, imagem 1 %32
    • Using the flat edge of the spudger, disconnect the big white LCD cable connector by slightly pulling on it until it's detached from its respective port.

  20. Gateway NV52 Motherboard Replacement: passo 20, imagem 1 %32
    • Using the tweezers, pull out the black and white cables located at the right side of the laptop.

  21. Gateway NV52 Motherboard Replacement: passo 21, imagem 1 %32 Gateway NV52 Motherboard Replacement: passo 21, imagem 2 %32
    • Remove the two 9/32" Phillips #0 screws on the top left and right corners.

    • Lift the entire display screen straight up using both hands.

  22. Gateway NV52 Motherboard Replacement: passo 22, imagem 1 %32
    • Turn the laptop upside down.

    • Remove ten 9/32" screws with a Phillips #0 Screwdriver.

  23. Gateway NV52 Motherboard Replacement: passo 23, imagem 1 %32
    • Flip the laptop over.

    • Remove the three 9/32"screws that secures the top cover with a Phillips #0 screwdriver.

  24. Gateway NV52 Motherboard Replacement: passo 24, imagem 1 %32
    • Gently disconnect the two ribbons from the motherboard using the black tweezers.

  25. Gateway NV52 Motherboard Replacement: passo 25, imagem 1 %32
    • Separate the top cover from the base using the heavy duty spudger. Insert the spudger in between the keyboard base and the base of the laptop with a minimum amount of force to separate them. Follow this procedure around the perimeter until the parts are separated.

  26. Gateway NV52 Motherboard Replacement: passo 26, imagem 1 %32
    • Remove the 3/16" screw securing the motherboard with a Phillips #0 screwdriver.

  27. Gateway NV52 Motherboard Replacement: passo 27, imagem 1 %32
    • Cautiously disconnect the USB board cable that is situated on the top right corner of the motherboard.

  28. Gateway NV52 Motherboard Replacement: passo 28, imagem 1 %32
    • Disconnect the modem cable located at the bottom right of the motherboard.

  29. Gateway NV52 Motherboard Replacement: passo 29, imagem 1 %32
    • Cautiously remove the motherboard and lie it down.

Conclusão

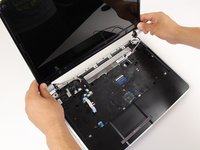
To reassemble your device, follow these instructions in reverse order.

10 outras pessoas executaram este guia.

Irma Marin

Membro desde: 04/10/14

608 Reputação

Autoria de 3 guias

Equipe

Cal Poly, Team 7-24, Regan Spring 2014 Membro de Cal Poly, Team 7-24, Regan Spring 2014

CPSU-REGAN-S14S7G24

Membros da 4

Autoria de 18 guias

8 comentários

Thanks so much for your guide post. I just finished replacing the CR2032 battery on my motherboard and could not have done it without your post.

larryrchrds - Responder

larryrchrds whats symptoms did your Notebook have? Mine comes up with the charging light on, power light on but no display, no fan noise. if i connect the display to another screen nothing comes up either.The computer just stoped working out of the blue. Iam wondering if you experienced the same.

edson -

I had the same issue as edson. Replaced the CMOS and works fine now. Fantastic guide. I realise this is 3 years after the comment. But might be handy for anyone else with the same problem :)

David Groom - Responder

Nice guide. Same symptoms!

Robert Clapp - Responder

Replacing the CMOS battery didn’t work for me, but I was able to reflow the GPU with a heat gun and my board started working again.

Shawn - Responder

Adicione um comentário

Exibir estatísticas:

Últimas 24 horas: 1

Últimos 7 dias: 9

Últimos 30 dias: 16

Duração total: 7,185