Ir para o conteúdo principal

GE 7-4836B Alarm Clock AM-FM Radio Speaker Replacement

O que você precisa

  1. GE 7-4836B Alarm Clock AM-FM Radio Speaker Replacement, Battery Compartment Cover: passo 1, imagem 1 %32 GE 7-4836B Alarm Clock AM-FM Radio Speaker Replacement, Battery Compartment Cover: passo 1, imagem 2 %32 GE 7-4836B Alarm Clock AM-FM Radio Speaker Replacement, Battery Compartment Cover: passo 1, imagem 3 %32
    • Find the battery compartment on the bottom of the clock radio.

    • Using your thumb, push the compartment cover latch toward the battery.

    • With the latch pushed in, pull the compartment cover upward to remove it..

  2. GE 7-4836B Alarm Clock AM-FM Radio Speaker Replacement, Battery: passo 2, imagem 1 %32 GE 7-4836B Alarm Clock AM-FM Radio Speaker Replacement, Battery: passo 2, imagem 2 %32
    • Lift the battery from the compartment.

    • Pull the battery up and gently disconnect it from the battery connector.

  3. GE 7-4836B Alarm Clock AM-FM Radio Speaker Replacement, Screws: passo 3, imagem 1 %32 GE 7-4836B Alarm Clock AM-FM Radio Speaker Replacement, Screws: passo 3, imagem 2 %32
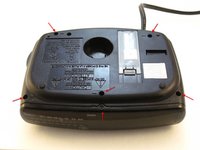
    • Using a Phillips #00 Screwdriver, unscrew the six 12mm screws from around the bottom of the clock radio.

  4. GE 7-4836B Alarm Clock AM-FM Radio Speaker Replacement, LCD Cover: passo 4, imagem 1 %32
    • Gently pull the liquid crystal display (LCD) cover off.

  5. GE 7-4836B Alarm Clock AM-FM Radio Speaker Replacement, Clock Radio: passo 5, imagem 1 %32 GE 7-4836B Alarm Clock AM-FM Radio Speaker Replacement, Clock Radio: passo 5, imagem 2 %32
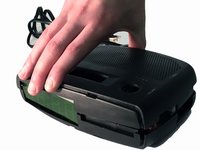
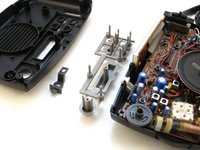
    • Lift the top off. Two gray, plastic internal pieces will fall out when you do this; set them aside.

  6. GE 7-4836B Alarm Clock AM-FM Radio Speaker Replacement, Speaker: passo 6, imagem 1 %32 GE 7-4836B Alarm Clock AM-FM Radio Speaker Replacement, Speaker: passo 6, imagem 2 %32
    • Grip the speaker.

    • Lift the speaker from the holder.

    • Turn the speaker over.

  7. GE 7-4836B Alarm Clock AM-FM Radio Speaker Replacement, Speaker from Wires: passo 7, imagem 1 %32 GE 7-4836B Alarm Clock AM-FM Radio Speaker Replacement, Speaker from Wires: passo 7, imagem 2 %32 GE 7-4836B Alarm Clock AM-FM Radio Speaker Replacement, Speaker from Wires: passo 7, imagem 3 %32
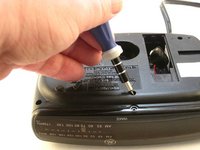
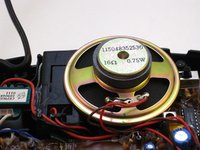
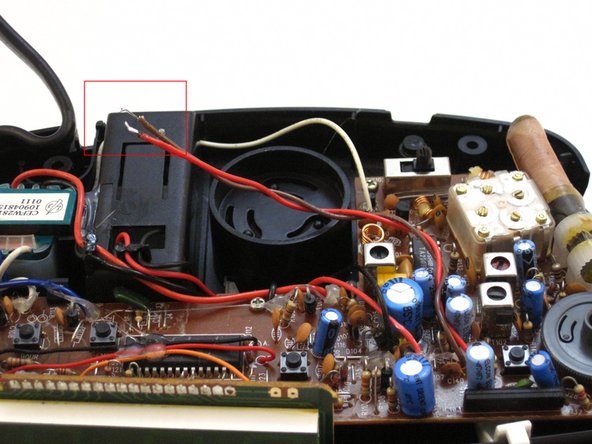
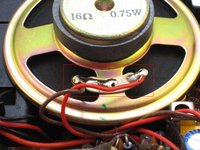
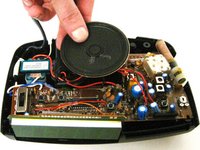
    • The red wire is the + and the tan wire is the -. These wires are connected with solder.

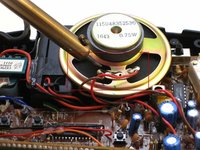
    • Apply the hot soldering iron tip to the speaker connection solder.

    • Pull the speaker away from the wires.

  8. GE 7-4836B Alarm Clock AM-FM Radio Speaker Replacement, New Speaker: passo 8, imagem 1 %32 GE 7-4836B Alarm Clock AM-FM Radio Speaker Replacement, New Speaker: passo 8, imagem 2 %32 GE 7-4836B Alarm Clock AM-FM Radio Speaker Replacement, New Speaker: passo 8, imagem 3 %32
    • Attach a new 65 mm speaker, model #115048352530, with the wire connectors. Match the red wire to the + and the tan wire to the -.

    • Solder the wires to connect. Let the solder cool.

    • Reverse Step 6 to insert the new speaker in holder.

Conclusão

To reassemble your device, follow these instructions in reverse order.

Uma outra pessoa concluiu este guia.

Dominick Giguere

Membro desde: 10/28/14

848 Reputação

Autoria de 6 guias

0 comentários

Adicione um comentário

Exibir estatísticas:

Últimas 24 horas: 0

Últimos 7 dias: 0

Últimos 30 dias: 1

Duração total: 1,592