Ir para o conteúdo principal
Participe da comunidade de reparos - Criar conta

Floor Pump O-Rings Replacement

O que você precisa

    1. Floor Pump O-Rings Replacement, O-Rings: passo 1, imagem 1 %32
      • Detach the hose from its holder.

      Pergunte ao FixBot

      Comentar

    2. Floor Pump O-Rings Replacement: passo 2, imagem 1 %32 Floor Pump O-Rings Replacement: passo 2, imagem 2 %32
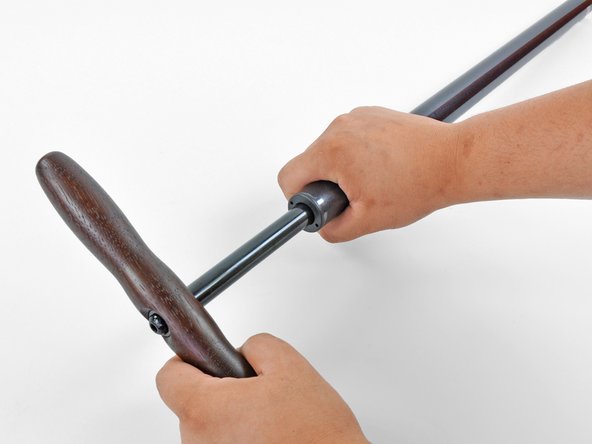
      • Hold the base of the pump steady and twist the barrel counter-clockwise by hand until it completely unthreads.

      • If you are having troubles stabilizing the base and twisting the barrel, try standing on the base and using both hands to loosen the barrel.

      • Lift the barrel off the base.

      • When removing the barrel, be sure not to lose the bump stop O-ring. It may stick to the pump base, may be stuck inside the barrel, or may fall out when you remove the barrel.

      Pergunte ao FixBot

      Comentar

    3. Floor Pump O-Rings Replacement: passo 3, imagem 1 %32
      • Lift the pump handle until the top cap is expsoed

      Pergunte ao FixBot

      Comentar

    4. Floor Pump O-Rings Replacement: passo 4, imagem 1 %32 Floor Pump O-Rings Replacement: passo 4, imagem 2 %32 Floor Pump O-Rings Replacement: passo 4, imagem 3 %32
      • Place the ends of needle nose pliers into the top cap holes and turn counter-clockwise until the cap is loose.

      • Finish removing the top cap by hand.

      • Pull the pump plunger out of the barrel.

      Pergunte ao FixBot

      Comentar

    5. Floor Pump O-Rings Replacement: passo 5, imagem 1 %32 Floor Pump O-Rings Replacement: passo 5, imagem 2 %32
      • Use a small flathead screwdriver to remove the plunger O-ring.

      • Use the screwdriver to remove the upper bump stop O-ring.

      • Install new O-rings.

      • Be careful not to over-stretch or cut the O-rings if you are using the screwdriver to install them.

      Pergunte ao FixBot

      Comentar

    6. Floor Pump O-Rings Replacement: passo 6, imagem 1 %32 Floor Pump O-Rings Replacement: passo 6, imagem 2 %32
      • Remove the lower bump stop O-ring from the pump base.

      • Remove and replace the base O-ring.

      Pergunte ao FixBot

      Comentar

    7. Floor Pump O-Rings Replacement: passo 7, imagem 1 %32 Floor Pump O-Rings Replacement: passo 7, imagem 2 %32 Floor Pump O-Rings Replacement: passo 7, imagem 3 %32
      • Insert the tips of needle nose pliers into the base cap holes and turn it counter-clockwise until it completely unthreads.

      • Remove the base cap from the pump base.

      • Remove and replace the base cap O-ring.

      • Re-assemble the pump using these instructions backwards.

      • Don't forget to set a new bump stop O-ring on top of the pump base before re-installing the pump barrel.

      Pergunte ao FixBot

      Comentar

Linha de Chegada

Cancelar: não concluí este guia.

Uma outra pessoa concluiu este guia.

iRobot

Membro desde: 09/24/09

1 Reputação

Autoria de 633 guias

1Comentário do guia

I was looking for ideas on how to “make" an O- ring. It can't be that difficult. I'll update when the plan comes together.?

RBizerka - Responder Compartilhar

Comentar

Visualizações:

Últimas 24 horas: 1

Últimos 7 dias: 13

Últimos 30 dias: 71

Ao todo: 7,202