Ir para o conteúdo principal
Participe da comunidade de reparos - Criar conta

Ematic FunTab 3 Touch Screen Replacement

O que você precisa

    1. Ematic FunTab 3 Touch Screen Replacement, Back Panel: passo 1, imagem 1 %32 Ematic FunTab 3 Touch Screen Replacement, Back Panel: passo 1, imagem 2 %32 Ematic FunTab 3 Touch Screen Replacement, Back Panel: passo 1, imagem 3 %32
      • Turn off the device before starting

      • To prevent damage, open the device on the side without the buttons.

      • Insert the hooked end of the plastic opening tool in the gap between the screen and the back panel on the edge of the device.

      • Slide the plastic opening tool down the long side of the device.

      • Insert tool again and slide it down the long slide of the case a second time.

      Pergunte ao FixBot

      Comentar

    2. Ematic FunTab 3 Touch Screen Replacement: passo 2, imagem 1 %32
      • Pull the back panel away from the screen.

      Pergunte ao FixBot

      Comentar

    1. Ematic FunTab 3 Touch Screen Replacement, Motherboard: passo 3, imagem 1 %32
      • Remove the black tape to reveal the screen connector.

      Pergunte ao FixBot

      Comentar

    2. Ematic FunTab 3 Touch Screen Replacement: passo 4, imagem 1 %32 Ematic FunTab 3 Touch Screen Replacement: passo 4, imagem 2 %32
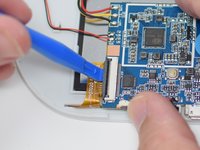
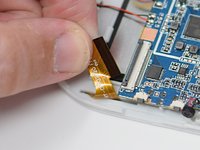
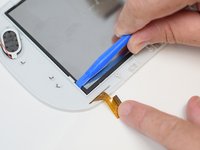
      • Flip up the retaining tab using the plastic opening tool.

      • Pull out the screen wire ribbon to disconnect the screen and motherboard.

      Pergunte ao FixBot

      Comentar

    3. Ematic FunTab 3 Touch Screen Replacement: passo 5, imagem 1 %32 Ematic FunTab 3 Touch Screen Replacement: passo 5, imagem 2 %32
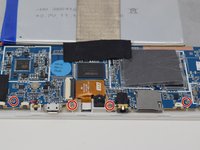
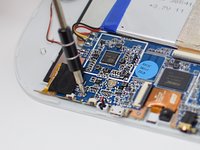
      • Using a PH 00 screwdriver, remove the four 4.5 mm screws that are holding the motherboard in place.

      Pergunte ao FixBot

      Comentar

    4. Ematic FunTab 3 Touch Screen Replacement: passo 6, imagem 1 %32
      • It is now safe to remove and replace the old motherboard with your new motherboard.

      • Close the black ribbon retaining tabs once ribbons are inserted during reassembly.

      Pergunte ao FixBot

      Comentar

    1. Ematic FunTab 3 Touch Screen Replacement, Touch Screen: passo 7, imagem 1 %32 Ematic FunTab 3 Touch Screen Replacement, Touch Screen: passo 7, imagem 2 %32
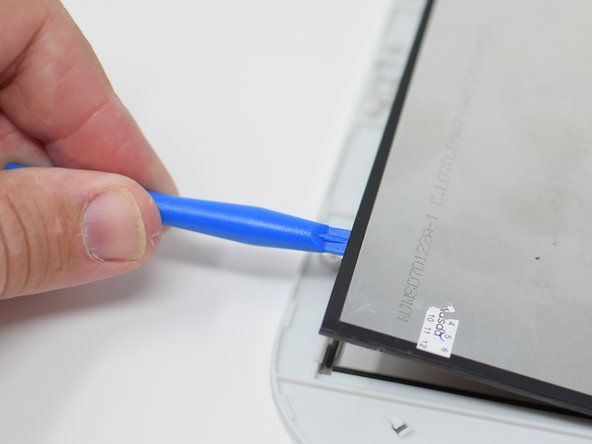
      • Insert the hook side of the opening tool between the case and display.

      • Press down on the tool until the screen is clear of the white retaining tabs.

      • Use the plastic opening tool to gently pry up the screen.

      • This is best done on the corner closest to the wire ribbon.

      • Continue prying around the screen until the screen pops out.

      Pergunte ao FixBot

      Comentar

    2. Ematic FunTab 3 Touch Screen Replacement: passo 8, imagem 1 %32
      • After the screen has come lose, remove it from the device.

      • When reassembling, make sure the screen locks in place, this may require extra pressure

      • Close the black ribbon retaining tabs once ribbons are inserted during reassembly.

      Pergunte ao FixBot

      Comentar

Conclusão

To reassemble your device, follow these instructions in reverse order.

Cancelar: não concluí este guia.

Amanda Davis

Membro desde: 07/11/18

581 Reputação

Autoria de 5 guias

Equipe

UW Tacoma, Team S1-G5, Cardinal Summer 2018 Membro de UW Tacoma, Team S1-G5, Cardinal Summer 2018

UWT-CARDINAL-SU18S1G5

4 Membros

Autoria de 12 guias

1Comentário do guia

Where can I get a new display for my emoticons funtab 3?

DanTheMan RBLX - Responder Compartilhar

Comentar

Visualizações:

Últimas 24 horas: 0

Últimos 7 dias: 2

Últimos 30 dias: 22

Ao todo: 1,248