Ir para o conteúdo principal

Dell Photo Printer 540 Case Replacement

O que você precisa

  1. Dell Photo Printer 540 Case Replacement, Case: passo 1, imagem 1 %32
    • Rotate the photo printer so that the bottom of the case faces upward.

  2. Dell Photo Printer 540 Case Replacement: passo 2, imagem 1 %32
    • Use a Phillips #2 screwdriver to remove the three 5.65 mm screws on the bottom panel of the case in a counter-clockwise fashion.

  3. Dell Photo Printer 540 Case Replacement: passo 3, imagem 1 %32
    • Rotate the device so that it is upright again. Under the LCD Panel there is a 9.62 mm screw, unscrew using a Phillips #2 screwdriver.

  4. Dell Photo Printer 540 Case Replacement: passo 4, imagem 1 %32
    • Remove the back panel of the case by pulling directly back.

    • Some carefully applied force may be required to remove this part.

  5. Dell Photo Printer 540 Case Replacement: passo 5, imagem 1 %32
    • Rotate the photo printer so that the bottom panel faces up once again. Now lift off the bottom panel of the case to access all internal components.

  6. Dell Photo Printer 540 Case Replacement: passo 6, imagem 1 %32 Dell Photo Printer 540 Case Replacement: passo 6, imagem 2 %32
    • Finally remove the side panel with the ink-cartridge door by holding the right side and pulling backwards with the left side.

    • Caution! The side panel is held in by tabs; don't break these.

Conclusão

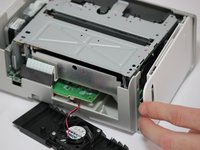
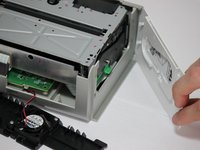
To reassemble your device, follow these instructions in reverse order.

Jonathan Mintz

Membro desde: 04/04/12

11 Reputação

Autoria de 3 guias

Equipe

Cal Poly, Team 14-7, Forte Spring 2012 Membro de Cal Poly, Team 14-7, Forte Spring 2012

CPSU-FORTE-S12S14G7

Membros da 4

Autoria de 12 guias

0 comentários

Adicione um comentário

Exibir estatísticas:

Últimas 24 horas: 0

Últimos 7 dias: 0

Últimos 30 dias: 0

Duração total: 632