Ir para o conteúdo principal

Dell Latitude 7410 Display Assembly Replacement

O que você precisa

  1. Dell Latitude 7410 Display Assembly Replacement, Prepare your laptop for disassembly: passo 1, imagem 1 %32
    • Allow your laptop's battery to drain below 25% before starting this repair—a charged battery may catch fire if damaged.

    • Unplug all cables, fully shut down your laptop, and close the lid.

  2. Dell Latitude 7410 Display Assembly Replacement, Unfasten the back cover: passo 2, imagem 1 %32
    • Use a Phillips screwdriver to loosen the eight captive screws securing the back cover.

  3. Dell Latitude 7410 Display Assembly Replacement, Insert an opening pick: passo 3, imagem 1 %32 Dell Latitude 7410 Display Assembly Replacement, Insert an opening pick: passo 3, imagem 2 %32
    • Insert an opening pick between the right edge of the back cover and the frame, just below the middle right screw.

  4. Dell Latitude 7410 Display Assembly Replacement, Unclip the right edge: passo 4, imagem 1 %32 Dell Latitude 7410 Display Assembly Replacement, Unclip the right edge: passo 4, imagem 2 %32
    • Slide your pick along the right edge to release the clips securing the back cover.

  5. Dell Latitude 7410 Display Assembly Replacement, Unclip the left edge: passo 5, imagem 1 %32 Dell Latitude 7410 Display Assembly Replacement, Unclip the left edge: passo 5, imagem 2 %32 Dell Latitude 7410 Display Assembly Replacement, Unclip the left edge: passo 5, imagem 3 %32
    • Insert your pick between the left edge of the back cover and the frame, next to the speaker cutout.

    • Slide your pick along the left edge to release the clips.

  6. Dell Latitude 7410 Display Assembly Replacement, Unclip the back edge: passo 6, imagem 1 %32 Dell Latitude 7410 Display Assembly Replacement, Unclip the back edge: passo 6, imagem 2 %32 Dell Latitude 7410 Display Assembly Replacement, Unclip the back edge: passo 6, imagem 3 %32
    • Insert your pick between the back cover and the right display-hinge to release the first clip along the back edge.

    • Slide your pick toward the left hinge until the second clip releases.

  7. Dell Latitude 7410 Display Assembly Replacement, Unclip the front edge: passo 7, imagem 1 %32 Dell Latitude 7410 Display Assembly Replacement, Unclip the front edge: passo 7, imagem 2 %32
    • Insert your pick between the front edge of the back cover and the frame, just to the right of the bottom left screw.

    • Slide your pick toward the right edge until the front edge releases from the frame.

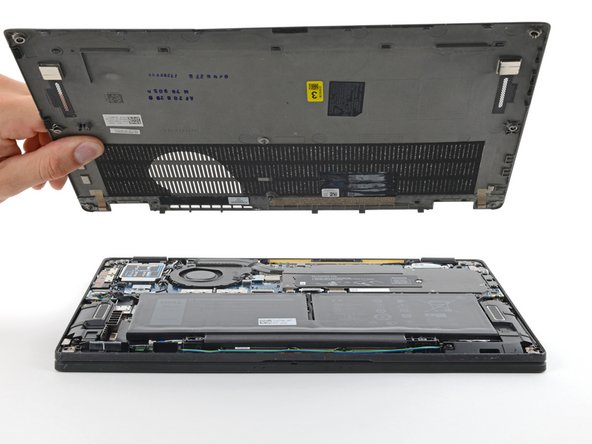
  8. Dell Latitude 7410 Display Assembly Replacement, Remove the back cover: passo 8, imagem 1 %32 Dell Latitude 7410 Display Assembly Replacement, Remove the back cover: passo 8, imagem 2 %32
    • Remove the back cover.

  9. Dell Latitude 7410 Display Assembly Replacement, Disconnect the battery: passo 9, imagem 1 %32 Dell Latitude 7410 Display Assembly Replacement, Disconnect the battery: passo 9, imagem 2 %32
    • Grab the black pull tab on the head of the battery connector and pull straight up to disconnect it.

  10. Dell Latitude 7410 Display Assembly Replacement, Remove the cover: passo 10, imagem 1 %32 Dell Latitude 7410 Display Assembly Replacement, Remove the cover: passo 10, imagem 2 %32 Dell Latitude 7410 Display Assembly Replacement, Remove the cover: passo 10, imagem 3 %32
    • If your laptop doesn't come with a WWAN card, skip the next two steps.

    • Use the flat end of a spudger to pry up the WWAN card cover from its clips on the I/O board.

    • Remove the cover.

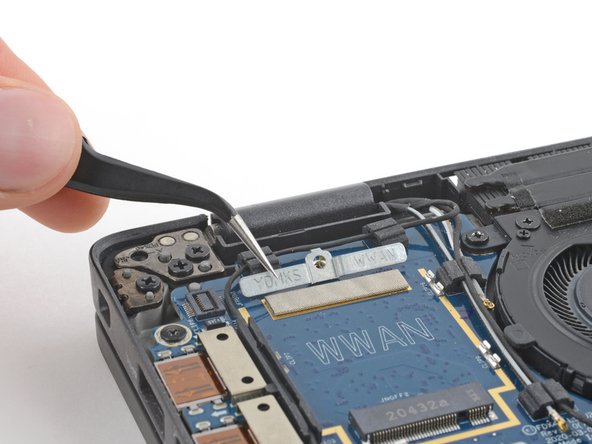
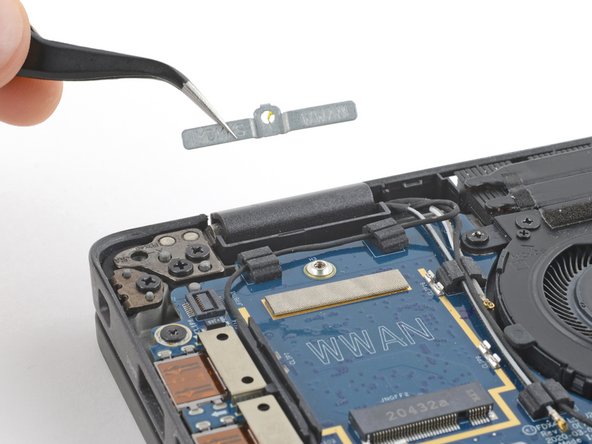
  11. Dell Latitude 7410 Display Assembly Replacement, Remove the WWAN cable bracket: passo 11, imagem 1 %32 Dell Latitude 7410 Display Assembly Replacement, Remove the WWAN cable bracket: passo 11, imagem 2 %32 Dell Latitude 7410 Display Assembly Replacement, Remove the WWAN cable bracket: passo 11, imagem 3 %32
    • Use your Phillips screwdriver to remove the 3 mm screw securing the WWAN cable bracket.

    • Remove the cable bracket.

  12. Dell Latitude 7410 Display Assembly Replacement, Remove the antenna cable bracket: passo 12, imagem 1 %32 Dell Latitude 7410 Display Assembly Replacement, Remove the antenna cable bracket: passo 12, imagem 2 %32 Dell Latitude 7410 Display Assembly Replacement, Remove the antenna cable bracket: passo 12, imagem 3 %32
    • Use your Phillips screwdriver to remove the 3 mm screw securing the antenna cable bracket.

    • Remove the antenna cable bracket.

  13. Dell Latitude 7410 Display Assembly Replacement, Disconnect the antenna cables: passo 13, imagem 1 %32 Dell Latitude 7410 Display Assembly Replacement, Disconnect the antenna cables: passo 13, imagem 2 %32 Dell Latitude 7410 Display Assembly Replacement, Disconnect the antenna cables: passo 13, imagem 3 %32
    • Use your spudger to disconnect the antenna press connectors labeled 1 and 2 by prying the heads of their connectors straight up.

    • To re-attach press connectors, carefully align and press down on one side until it clicks into place, then repeat on the other side. Don't press down in the middle. If the connector is misaligned, the pins can bend and cause permanent damage.

  14. Dell Latitude 7410 Display Assembly Replacement, Move the antenna cables: passo 14, imagem 1 %32 Dell Latitude 7410 Display Assembly Replacement, Move the antenna cables: passo 14, imagem 2 %32 Dell Latitude 7410 Display Assembly Replacement, Move the antenna cables: passo 14, imagem 3 %32
    • This step shows a laptop that didn't come with a WWAN card. If yours has one, disconnect and remove it now.

    • Lift the antenna cables out from their cable routing on the I/O board and move them away from the board.

  15. Dell Latitude 7410 Display Assembly Replacement, Remove the display cable bracket: passo 15, imagem 1 %32 Dell Latitude 7410 Display Assembly Replacement, Remove the display cable bracket: passo 15, imagem 2 %32 Dell Latitude 7410 Display Assembly Replacement, Remove the display cable bracket: passo 15, imagem 3 %32
    • Use your Phillips screwdriver to remove the two 2.7 mm screws securing the display cable bracket.

  16. Dell Latitude 7410 Display Assembly Replacement, Disconnect the display assembly: passo 16, imagem 1 %32 Dell Latitude 7410 Display Assembly Replacement, Disconnect the display assembly: passo 16, imagem 2 %32
    Ferramenta utilizada nesse passo:
    Tweezers
    $4.99
    Comprar
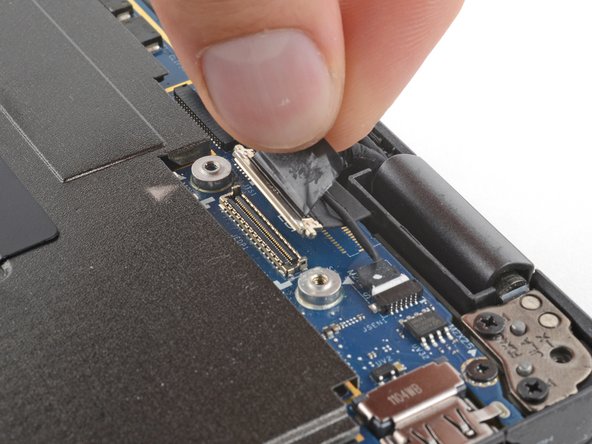
    • Use tweezers or your fingers to disconnect the leftmost wide connector by pulling it straight out of its socket.

  17. Dell Latitude 7410 Display Assembly Replacement: passo 17, imagem 1 %32 Dell Latitude 7410 Display Assembly Replacement: passo 17, imagem 2 %32
    • Use tweezers or your fingers to disconnect the narrow connector, just to the right of the previous connector, by pulling it straight out of its socket.

  18. Dell Latitude 7410 Display Assembly Replacement: passo 18, imagem 1 %32 Dell Latitude 7410 Display Assembly Replacement: passo 18, imagem 2 %32
    • Use your fingers to grab the display connector pull tab and pull straight up to disconnect the display.

    • During reassembly, reconnect this cable before the two leftmost connectors.

  19. Dell Latitude 7410 Display Assembly Replacement: passo 19, imagem 1 %32 Dell Latitude 7410 Display Assembly Replacement: passo 19, imagem 2 %32
    • Use tweezers or your fingers to disconnect the camera connector by pulling it straight out of its socket.

  20. Dell Latitude 7410 Display Assembly Replacement, Open the laptop: passo 20, imagem 1 %32 Dell Latitude 7410 Display Assembly Replacement, Open the laptop: passo 20, imagem 2 %32
    • Grab the body of the laptop and open it 90 degrees.

  21. Dell Latitude 7410 Display Assembly Replacement, Lay the laptop down: passo 21, imagem 1 %32
    • Lay the laptop keyboard-side-down over the edge of a table with the display hanging below.

  22. Dell Latitude 7410 Display Assembly Replacement, Unfasten the hinges: passo 22, imagem 1 %32 Dell Latitude 7410 Display Assembly Replacement, Unfasten the hinges: passo 22, imagem 2 %32
    • Use your Phillips screwdriver to remove the four 5.7 mm screws securing the hinges—two on each hinge.

  23. Dell Latitude 7410 Display Assembly Replacement, Remove the display assembly: passo 23, imagem 1 %32 Dell Latitude 7410 Display Assembly Replacement, Remove the display assembly: passo 23, imagem 2 %32
    • Be careful not to catch on any cables hanging off the display assembly.

    • Grab the display near the hinges and lift it straight up to free the hinges from the frame.

    • Remove the display assembly.

Conclusão

To reassemble your device, follow these instructions in reverse order.

Take your e-waste to an R2 or e-Stewards certified recycler.

Repair didn’t go as planned? Try some basic troubleshooting, or ask our Answers community for help.

Uma outra pessoa concluiu este guia.

Clay Eickemeyer

Membro desde: 09/19/22

66.989 Reputação

Autoria de 453 guias

Equipe

iFixit Membro de iFixit

Staff

Membros da 136

Autoria de 17.299 guias

Um comentário

This guide is brilliant. It's the first time I've attempted a lid swap and it was so straightforward thanks to this tutorial. The laptop which received the replacement screen is up and running. Thank you :)

Stevie B - Responder

Adicione um comentário

Exibir estatísticas:

Últimas 24 horas: 3

Últimos 7 dias: 18

Últimos 30 dias: 63

Duração total: 335