Ir para o conteúdo principal

Cricut Maker 3 Blade Replacement

  1. Cricut Maker 3 Blade Replacement, Prepare your Cricut for disassembly: passo 1, imagem 1 %32 Cricut Maker 3 Blade Replacement, Prepare your Cricut for disassembly: passo 1, imagem 2 %32 Cricut Maker 3 Blade Replacement, Prepare your Cricut for disassembly: passo 1, imagem 3 %32
    • Be very careful not to cut yourself when working near the Cricut's small, sharp blade, located in the tool holder within the Cricut.

    • Power off the Cricut and unplug all cables.

  2. Cricut Maker 3 Blade Replacement, Open the Cricut: passo 2, imagem 1 %32 Cricut Maker 3 Blade Replacement, Open the Cricut: passo 2, imagem 2 %32
    • Open the Cricut by lifting the top silver lid. The front tray will also open.

  3. Cricut Maker 3 Blade Replacement, Open the clamp: passo 3, imagem 1 %32 Cricut Maker 3 Blade Replacement, Open the clamp: passo 3, imagem 2 %32
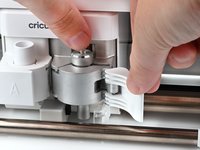
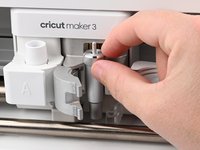
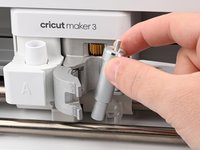
    • Partially open clamp B on the tool holder by pulling the plastic latch away from the tool holder.

  4. Cricut Maker 3 Blade Replacement: passo 4, imagem 1 %32 Cricut Maker 3 Blade Replacement: passo 4, imagem 2 %32
    • While holding the blade housing in the tool holder, fully open clamp B by pulling the plastic latch to the right.

  5. Cricut Maker 3 Blade Replacement, Remove the blade housing: passo 5, imagem 1 %32 Cricut Maker 3 Blade Replacement, Remove the blade housing: passo 5, imagem 2 %32
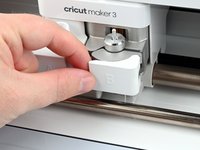
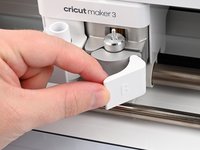
    • Grab the blade housing by the top and remove it from the tool holder.

  6. Cricut Maker 3 Blade Replacement, Remove the blade: passo 6, imagem 1 %32 Cricut Maker 3 Blade Replacement, Remove the blade: passo 6, imagem 2 %32
    • Be careful not to cut yourself while working near the small, sharp blade.

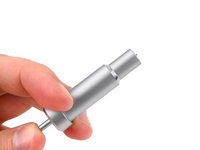
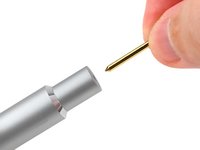
    • Hold the blade housing between your index finger and middle finger with the blade pointed away from your palm.

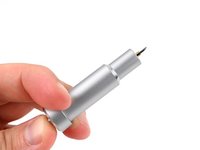
    • Use your thumb to press the plunger to push the blade out of the housing.

  7. Cricut Maker 3 Blade Replacement: passo 7, imagem 1 %32 Cricut Maker 3 Blade Replacement: passo 7, imagem 2 %32
    • Firmly grip the flat sides of the blade to avoid cutting yourself.

    • With the plunger still pressed, use your free hand to carefully grip the blade and pull it out of the housing to remove it.

    • The blade is held in with a magnet and should come out of the housing easily.

Conclusão

To reassemble your device, follow these instructions in reverse order.

Repair didn’t go as planned? Try some basic troubleshooting, or ask our Answers community for help.

Spencer Pennington

Membro desde: 09/09/23

16.989 Reputação

Autoria de 113 guias

Equipe

iFixit Membro de iFixit

Staff

Membros da 118

Autoria de 19.450 guias

0 comentários

Adicione um comentário

Exibir estatísticas:

Últimas 24 horas: 1

Últimos 7 dias: 6

Últimos 30 dias: 12

Duração total: 67