Ir para o conteúdo principal
Creating a Buttonhole Using a Sewing Machine

Creating a Buttonhole Using a Sewing Machine

Brittany McCrigler

Brittany McCrigler e 3 outros colaboradores

Última atualização em August 1, 2017

15 minutos
Moderado
Patagonia

Introdução

Ir para o passo 1

Use this guide to create a buttonhole with your sewing machine. We’re using a Bernina 830, but the process should be similar for all sewing machines with a mechanical buttonhole dial. Since every sewing machine is different, refer to your sewing machine’s owner’s manual for specific information. In this guide we’re using contrasting thread for visibility. When it comes time for your actual project, you’ll want to use thread that matches the color of your fabric.

  1. Creating a Buttonhole Using a Sewing Machine, Creating a Buttonhole Using a Sewing Machine: passo 1, imagem 1 %32 Creating a Buttonhole Using a Sewing Machine, Creating a Buttonhole Using a Sewing Machine: passo 1, imagem 2 %32
    • Select your buttonhole foot. Buttonhole feet can vary in appearance, so check you manual.

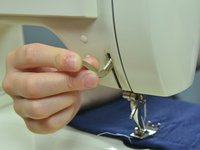
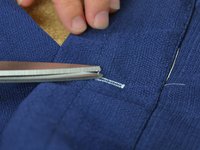
    • Thread the buttonhole foot by sliding the thread through the diagonal slit into the center hole.

  2. Creating a Buttonhole Using a Sewing Machine: passo 2, imagem 1 %32 Creating a Buttonhole Using a Sewing Machine: passo 2, imagem 2 %32
    • Mark where you would like the top and bottom of the buttonhole to be with tailor's chalk.

    • You can measure your button if you aren't sure.

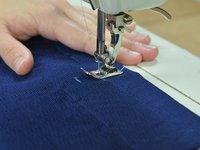
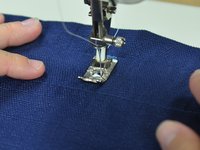
    • Align the sewing machine at the upper left corner of the buttonhole.

  3. Creating a Buttonhole Using a Sewing Machine: passo 3, imagem 1 %32 Creating a Buttonhole Using a Sewing Machine: passo 3, imagem 2 %32
  4. Creating a Buttonhole Using a Sewing Machine: passo 4, imagem 1 %32 Creating a Buttonhole Using a Sewing Machine: passo 4, imagem 2 %32
    • Set your stitch length dial to nearly zero, this will create a satin stitch. The usual stitch length is around the 2.5.

  5. Creating a Buttonhole Using a Sewing Machine: passo 5, imagem 1 %32 Creating a Buttonhole Using a Sewing Machine: passo 5, imagem 2 %32 Creating a Buttonhole Using a Sewing Machine: passo 5, imagem 3 %32
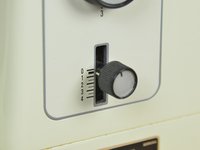
    • Set your button hole dial to one. If you have an electronic sewing machine, refer to your manual.

    • Every time you adjust this dial, your needle will move. That's okay; it's supposed to do that.

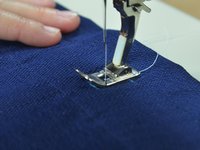
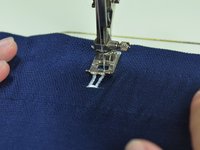
    • Start sewing. Sew to your second line.

  6. Creating a Buttonhole Using a Sewing Machine: passo 6, imagem 1 %32 Creating a Buttonhole Using a Sewing Machine: passo 6, imagem 2 %32
    • Set your button hole dial to two.

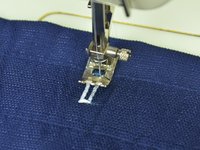
    • Sew the bar tack at the bottom of the buttonhole.

    • Setting the button hole dial to two tells your sewing machine what to do, all you need to do is sew a few stitches to create the bar tack.

  7. Creating a Buttonhole Using a Sewing Machine: passo 7, imagem 1 %32 Creating a Buttonhole Using a Sewing Machine: passo 7, imagem 2 %32
    • Set your buttonhole dial to three.

    • Sew up the second side of your buttonhole, stopping at your top mark.

  8. Creating a Buttonhole Using a Sewing Machine: passo 8, imagem 1 %32 Creating a Buttonhole Using a Sewing Machine: passo 8, imagem 2 %32
    • Set your buttonhole dial to four.

    • Sew the top bar tack at the top of the buttonhole.

  9. Creating a Buttonhole Using a Sewing Machine: passo 9, imagem 1 %32 Creating a Buttonhole Using a Sewing Machine: passo 9, imagem 2 %32
    • Set your buttonhole dial to five.

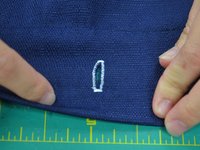
    • This setting backstitches to hold the thread in place. Sew a few more stitches, which will finish the buttonhole.

  10. Creating a Buttonhole Using a Sewing Machine: passo 10, imagem 1 %32 Creating a Buttonhole Using a Sewing Machine: passo 10, imagem 2 %32
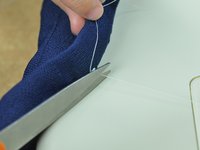
    • Clip the threads, freeing the fabric from the machine.

    • Clip any extra loose threads.

  11. Creating a Buttonhole Using a Sewing Machine: passo 11, imagem 1 %32 Creating a Buttonhole Using a Sewing Machine: passo 11, imagem 2 %32
    • Use a hobby knife to cut open the buttonhole.

    • Be careful not to cut through the stitching, you only want to cut the fabric between the rows of stitching.

Linha de Chegada

5 outras pessoas executaram este guia.

Brittany McCrigler

Membro desde: 03/05/12

89.965 Reputação

Autoria de 142 guias

Equipe

iFixit Membro de iFixit

Staff

121 Membros

Autoria de 19.716 guias

2Comentários do guia

I got up to position (!) 2 ok, then when I tried to go back up on position 3 it didn't work and just chewed up my fabric. Is it supposed to go backwards, or are you supposed to turn the fabric around? Did I do something wrong?

Holly - Responder

The same thing happened to me when I first tried this too, Holly.

I discovered that I was over-stitching position 2.

Now, I do a maximum 3 stitches only, before I go on to position 3 and everything works beautifully. I don’t have to turn the fabric around - position 3 stitches in reverse, and I finish off with a couple of stitches in position 2, to top off the button-hole.

I hope this helps!

Roszarie - Responder

Comentar

Visualizações:

Últimas 24 horas: 3

Últimos 7 dias: 55

Últimos 30 dias: 158

Ao todo: 28,198