Ir para o conteúdo principal

Cleaning Function Buttons

O que você precisa

  1. Cleaning Function Buttons, Front and Rear Cover: passo 1, imagem 1 %32 Cleaning Function Buttons, Front and Rear Cover: passo 1, imagem 2 %32
    • Remove wrist strap and battery.

  2. Cleaning Function Buttons: passo 2, imagem 1 %32 Cleaning Function Buttons: passo 2, imagem 2 %32 Cleaning Function Buttons: passo 2, imagem 3 %32
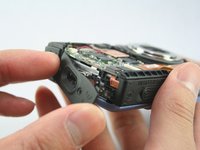
    • Remove 2 screws from each side of the camera (4 total, 0.102 in).

    • Remove 2 screws from the bottom on the camera (0.138 in).

    • Do not mix the 4 side screws with the 2 bottoms ones; they are different sizes.

  3. Cleaning Function Buttons: passo 3, imagem 1 %32 Cleaning Function Buttons: passo 3, imagem 2 %32 Cleaning Function Buttons: passo 3, imagem 3 %32
    • Gently pull off the front cover.

    • The plate on the side should come off.

    • Gently pull off the back cover.

  4. Cleaning Function Buttons: passo 4, imagem 1 %32
    • The cases should now be removed.

  5. Cleaning Function Buttons, Cleaning Function Buttons: passo 5, imagem 1 %32
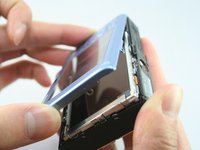
    • Clean around the function buttons with a cotton swab dipped in isopropyl alcohol.

Conclusão

To reassemble your device, follow these instructions in reverse order.

Uma outra pessoa concluiu este guia.

Tyler Grossheim

Membro desde: 01/25/11

1.470 Reputação

Autoria de 6 guias

Equipe

Cal Poly, Team 3-32, Regan Winter 2011 Membro de Cal Poly, Team 3-32, Regan Winter 2011

CPSU-REGAN-W11S3G32

Membros da 3

Autoria de 8 guias

0 comentários

Adicione um comentário

Exibir estatísticas:

Últimas 24 horas: 0

Últimos 7 dias: 0

Últimos 30 dias: 2

Duração total: 1,952