Ir para o conteúdo principal

Capresso Perfectea 260 Handle Replacement

O que você precisa

  1. Capresso Perfectea 260 Handle Replacement, Lid: passo 1, imagem 1 %32
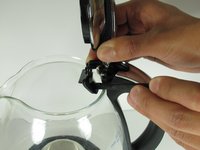
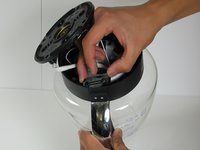
    • Lift the lid of the Perfectea

    • Remove the two 12mm Phillips #2 screws located at the brim of the pot.

  2. Capresso Perfectea 260 Handle Replacement: passo 2, imagem 1 %32 Capresso Perfectea 260 Handle Replacement: passo 2, imagem 2 %32 Capresso Perfectea 260 Handle Replacement: passo 2, imagem 3 %32
    • Adhesive tape is left holding the lid to the glass pot.

    • Use the spudger for this step.

    • With one hand, firmly grip the lid while designating your other hand to wedge the spudger between the lid and the glass pot.

    • Working from the outside to the inside, gently pry the adhesive tape from the glass pot, detaching the lid.

  3. Capresso Perfectea 260 Handle Replacement, Handle: passo 3, imagem 1 %32 Capresso Perfectea 260 Handle Replacement, Handle: passo 3, imagem 2 %32 Capresso Perfectea 260 Handle Replacement, Handle: passo 3, imagem 3 %32
    • Use the plastic opening tool for this step.

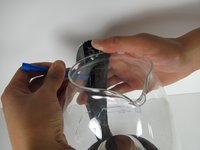
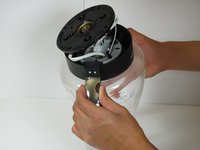
    • Firmly grip the glass pot with one hand while using the other to slip the flat end of the plastic opening tool between the glass pot and the adhesive tape holding the handle to the glass pot.

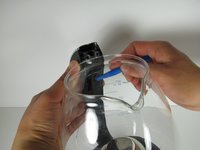
    • Gently pry the adhesive tape from the glass pot. Work your way around the handle until the handle is loose and not attached to the pot anymore.

  4. Capresso Perfectea 260 Handle Replacement: passo 4, imagem 1 %32
    • Once the handle is loose, locate the four 10 mm Phillips #2 screws from the base of the Perfectea and remove them.

    • Remove the base.

  5. Capresso Perfectea 260 Handle Replacement: passo 5, imagem 1 %32
    • Locate the two 10 mm Phillips #2 screws at the bottom of the handle and remove them.

  6. Capresso Perfectea 260 Handle Replacement: passo 6, imagem 1 %32 Capresso Perfectea 260 Handle Replacement: passo 6, imagem 2 %32
    • In order to free the bottom of the handle, remove the plastic piece that was held by the two screws

    • While firmly holding the glass pot, gently slide the bottom of the handle up and out of the base of the pot.

Conclusão

To reassemble your device, follow these instructions in reverse order.

Uma outra pessoa concluiu este guia.

Kenji Anzai

Membro desde: 04/14/15

588 Reputação

Autoria de 4 guias

Equipe

Cal Poly, Team 6-17, Maness Spring 2015 Membro de Cal Poly, Team 6-17, Maness Spring 2015

CPSU-MANESS-S15S6G17

Membros da 4

Autoria de 6 guias

Um comentário

This guide applies to the Capresso H2O kettle too. Thanks for the guide.

Giovanni Ciriani - Responder

Adicione um comentário

Exibir estatísticas:

Últimas 24 horas: 0

Últimos 7 dias: 3

Últimos 30 dias: 7

Duração total: 560