Ir para o conteúdo principal

Capresso Perfectea 260 Control System Replacement

O que você precisa

  1. Capresso Perfectea 260 Control System Replacement, Motherboard: passo 1, imagem 1 %32
    • First, take the base of the device and flip it over.

  2. Capresso Perfectea 260 Control System Replacement: passo 2, imagem 1 %32 Capresso Perfectea 260 Control System Replacement: passo 2, imagem 2 %32
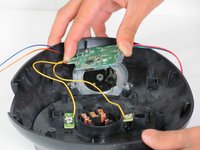
    • Remove the four 12 mm Phillips #2 screws surrounding the base then lift the bottom half of the base to expose the circuit boards inside the device.

  3. Capresso Perfectea 260 Control System Replacement: passo 3, imagem 1 %32
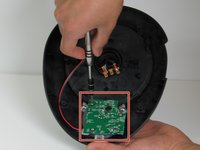
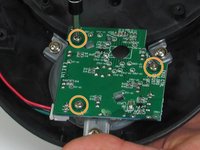
    • Remove the two 7.5 mm Phillips #2 screws holding in the motherboard

  4. Capresso Perfectea 260 Control System Replacement: passo 4, imagem 1 %32
    • Unplug the wire going into the side of the motherboard

  5. Capresso Perfectea 260 Control System Replacement: passo 5, imagem 1 %32 Capresso Perfectea 260 Control System Replacement: passo 5, imagem 2 %32
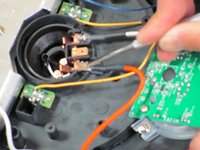
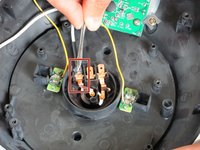
    • Use the metal spudger to cut open the rubber covering the latch where it clamps onto the copper tab.

    • Unplug wire at heating element by first using the metal spudger to push the latch in and then pushing it out.

    • Be careful when unplugging the wire as if it is done too forcefully it can damage the connection and make it difficult to connect a new motherboard

  6. Capresso Perfectea 260 Control System Replacement: passo 6, imagem 1 %32
    • Lift the motherboard out of the device

  7. Capresso Perfectea 260 Control System Replacement, Control System: passo 7, imagem 1 %32 Capresso Perfectea 260 Control System Replacement, Control System: passo 7, imagem 2 %32
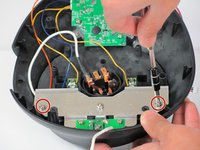
    • Remove the two 7.5mm Phillips #2 screws from the metal frame.

    • Remove the frame from the assembly.

  8. Capresso Perfectea 260 Control System Replacement: passo 8, imagem 1 %32 Capresso Perfectea 260 Control System Replacement: passo 8, imagem 2 %32 Capresso Perfectea 260 Control System Replacement: passo 8, imagem 3 %32
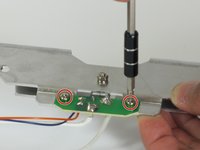
    • Remove the two 6mm fine thread Phillips #2 screws attaching the small computer chip to the metal frame.

    • Flip over and remove the 7.5 mm fine thread Phillips #2 screw from the back while holding the 5mm nut on the front securely.

  9. Capresso Perfectea 260 Control System Replacement: passo 9, imagem 1 %32 Capresso Perfectea 260 Control System Replacement: passo 9, imagem 2 %32 Capresso Perfectea 260 Control System Replacement: passo 9, imagem 3 %32
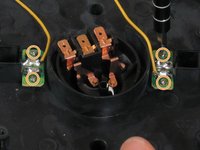
    • Find the cable that attaches the small computer chip to the heating element connections.

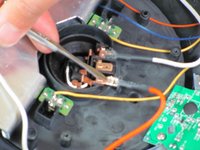
    • Use the spudger to cut open the rubber coating on the latch where it clamps onto the copper tab.

    • Insert the metal spudger into the rectangular hole on the latch and push toward the tab (away from the wire) to unbend the tab.

    • Push the latch off the tab with the spudger.

    • The tab will come loose suddenly. Make sure that you apply force in a controlled manner to avoid injuring yourself or damaging the other components.

  10. Capresso Perfectea 260 Control System Replacement: passo 10, imagem 1 %32 Capresso Perfectea 260 Control System Replacement: passo 10, imagem 2 %32 Capresso Perfectea 260 Control System Replacement: passo 10, imagem 3 %32
    • Identify the two computer chips that connect the two yellow wires to the temperature controls.

    • Remove the four 5 mm Phillips #1 screws.

    • Remove the two computer chips from their places.

    • The two computer chips are held in place by plastic interference pins. Wiggle the board free of these pins to remove.

  11. Capresso Perfectea 260 Control System Replacement: passo 11, imagem 1 %32 Capresso Perfectea 260 Control System Replacement: passo 11, imagem 2 %32 Capresso Perfectea 260 Control System Replacement: passo 11, imagem 3 %32
    • Find the computer chip over the dial.

    • Remove the three 6mm Phillips #2 screws.

    • Remove the computer chip.

    • Remember the orientation of the computer chip on the dial and which peg goes into which hole.

    • Keep the plastic frame on the bottom of the chip attached.

  12. Capresso Perfectea 260 Control System Replacement: passo 12, imagem 1 %32
    • Unplug the four cables on the left side of the chip.

    • Remember which cable goes to which plug.

Conclusão

To reassemble your device, follow these instructions in reverse order.

Uma outra pessoa concluiu este guia.

Kenji Anzai

Membro desde: 04/14/15

588 Reputação

Autoria de 4 guias

Equipe

Cal Poly, Team 6-17, Maness Spring 2015 Membro de Cal Poly, Team 6-17, Maness Spring 2015

CPSU-MANESS-S15S6G17

Membros da 4

Autoria de 6 guias

0 comentários

Adicione um comentário

Exibir estatísticas:

Últimas 24 horas: 1

Últimos 7 dias: 3

Últimos 30 dias: 9

Duração total: 2,203