Introdução
This guide requires you to use a Phillips head screwdriver to remove the screws around the lens.
O que você precisa
-
-
First, remove the batteries and memory card.
-
Remove the 5.0 mm black screw with a Phillips #00 screwdriver.
-
Remove the 5.0 mm silver screw with a Phillips #00 screwdriver.
 Pergunte ao FixBot
-
-
-
Remove the 5.0 mm black screw on the right with a Phillips #00 screwdriver.
-
-
-
Remove the 5.0 mm screw on the left with a Phillips #00 screwdriver.
-
-
-
Begin taking off the back cover with a plastic opening tool.
-
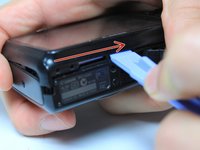
Begin by wedging the plastic opening tool behind the bottom left corner of the LCD screen as shown.
-
Slide the plastic opening tool to the right, along the mating edge, to pry off the back cover.
-
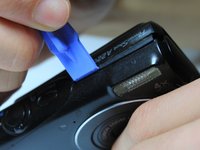
Continue taking off the back cover along the left side of the camera as seen in the third picture.
-
-
-
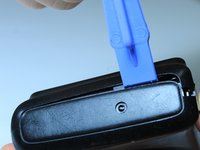
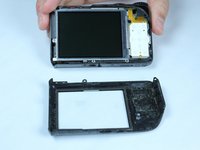
Use the plastic opening tool to separate the top section of the back cover from the frame.
-
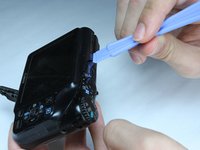
Once there is enough separation between the back cover and the frame, remove the back cover for replacement.
-
-
-
Remove the internal 4.4mm screw with a Phillips 00 screwdriver.
-
-
-
-
Gently lift of the buttons for replacement. They should come off without excessive force.
-
If the buttons do not lift off easily, you may have unscrewed the wrong screw. Revert to previous step.
-
-
-
Lift up the electrical ribbon shown to access the next screw.
-
Remove the 3.9 mm screw with a Phillips #00 screwdriver.
-
-
-
Remove the two 3.9 mm screws shown with a Phillips #00 screwdriver.
-
-
-
There is an electrical flap that holds the LCD ribbon down. Note the flap in is closed position.
-
Lift up the flap with a plastic opening tool.
-
-
-
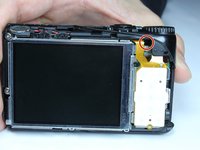
Holding the outer frame of the LCD screen, gently lift the LCD screen for replacement.
-
-
-
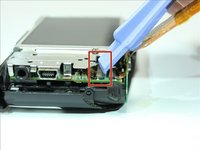
Locate ribbon flap, enclosed in red. (picture 1)
-
Using a plastic opening tool, lift up the ribbon flap to allow insertion of the LCD ribbon. (picture 2)
-
Place the LCD screen on the camera and align the ribbon underneath the open ribbon flap. Close the ribbon flap onto the ribbon. (picture 3)
-
-
-
Remove the two 5.3 mm screws circled in red with a Phillips #00 screwdriver.
-
Remove the 4.4 mm screw circled in orange with a Phillips #00 screwdriver.
-
-
-
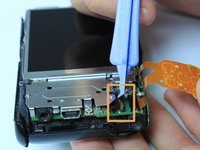
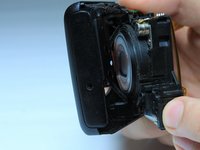
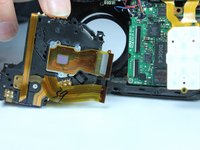
Gently press the front of the lens to begin to remove it from the frame.
-
Gently angle out the lens from the frame as seen in picture 2.
-
-
-
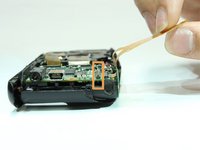
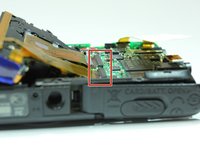
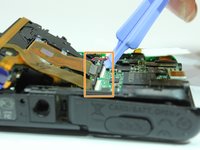
Locate the two electrical ribbons that are attached to the main motherboard.
-
Lift up the two black flaps on the motherboard that hold the electrical ribbons in place.
-
Gently remove the lens for replacement.
-


To reassemble your device, follow these instructions in reverse order.
Cancelar: não concluí este guia.
Uma outra pessoa concluiu este guia.

Equipe

Baylor, Team 4-5, Williams Spring 2015 Membro de Baylor, Team 4-5, Williams Spring 2015
BU-WILLIAMS-S15S4G5
4 Membros
Autoria de 13 guias
3Comentários do guia
Great guide, used it to tear down my A2200. Found an internal battery:MS6145E located on the top ICB (where the flash is,) does anyone know what this does/powers?
My camera, according to Canon USA has a bad sensor(?) because the display fails after taking one photo, but they did not say what sensor or its location. I tore it down looking for sensors and found one for the flash/redeye and a questionable object (I don’t think it’s a sensor.)
If the issue persists, you need to go ahead and update your printer driver. Go to the website of the manufacturer and search for your Canon Printer Error State drivers. Download the driver's recent version manually.
Thanks to your brilliant guide I can remove the lens of my A2200 camera and am in a position to insert a replacement. Please where do I get one from?