Ir para o conteúdo principal
Participe da comunidade de reparos - Criar conta

Canon EOS A2 LCD Screen Plastic Cover Replacement

O que você precisa

    1. Canon EOS A2 LCD Screen Plastic Cover Replacement, Battery: passo 1, imagem 1 %32
      • Locate the battery door/camera grip on the left side of the camera and lift the rotating removal tab.

      Pergunte ao FixBot

      Comentar

    2. Canon EOS A2 LCD Screen Plastic Cover Replacement: passo 2, imagem 1 %32
      • Twist the tab clockwise to unlock the door, then pull outward from the camera to remove it.

      Pergunte ao FixBot

      Comentar

    3. Canon EOS A2 LCD Screen Plastic Cover Replacement: passo 3, imagem 1 %32
      • Remove the battery from inside the battery housing and set the cover aside.

      Pergunte ao FixBot

      Comentar

    1. Canon EOS A2 LCD Screen Plastic Cover Replacement, Front Cover: passo 4, imagem 1 %32
      • Remove the two 6.4mm screws above the lens aperture using a phillips #00 screw driver.

      Pergunte ao FixBot

      Comentar

    2. Canon EOS A2 LCD Screen Plastic Cover Replacement: passo 5, imagem 1 %32
      • Remove the 6.4mm screw from the inside of the flash bezel.

      • If the flash is locked down, insert the battery, then with the help of a pencil turn the rotary (CW or CCW) switch until the "125" is displayed in the LCD. Press the Flash symbol button. You should hear the latch from the flash, then you can manually lift the flash. If OK, then remove the battery from the camera

      Pergunte ao FixBot

      Comentar

    3. Canon EOS A2 LCD Screen Plastic Cover Replacement: passo 6, imagem 1 %32
      • Flip the camera upside down and remove the 5.4mm screw below the lens bezel on the front of the camera.

      Pergunte ao FixBot

      Comentar

    4. Canon EOS A2 LCD Screen Plastic Cover Replacement: passo 7, imagem 1 %32
      • Remove the 5.6mm screws behind the battery cover.

      Pergunte ao FixBot

      Comentar

    5. Canon EOS A2 LCD Screen Plastic Cover Replacement: passo 8, imagem 1 %32
      • Remove two 6.4mm screws on the latch mechanism on the right side of the camera.

      Pergunte ao FixBot

      Comentar

    6. Canon EOS A2 LCD Screen Plastic Cover Replacement: passo 9, imagem 1 %32
      • Remove the 6.4mm screw on the top of the inside edge of the battery hole.

      Pergunte ao FixBot

      Comentar

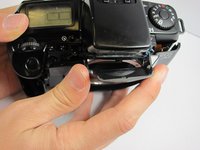
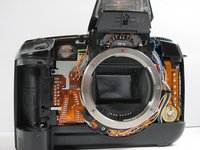
    7. Canon EOS A2 LCD Screen Plastic Cover Replacement: passo 10, imagem 1 %32 Canon EOS A2 LCD Screen Plastic Cover Replacement: passo 10, imagem 2 %32
      • Starting at the flash, carefully pull the front cover away from the camera.

      Pergunte ao FixBot

      Comentar

    1. Canon EOS A2 LCD Screen Plastic Cover Replacement, Top Cover: passo 11, imagem 1 %32
      • Remove the 4.3mm screw below the camera strap ring.

      Pergunte ao FixBot

      Comentar

    2. Canon EOS A2 LCD Screen Plastic Cover Replacement: passo 12, imagem 1 %32
      • Remove two 4.8mm screws located on both sides of the eyepiece.

      Pergunte ao FixBot

      Comentar

    3. Canon EOS A2 LCD Screen Plastic Cover Replacement: passo 13, imagem 1 %32
      • Pull the top cover up slowly.

      • A ribbon cable is attached to the bottom of the top cover and the camera. Pull up very carefully to avoid damaging this.

      Pergunte ao FixBot

      Comentar

    4. Canon EOS A2 LCD Screen Plastic Cover Replacement: passo 14, imagem 1 %32
      • Once you have revealed the ribbon cable, gently let the top cover hang off the front of the camera. Use the plastic opening tool to gently pull the white tabs on the ribbon cable, releasing the ribbon cable.

      • If you pull the white tabs all the way out, just insert them back in to avoid losing them.

      Pergunte ao FixBot

      Comentar

    1. Canon EOS A2 LCD Screen Plastic Cover Replacement, LCD Screen Plastic Cover: passo 15, imagem 1 %32
      • Use a soft cloth to push up on the LCD plastic protector from underneath the top of the camera.

      Pergunte ao FixBot

      Comentar

    2. Canon EOS A2 LCD Screen Plastic Cover Replacement: passo 16, imagem 1 %32
      • Once the LCD protector has been broken free, lift up on the side adjacent to the flash and pull out the plastic protector. You may now install the new plastic cover.

      Pergunte ao FixBot

      Comentar

Conclusão

To reassemble your device, follow these instructions in reverse order.

Cancelar: não concluí este guia.

Mark

Membro desde: 04/20/11

197 Reputação

Autoria de 5 guias

Equipe

Cal Poly, Team 8-9, Regan Spring 2011 Membro de Cal Poly, Team 8-9, Regan Spring 2011

CPSU-REGAN-S11S8G9

4 Membros

Autoria de 25 guias

0Comentários do guia

Comentar

Visualizações:

Últimas 24 horas: 3

Últimos 7 dias: 15

Últimos 30 dias: 63

Ao todo: 4,037