Ir para o conteúdo principal
Participe da comunidade de reparos - Criar conta

Boosted Board 1st Generation Belts Replacement

O que você precisa

  1. Boosted Board 1st Generation Belts Replacement, Rear Wheels: passo 1, imagem 1 %32 Boosted Board 1st Generation Belts Replacement, Rear Wheels: passo 1, imagem 2 %32
    • Loosen the two 16.74 mm motor mount hex nut screws with a 9/64" Allen wrench.

    • Do Not Remove the Screws.

    Pergunte ao FixBot

    Comentar

  2. Boosted Board 1st Generation Belts Replacement: passo 2, imagem 1 %32
    • Compress the motor mount back towards the wheel.

    • While keeping the motor mount compressed, tighten one of the hex nuts that you loosened in the previous step.

    • The motor mounts are spring tensioned so it is necessary compress them to loosen the belts.

    Pergunte ao FixBot

    Comentar

  3. Boosted Board 1st Generation Belts Replacement: passo 3, imagem 1 %32 Boosted Board 1st Generation Belts Replacement: passo 3, imagem 2 %32
    • Remove the axel nut with a 1/2" socket wrench

    Pergunte ao FixBot

    Comentar

  4. Boosted Board 1st Generation Belts Replacement: passo 4, imagem 1 %32 Boosted Board 1st Generation Belts Replacement: passo 4, imagem 2 %32 Boosted Board 1st Generation Belts Replacement: passo 4, imagem 3 %32
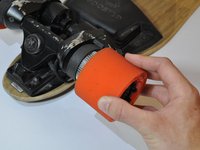
    • Rotate and pull counterclockwise until the wheel comes off the axle completely.

    • The front washer will come off with the wheel.

    • Remove the back washer from the axle.

    • Replacing the wheel requires the bearings to be switched into the new wheel.

    Pergunte ao FixBot

    Comentar

  5. Boosted Board 1st Generation Belts Replacement, Belts: passo 5, imagem 1 %32 Boosted Board 1st Generation Belts Replacement, Belts: passo 5, imagem 2 %32 Boosted Board 1st Generation Belts Replacement, Belts: passo 5, imagem 3 %32
    • Compress the motor mount back .

    • Slide the belt off the axle

    Pergunte ao FixBot

    Comentar

  6. Boosted Board 1st Generation Belts Replacement: passo 6, imagem 1 %32
    • Remove the two hex screws.

    • Remove the front hex screw.

    • When removing the Front hex screw, hold the motor mount and the truck together.

    • The springs inside the motor mount will push the motor out of the casing if they are not held together.

    Pergunte ao FixBot

    Comentar

  7. Boosted Board 1st Generation Belts Replacement: passo 7, imagem 1 %32 Boosted Board 1st Generation Belts Replacement: passo 7, imagem 2 %32 Boosted Board 1st Generation Belts Replacement: passo 7, imagem 3 %32
    • Making sure to hold the motor and truck together, lift off the belt casing and take off the belt.

    • Do Not let go of the motor and truck until the new belt is on and the Front hex screw is tightened securely.

    • The springs inside the motor mount will push the motor out of the casing if they are not held together.

    Pergunte ao FixBot

    Comentar

Conclusão

To reassemble your device, follow these instructions in reverse order.

Cancelar: não concluí este guia.

4 outras pessoas executaram este guia.

Emily Imfeld

Membro desde: 10/06/16

532 Reputação

Autoria de 4 guias

Equipe

Cal Poly, Team 15-7, Livingston Fall 2016 Membro de Cal Poly, Team 15-7, Livingston Fall 2016

CPSU-LIVINGSTON-F16S15G7

4 Membros

Autoria de 6 guias

0Comentários do guia

Comentar

Visualizações:

Últimas 24 horas: 4

Últimos 7 dias: 12

Últimos 30 dias: 40

Ao todo: 2,043