Ir para o conteúdo principal
Participe da comunidade de reparos - Criar conta

Asus X55C CPU Intel Replacement

O que você precisa

Vídeo de Apresentação

  1. Asus X55C CPU Intel Replacement, Keyboard: passo 1, imagem 1 %32
    • Switch off the laptop and remove the battery.

    Pergunte ao FixBot

    Comentar

  2. Asus X55C CPU Intel Replacement: passo 2, imagem 1 %32 Asus X55C CPU Intel Replacement: passo 2, imagem 2 %32 Asus X55C CPU Intel Replacement: passo 2, imagem 3 %32
    • The Keyboard is held by 5x locking clips.

    • Pick up a little the one side of the Keyboard and start opening the clips one by one.

    • Disconnect the Keyboard flex cable from the mother board and remove the KB.

    • Please SUBSCRIBE to my channel ツ

    Pergunte ao FixBot

    Comentar

  3. Asus X55C CPU Intel Replacement, Motherboard: passo 3, imagem 1 %32 Asus X55C CPU Intel Replacement, Motherboard: passo 3, imagem 2 %32
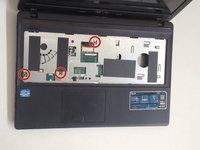
    • Remove 3x Philips screws.

    • Disconnect the two small flex cables:

    • Power On button flex cable

    • Touch pad flex cable

    Pergunte ao FixBot

    Comentar

  4. Asus X55C CPU Intel Replacement: passo 4, imagem 1 %32 Asus X55C CPU Intel Replacement: passo 4, imagem 2 %32 Asus X55C CPU Intel Replacement: passo 4, imagem 3 %32
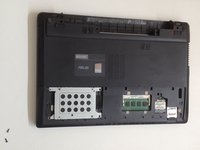
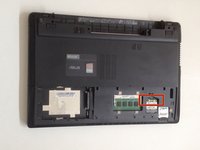
    • Unscrew the two Philips screws and remove the HDD / RAM Cover.

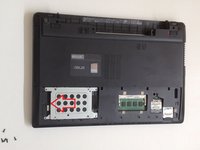
    • Remove three screws securing the hard drive caddy (hard drive assembly).

    • Slide the hard drive assembly to the left to disconnect it from the motherboard.

    Pergunte ao FixBot

    Comentar

  5. Asus X55C CPU Intel Replacement: passo 5, imagem 1 %32 Asus X55C CPU Intel Replacement: passo 5, imagem 2 %32
    • Disconnect the two coaxial antenna cables from the Wi-Fi card.

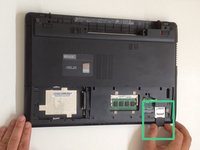
    • Remove any Memory or Dummy card.

    Pergunte ao FixBot

    Comentar

  6. Asus X55C CPU Intel Replacement: passo 6, imagem 1 %32 Asus X55C CPU Intel Replacement: passo 6, imagem 2 %32 Asus X55C CPU Intel Replacement: passo 6, imagem 3 %32
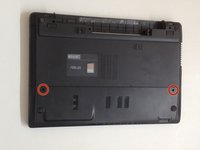
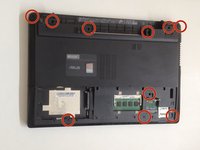
    • The bottom cover is held by 10x Phillips screws. Remove them.

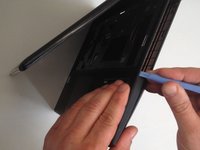
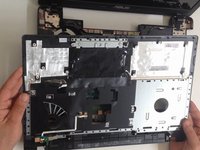
    • With a plastic tool separate the Upper cover and remove it.
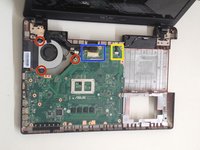
    Pergunte ao FixBot

    Comentar

  7. Asus X55C CPU Intel Replacement: passo 7, imagem 1 %32 Asus X55C CPU Intel Replacement: passo 7, imagem 2 %32 Asus X55C CPU Intel Replacement: passo 7, imagem 3 %32
    • Disconnect:

    • The Microphone cable

    • The LCD Display flex cable

    • Remove 3x Pillips screws.

    • Lift the board first from the right edge.

    • There is another one cable, from the DC connector, connected to the underside of main board. We should spun the the board to disconnect the DC connector cable.
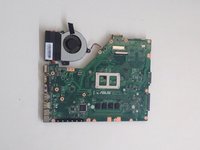
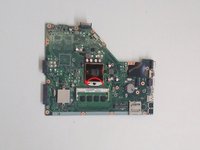
    Pergunte ao FixBot

    Comentar

  8. Asus X55C CPU Intel Replacement: passo 8, imagem 1 %32 Asus X55C CPU Intel Replacement: passo 8, imagem 2 %32
    Pergunte ao FixBot

    Comentar

  9. Asus X55C CPU Intel Replacement, CPU Intel: passo 9, imagem 1 %32 Asus X55C CPU Intel Replacement, CPU Intel: passo 9, imagem 2 %32 Asus X55C CPU Intel Replacement, CPU Intel: passo 9, imagem 3 %32
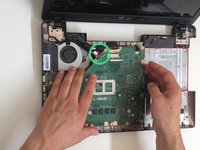
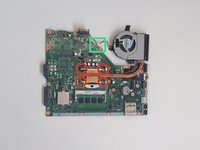
    • Disconnect the Fan cable from the Motherboard.

    • Remove the screws (4x Phillips screws) that hold the cooling system to the Motherboard

    • Remove the Cooling System.

    Pergunte ao FixBot

    Comentar

  10. Asus X55C CPU Intel Replacement: passo 10, imagem 1 %32 Asus X55C CPU Intel Replacement: passo 10, imagem 2 %32 Asus X55C CPU Intel Replacement: passo 10, imagem 3 %32
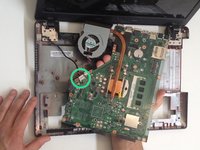
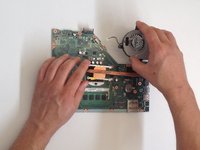
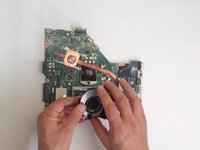
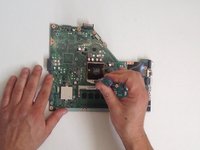
    • Counter clockwise release the screw securing the CPU using a flat head screwdriver.
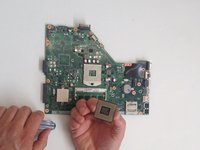
    • Guideline, lift with equal pressure on two sides of the processor chip to avoid bending any of the pins.

    • Intel Core i3-2370M

    • Before installing the new CPU, clean the Cooling system and put new thermal compound / paste.

    Pergunte ao FixBot

    Comentar

Conclusão

To reassemble your device, follow these instructions in reverse order.

Cancelar: não concluí este guia.

4 outras pessoas executaram este guia.

ZFix

Membro desde: 12/09/13

197.225 Reputação

Autoria de 330 guias

Equipe

Master Techs Membro de Master Techs

Community

333 Membros

Autoria de 1.496 guias

5Comentários do guia

In step 3 my computer had an extra screw for the DVD drive. So make sure your not trying to pry it open with the screw in like i did.

bill cool - Responder Compartilhar

Hi there!… I have an old Asus X550CL laptop with an I3 processor. So you know if it’s upgradeable to an I7?

Best Regards!

angelo.cesar79 - Responder Compartilhar

I’ve the same laptop. Were you able to upgrade it?

Manish - Responder Compartilhar

Hi, someone let me know if I can upgrade a Asus X55VD's processor from B980 to i7 2670QM.

Or what to take into account? Power usage? Should I only get an i5?

Thanks in advance

Robert Indries - Responder Compartilhar

Hi there what about the shutdown every 30min exactly

SAINTE-COLOMBE Vonjy - Responder Compartilhar

Comentar

Visualizações:

Últimas 24 horas: 3

Últimos 7 dias: 12

Últimos 30 dias: 60

Ao todo: 6,580