Ir para o conteúdo principal
Participe da comunidade de reparos - Criar conta

Archos 101 G9 Battery Replacement

O que você precisa

    1. Archos 101 G9 Battery Replacement, Display Assembly: passo 1, imagem 1 %32
      • Place an iFixit opening tool in the crease where the display assembly and back of the device meet.

      • Slide the tool firmly through the crease on one side of the device, twisting as you go to create separation.

      • When you reach the corner, carefully pry the two halves of the device apart.

      • There are small clips along the edges that need to stay intact in order to properly reassemble the device. Be very gentle when prying so as not to break the clips.

      • Repeat for the remaining three sides and corners.

      Pergunte ao FixBot

      Comentar

    2. Archos 101 G9 Battery Replacement: passo 2, imagem 1 %32 Archos 101 G9 Battery Replacement: passo 2, imagem 2 %32
      • Separate the halves of the device.

      • Ensure that you separate from the top and you keep the bottoms of both pieces near each other so as not to damage the ribbon cables that connect the halves.

      Pergunte ao FixBot

      Comentar

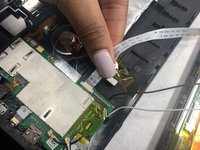
    3. Archos 101 G9 Battery Replacement: passo 3, imagem 1 %32 Archos 101 G9 Battery Replacement: passo 3, imagem 2 %32
      • Gently remove both ribbon cables from their sockets on the motherboard.

      Pergunte ao FixBot

      Comentar

    4. Archos 101 G9 Battery Replacement: passo 4, imagem 1 %32
      • Remove the white and black coaxial cables with gold tips from the motherboard.

      Pergunte ao FixBot

      Comentar

    5. Archos 101 G9 Battery Replacement: passo 5, imagem 1 %32
      • Remove the display assembly from the back panel.

      Pergunte ao FixBot

      Comentar

    1. Archos 101 G9 Battery Replacement, Battery: passo 6, imagem 1 %32
      • Remove the tape covering the solder connections on the motherboard.

      Pergunte ao FixBot

      Comentar

    2. Archos 101 G9 Battery Replacement: passo 7, imagem 1 %32
      • Desolder the BATT+ connection from the motherboard.

      • Desolder the BATT- connection from the motherboard.

      • Desolder the NTC+ connection from the motherboard.

      • Desolder the NTC- connection from the motherboard.

      • Proceed with caution when using the soldering iron. Try not to damage the connections on the motherboard.

      Pergunte ao FixBot

      Comentar

    3. Archos 101 G9 Battery Replacement: passo 8, imagem 1 %32
      • Remove the black tape from the top of each battery.

      Pergunte ao FixBot

      Comentar

    4. Archos 101 G9 Battery Replacement: passo 9, imagem 1 %32
      • Remove the yellow tape from the batteries.

      Pergunte ao FixBot

      Comentar

    5. Archos 101 G9 Battery Replacement: passo 10, imagem 1 %32
      • Gently pry the batteries away from the case using a nylon spudger.

      • Be very careful not to bend the batteries excessively while doing this.

      • Metal prying tools and other sharp objects may puncture the battery, potentially causing a fire. Always use plastic or nylon prying tools near the battery.

      Pergunte ao FixBot

      Comentar

Conclusão

To reassemble your device, follow these instructions in reverse order.

Cancelar: não concluí este guia.

Clay Meunier

Membro desde: 10/28/21

557 Reputação

Autoria de 4 guias

Equipe

UMass Dartmouth, Team 4-1, Gulbrandsen Fall 2021 Membro de UMass Dartmouth, Team 4-1, Gulbrandsen Fall 2021

UMASSD-GULBRANDSEN-F21S4G1

3 Membros

Autoria de 6 guias

0Comentários do guia

Comentar

Visualizações:

Últimas 24 horas: 0

Últimos 7 dias: 10

Últimos 30 dias: 38

Ao todo: 1,493