Essa tradução foi gerada por um programa e ainda não foi revisada por uma pessoa. Falas essa língua? Dá uma olhada.
Introdução
Use este guia para substituir o adesivo do seu Apple Watch Series 2 e selá-lo novamente. A resistência à água do Apple Watch pode não ser totalmente restaurada após este procedimento.
O que você precisa
-
-
Ferramenta utilizada neste passo:Adhesive Cleanup Kit (Set of 12)$7.99
-
Aplique um pouco de álcool isopropílico (>99%) em um cotonete ou use uma almofada de limpeza para remover suavemente os restos de adesivo sobre a junta de vedação do force touch.
 Pergunte ao FixBot
-
-
-
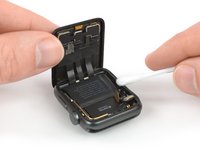
Vire o Apple Watch de cabeça para baixo de modo que a tela fique apoiada sobre uma superfície plana enquanto você levanta a caixa.
-
Remova os resíduos na parte de trás da tela.
-
-
-
Ferramenta utilizada neste passo:Tweezers$4.99
-
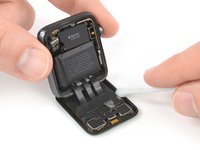
Use uma pinça para remover cuidadosamente o adesivo de substituição com a película protetora azul do papel de suporte.
-
-
-
Segure o adesivo para display na diagonal para passá-lo sobre o display.
-
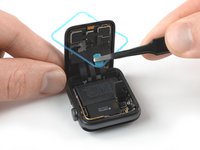
Incline o display levemente para frente para que você possa alinhar o adesivo com o quadro.
-
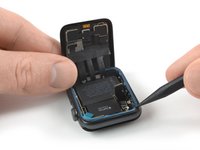
Posicione o adesivo para display sobre a junta de vedação do force touch e use a ponta da espátula para movê-lo e pressioná-lo no lugar.
-
-
-
Reconecte a bateria como mostrado no guia de substituição de onde você veio.
-
Remova a película protetora do adesivo.
-
-
-
Alinhe a tela e pressione-a firmemente sobre o adesivo para display.
-
-








Cancelar: não concluí este guia.
20 outras pessoas executaram este guia.


7Comentários do guia
Will the new adhesive be water proof?
or will the watch after replacement no longer be water proof?
The Apple Watch isn’t waterproof, but water resistant. After opening and resealing it there is no guaranty that the resistance is the same as before. More on that topic can also be read on Apples website (“Apple Watch can't be rechecked or resealed for water resistance.“). But when resealed properly (using heat and pressure without damaging the force touch gasket in the opening process and cleaning off old residue) there shouldn’t be any concern for a normal daily use like washing hands or taking a shower. It might even work for a swim in a pool or an ocean, but I wouldn’t count on that 50M ISO rating ;)
This one was a bugger! Dang…getting this over the display w/o sticking to everything is an exercise puzzle. The first one also didn't release correctly and I ended up installing just the blue adhesive backing…then realized that the adhesive was still on the other backing, which I then had to very carefully remove with a tweezers, then navigate the puzzle of an exercise getting it over the display and in to position. I did it, but as other commenters noted, it is not sealed anything like it originally was. In fact, it came up in a few days and I had to use the iRemover to heat it back up and press it back into place. I also use an iWatch bumper guard all the time now to protect it from popping off. For this older series 2 iWatch I’m ok.
Thank you iFixIt for top notch parts, instructions and tutorials. I’ve been an IT tech/specialist for many years, but still approach new repairs with caution, especially on Apple products, until I’ve done it at least once.
Yes, resealing the Apple Watch is a tough one. It is either disconnecting the display and go without the "exercise puzzle" but risk damaging cables and having to reconnect the display vs. keeping a steady hand and feeding the adhesive around the display.
I edited the guide to apply pressure on the closed watch for a longer time now. A few hours under some heavy books might do a better job.
Oh, and congrats on the repair.
Adhesive gasket/strip did not fit. It was slightly undersized :( I ended up cutting tiny strips to fill the gaps. :(
