
Why won’t my controller work with batteries but works with usb
Hello everyone
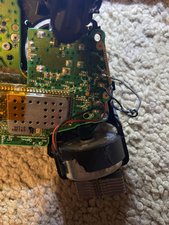
Earlier today I was attempting to do a shell replacement on one of these and I had thought everything was going well for it. All the buttons worked turns on well and I had forgotten to test the batteries. No problem I tried to plug batteries in and no luck. Plug the usb cable in with the batteries it turns on and unplugging the controller with the batteries in keeps it going until the battery is taken out. I took it apart again and tried looking for something that was incorrect. The only thing I found was a factory defect I think anyway of this square over by the where the dpad is located on the board there are two points that look bridged on it. Could this be my issue or am I looking completely in the wrong spot. My other concern was the battery not making contact properly but like I mentioned earlier it works after I jumpstart it with a usb cable so I don’t think it is that.


Any help is appreciated as always
Edit someone in the comments said it could be a good idea to post what we had done so I uploaded those. To my knowledge I don’t believe these solder points have anything to do with power but I could be wrong we just needed to replace that whole outer casing on the front because of missing triggers
Esta é uma boa pergunta?
3 comentários
I don't have an answer to your question, but that entire area you're pointing to on your microscope is a mounting point for a small microchip. Likely they use the same PCB for multiple different models of the controller, and that chip is only there on "Elite" models versus the standard model you have, or vice versa.
Either way: There never was anything there and never should have been, but those points being bridges do not matter in the slightest. That entire area in the copper with the 12 contacts is all ground. All 12 points are ground and they could all be bridged together and it would not affect anything, so long as they are not bridged to any of the 8 data/power contacts on the sides.
You are looking in the wrong place.
por Justin Castle
@erelectronics ah ok I wouldn’t think so that was just the only thing I could think of. Would you happen to know where I should consider starting to look?
por Jacob Ridlon
@ultraplankton I have no idea. If it worked before you messed with it, and not after, then the only suggestion I can give is double and triple check everything you did. If you *replaced* anything, and you still have the original, try swapping back to the original? (I am unsure if a "shell replacement" involves any circuitry or not on this controller model.) Maybe something newly installed has a strange short or something.
Sorry, can't really help beyond general suggestions. I only really knew that the thing you were pointing at was in no way a problem and was trying to save your time.
por Justin Castle