Ir para o conteúdo principal

How to extract PCB from chassis of Fluke VoltAlert 1AC-A II to make some resoldering?

1 Perguntas Visualizar todos

How to extract PCB from chassis of Fluke VoltAlert 1AC-A II?

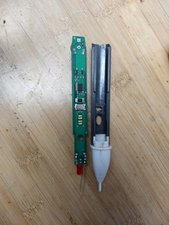
This is a Fluke VoltAlert 1AC-A II. I have to extract the PCB from the chassis of the same in order to re-heat some components. The circuit moves, but it stops even 1 mm. I tried to see where the block was, but I could not see it. Is there anyone who has already extracted the circuit and knows how?

The acid output from the batteries has corroded some welds that have to be redone, but to access them I have to be able to pull the printed circuit strip out of the wrapper that contains it. I need to know where to unlock to allow the exit as it flows though for a very short ride (less than 1 mm)

Respondido! Ver a resposta Também tenho esse problema

Esta é uma boa pergunta?

Pontuação 1
5 comentários

Hey did you ever have any luck getting the circuit board out of the voltalert tester? I am having the same problem that you had(same reason: corroded batteries) only able to move the pcb very minutely and don't want to force it and break something

por

Not yet. I still wait for suggestions from people who succeeded in this experience to extract PCB. Thanks

por

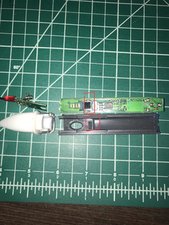
I have been able to extract the PCB from the chassis in the following way:

The chassis has a hole near the positive therminal for batteries.

I take a little screwdriver and insert it in the hole.

I place similar screwdriver horizontally in a perpendicular way to the tip, making sure it is stuck in the white part of the plastic.

I use a lever movment to extract the PCB, which when installed is on a one way clip.

To remove the only way is with force!

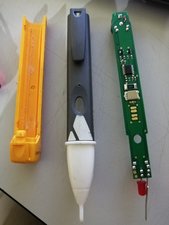
Once removed please note the one way tab will no longer work but doesn't matter it merely keeps the board in does not affect workings.

When taking apart remember to remove the rubber button and keep it safe.

When putting it back together just bend the metallic tab back to its original way.

por

hi guys

i lost the green button with my non contact volt alert ,i cant find this part in website .

any help?

moh_ah1981@yahoo.co.uk email me please

por

Adicionar um comentário

3 respostas

Solução escolhida

I was able to extract the PCB by digging a small hole right next to the button (I used Blake's picture as reference). Just dig until you can see the small metal clip, push it down with a small tool and you should be able to slide the PCB right out of its case easily.

Actualización (07/05/19)

Block Image

Yes. I used a small drill, but was also considering using a soldering iron tip to melt the plastic and get to the clip. Whatever tool that can go through plastic should do the trick, just make sure you can reach the metal clip to push it.

Esta resposta foi útil?

Pontuação 4

1 comentário:

I figured out what is wrong with mine. What is the diode soldered next to the speaker in this picture? It is orange and busted on mine. I could easily replace this part if i knew what it was.

por

Adicionar um comentário
Pergunta mais útil

I sacrificed my fluke to the cause, it didn’t make it. However I used unconventional methods, but I figured it out. So if you take the button off with a pair of tweezers there is a clip right behind it towards the butt of the pen. You “should” be able to just stick something in there to push it down and it can slide right out.

Block Image

Esta resposta foi útil?

Pontuação 5

1 comentário:

Works perfect!!!

por

Adicionar um comentário

Hola, mi probador de voltaje (Fluke 1ac A Ii Voltalert) estuvo expuesto a mucha humedad y se llenó de sarro, por lo que tenia que sacar el PCB para limpiarlo. Estuve cerca de 40 minutos intentando encontrar la forma de sacarlo y nada funcionaba.

Gracias a la imagen de referencia de @ivanm y la de @billingsaur pude hacer el orificio en el lugar correcto, adjunto la imagen para que le sirva a alguien mas.

Block Image

Block Image

Esta resposta foi útil?

Pontuação 3

3 comentários:

I figured out what is wrong with mine. What is the diode soldered next to the speaker in this picture? It is orange and busted on mine. I could easily replace this part if i knew what it was.

por

I just had to desolder the glass diode next to the speaker to clean up corrosion left by a leaky cell so I took the opportunity to try and identify the diode hoping It could help someone else. It comes up as a diode with Vf=0.7v.

On mine at least there are no markings on it aside from the cathode band.

I hope this helps someone

por

My diode was blown. replaced it wit IN4148 /Vf=1.0V). Works fine. Could open it with method Blake recommended.

por

Adicionar um comentário

Adicionar a sua resposta

Francesco Taliercio será eternamente grato(a).
Exibir estatísticas:

Últimas 24 horas: 0

Últimos 7 dias: 2

Últimos 30 dias: 28

Duração total: 4,021