Ir para o conteúdo principal

O que você precisa

Este teardown (desmontagem analítica) não é um guia de reparo. Para reparar seu/sua Canon PowerShot S400, use o nosso manual de serviço.

  1. Canon PowerShot S400 Teardown, LCD Screen: passo 1, imagem 1 %32 Canon PowerShot S400 Teardown, LCD Screen: passo 1, imagem 2 %32
    • Unless stated otherwise, use a Phillips #00 screwdriver to remove all screws.

    • On the backside of the camera, remove the 4.75 mm screw that sits at the top right corner.

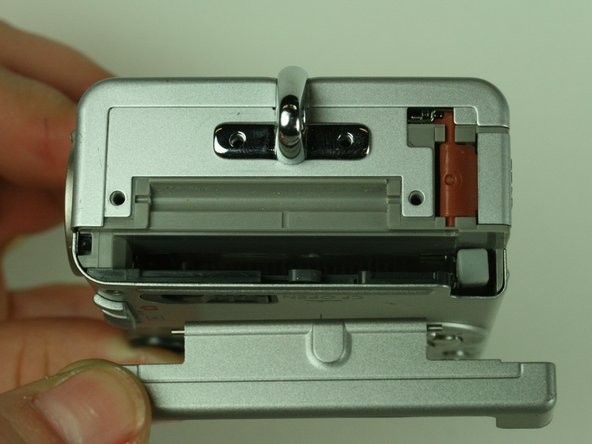
    • Remove the four 4.75 mm screws that sit at the bottom of the camera.

  2. Canon PowerShot S400 Teardown: passo 2, imagem 1 %32
    • On the side of the camera, remove the two 4.75 mm screws that sit near the USB digital terminal.

  3. Canon PowerShot S400 Teardown: passo 3, imagem 1 %32 Canon PowerShot S400 Teardown: passo 3, imagem 2 %32 Canon PowerShot S400 Teardown: passo 3, imagem 3 %32
    • On the side of the camera, remove the four 4.75 mm screws that sit near the wrist strap mount.

    • Remove the two small metal plates, which the four screws hold in place.

  4. Canon PowerShot S400 Teardown: passo 4, imagem 1 %32 Canon PowerShot S400 Teardown: passo 4, imagem 2 %32
    • When removing the casing, do not drop the small black plastic piece. This piece sits in a small gap above the lens, to the left of the flash, and underneath the camera case.

    • Remove the small black plastic piece and set it aside. If necessary, use tweezers to remove the small black plastic piece.

    • Detach the front case and back case.

  5. Canon PowerShot S400 Teardown: passo 5, imagem 1 %32
    • Do not remove the metal plate this step refers to. Removal at this step may damage the ribbon cable. Wait until the next step to remove the plate.

    • Remove the 3.5 mm screw that sits on the metal plate at the bottom of the camera.

    • Remove the two other 3.5 mm screws that sit on the side, to the left of the screw you just removed.

    • In the image, we have already removed some of the screws.

  6. Canon PowerShot S400 Teardown: passo 6, imagem 1 %32 Canon PowerShot S400 Teardown: passo 6, imagem 2 %32 Canon PowerShot S400 Teardown: passo 6, imagem 3 %32
    • A ribbon cable attaches to the metal plate and to the main circuit board, on the front of the camera.

    • Gently release the black latch.

    • Remove the ribbon cable and metal plate assembly.

  7. Canon PowerShot S400 Teardown: passo 7, imagem 1 %32 Canon PowerShot S400 Teardown: passo 7, imagem 2 %32
    • On the backside of the camera, remove the 3.5 mm screw that sits to the left of the viewfinder and above the LCD screen.

    • Remove the second 3.5 mm screw that sits directly above the LCD screen.

    • Gently detach the ribbon cable.

  8. Canon PowerShot S400 Teardown: passo 8, imagem 1 %32
    • Locate the ribbon cable on the main circuit board, which sits below the lens.

    • Gently release the black latch on the ribbon cable connector and detach the ribbon cable.

  9. Canon PowerShot S400 Teardown: passo 9, imagem 1 %32 Canon PowerShot S400 Teardown: passo 9, imagem 2 %32
    • Remove the LCD screen and set it aside.

  10. Canon PowerShot S400 Teardown, Motherboard: passo 10, imagem 1 %32
    • On the main circuit board, gently release the black latches of the four ribbon cables.

    • Gently detach the ribbon cables.

  11. Canon PowerShot S400 Teardown: passo 11, imagem 1 %32 Canon PowerShot S400 Teardown: passo 11, imagem 2 %32
    • Detach the white-capped and green-capped wires, which sit near the flash.

  12. Canon PowerShot S400 Teardown: passo 12, imagem 1 %32
    • Using a spudger, gently detach the shutter button assembly from the camera.

  13. Canon PowerShot S400 Teardown: passo 13, imagem 1 %32
    • Remove the four 3.5 mm screws that hold the main circuit board.

    • In the image, we have already removed some of the screws.

    • Do not remove the main circuit board yet.

  14. Canon PowerShot S400 Teardown: passo 14, imagem 1 %32 Canon PowerShot S400 Teardown: passo 14, imagem 2 %32
    • Do not completely remove the main circuit board from the camera. A soldered ribbon cable still attaches the board to the camera. Complete removal would break the soldering points.

    • In a hinge-like motion, gently lift the bottom of the main circuit board, which is the side without the soldering points.

    • Gently detach the white ribbon cable from the underside of the main circuit board.

  15. Canon PowerShot S400 Teardown: passo 15, imagem 1 %32 Canon PowerShot S400 Teardown: passo 15, imagem 2 %32
    • Do not attempt this next step unless you have soldering experience and feel comfortable desoldering. Otherwise you may damage the camera.

    • Gently desolder the two ribbon cables attached to the motherboard.

    • Remove the motherboard.

  16. Canon PowerShot S400 Teardown, Canon PowerShot S400 Teardown: passo 16, imagem 1 %32 Canon PowerShot S400 Teardown, Canon PowerShot S400 Teardown: passo 16, imagem 2 %32
    • This step exposes the flash capacitor, a black cylindrical object, that is a part of the flash assembly. The capacitor can cause electrical shock.

    • Working with the lens-flash assembly, remove the three 3.45mm screws located on the metal plate.

    • Separate the flash assembly from the lens assembly.

    • Set aside the flash assembly.

  17. Canon PowerShot S400 Teardown: passo 17, imagem 1 %32
    • A ribbon cable prevents complete separation of the viewfinder and the lens assembly.

    • Remove the three 2.5mm screws connecting the viewfinder to the rest of the lens assembly.

  18. Canon PowerShot S400 Teardown: passo 18, imagem 1 %32
    • Remove the three 2.5mm screws underneath the flex circuit.

  19. Canon PowerShot S400 Teardown: passo 19, imagem 1 %32
    • Remove the small 1.5mm screw attaching the metal plate to the lens assembly.

  20. Canon PowerShot S400 Teardown: passo 20, imagem 1 %32
    • Displayed here are all of the components of the camera.

    • To reassemble the camera, follow all of the steps in reverse order.

Justin

Membro desde: 01/17/11

133 Reputação

Autoria de 1 guia

Equipe

Cal Poly, Team 5-19, Amido Winter 2011 Membro de Cal Poly, Team 5-19, Amido Winter 2011

CPSU-AMIDO-W11S5G19

Membros da 4

Autoria de 6 guias

2 comentários

FYI My S400 would not start sometimes. If I banged it in the palm of my hand occasionally it would then work. I was also having terrible trouble with batteries not working and showing low charge when they had been charged.. I opened it up as a last resort. On the front left side below the shutter button there was a small ribbon cable that under a magnifying glass I could see was slightly out of line. I reseated it and the camera has acted flawlessly since.

dwoodusa90069 - Responder

Am curious - I do not see the “Sensor” in this teardown? My immaculate S400 never dropped, not a scratch or scuff-mark, suddenly stopped working - dead sensor. The shutter still works and it can play images taken on another camera. But the display is near-black in record mode and images taken are “pure black”. It literally went from perfect to dead in one power-cycle. I was wondering if something may have come loose in there that a tear-down would identify?

TheDesertsweeper - Responder

Adicione um comentário

Exibir estatísticas:

Últimas 24 horas: 1

Últimos 7 dias: 2

Últimos 30 dias: 11

Duração total: 7,063