Ir para o conteúdo principal

why! N240JU Replacement motherboard

O que você precisa

  1. why! N240JU Replacement motherboard, Battery: passo 1, imagem 1 %32 why! N240JU Replacement motherboard, Battery: passo 1, imagem 2 %32
    • Start by unlocking the right locking latch.

    • Then, by simultaneously unlocking the left latch, lift the battery out of its socket.

  2. why! N240JU Replacement motherboard, Access to main components: passo 2, imagem 1 %32 why! N240JU Replacement motherboard, Access to main components: passo 2, imagem 2 %32
    • Begin by spotting the dummy memory card.

    • Then, remove it and put it on your workplan.

  3. why! N240JU Replacement motherboard: passo 3, imagem 1 %32 why! N240JU Replacement motherboard: passo 3, imagem 2 %32 why! N240JU Replacement motherboard: passo 3, imagem 3 %32
    • Locate the 15 screws that hold the bottom cover of the device in place.

    • Unscrew them and place them on your work surface.

    • Then, un-clip the bottom cover, starting with the side shown in the third picture.

  4. why! N240JU Replacement motherboard, SSD M.2 disk: passo 4, imagem 1 %32 why! N240JU Replacement motherboard, SSD M.2 disk: passo 4, imagem 2 %32 why! N240JU Replacement motherboard, SSD M.2 disk: passo 4, imagem 3 %32
    • Locate the M.2 SSD in its slot.

    • Unscrew the fastening screw of the latter.

    • Lift and remove the SSD M.2 drive from its connector.

  5. why! N240JU Replacement motherboard, Hard disk (mass storage): passo 5, imagem 1 %32 why! N240JU Replacement motherboard, Hard disk (mass storage): passo 5, imagem 2 %32 why! N240JU Replacement motherboard, Hard disk (mass storage): passo 5, imagem 3 %32
    • Locate the hard drive in its location.

    • Lift it slightly.

    • Finally remove it from its SATA connector.

  6. why! N240JU Replacement motherboard, BIOS stack: passo 6, imagem 1 %32 why! N240JU Replacement motherboard, BIOS stack: passo 6, imagem 2 %32
    • To reassemble your device, follow the instructions in reverse order.

    • Lift it gently and take it out of its place.

  7. why! N240JU Replacement motherboard, WLAN card: passo 7, imagem 1 %32 why! N240JU Replacement motherboard, WLAN card: passo 7, imagem 2 %32
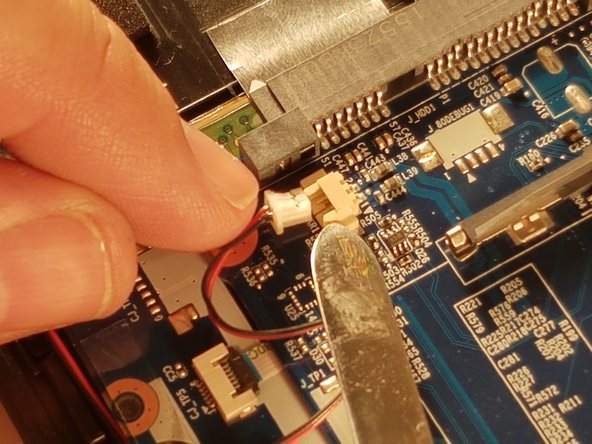
    • Carefully unplug the MAIN and AUX antennas.

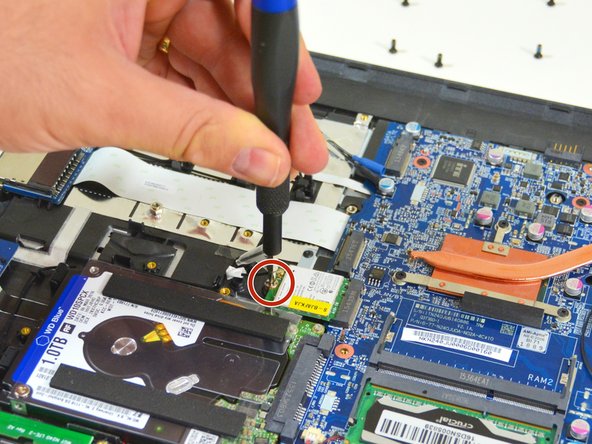
    • Unscrew the fixing screw with the Philips # 0 screwdriver. Then lift the chipset slightly and remove it from the connector.

  8. why! N240JU Replacement motherboard, RAM Memory: passo 8, imagem 1 %32 why! N240JU Replacement motherboard, RAM Memory: passo 8, imagem 2 %32 why! N240JU Replacement motherboard, RAM Memory: passo 8, imagem 3 %32
    • Find and separate the spring blades that maintain the memory module in place (right).

    • Find and separate the spring blades that maintain the memory module in place (left).

    • Remove the memory module (RAM) from its connector.

  9. why! N240JU Replacement motherboard, The fan: passo 9, imagem 1 %32 why! N240JU Replacement motherboard, The fan: passo 9, imagem 2 %32 why! N240JU Replacement motherboard, The fan: passo 9, imagem 3 %32
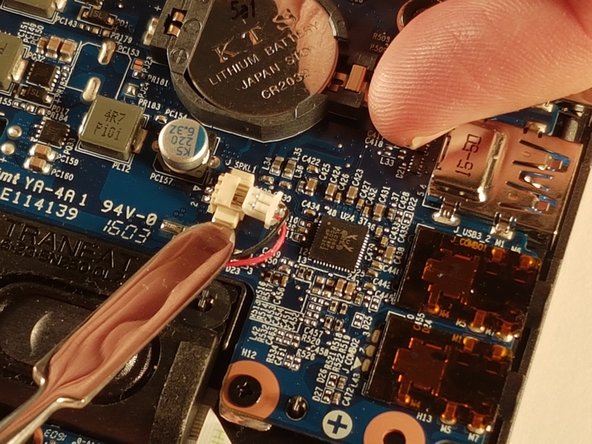
    • Remove the power cable from the fan.

    • Unscrew the two screws securing the fan.

    • Finally remove the fan and place it on your worktop.

  10. why! N240JU Replacement motherboard, The keyboard: passo 10, imagem 1 %32 why! N240JU Replacement motherboard, The keyboard: passo 10, imagem 2 %32 why! N240JU Replacement motherboard, The keyboard: passo 10, imagem 3 %32
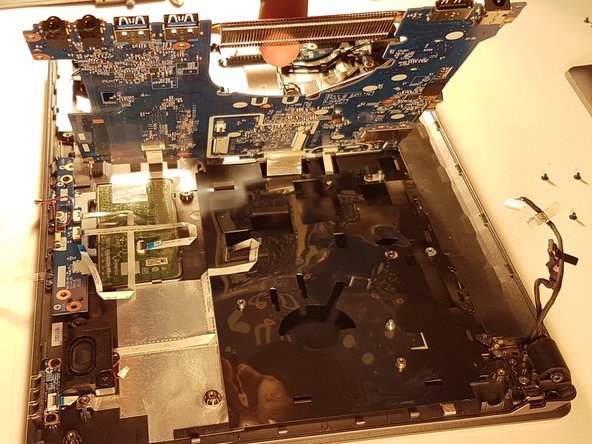
    • Unscrew the circled screws in green and red

    • Put the computer in the position of the second image while pushing a paper clip into the hole of the screw circled in green until you hear a click

    • Lift the keyboard

  11. why! N240JU Replacement motherboard: passo 11, imagem 1 %32 why! N240JU Replacement motherboard: passo 11, imagem 2 %32 why! N240JU Replacement motherboard: passo 11, imagem 3 %32
    • Disconnect the connector circled in red in the direction of the arrow

  12. why! N240JU Replacement motherboard, Motherboard: passo 12, imagem 1 %32 why! N240JU Replacement motherboard, Motherboard: passo 12, imagem 2 %32 why! N240JU Replacement motherboard, Motherboard: passo 12, imagem 3 %32
    • Locate the two flat cables and remove them carefully.

  13. why! N240JU Replacement motherboard: passo 13, imagem 1 %32 why! N240JU Replacement motherboard: passo 13, imagem 2 %32 why! N240JU Replacement motherboard: passo 13, imagem 3 %32
    • Locate the five connectors on the motherboard

    • Unplug all connectors

  14. why! N240JU Replacement motherboard: passo 14, imagem 1 %32 why! N240JU Replacement motherboard: passo 14, imagem 2 %32 why! N240JU Replacement motherboard: passo 14, imagem 3 %32
    • Unplug all connectors

  15. why! N240JU Replacement motherboard: passo 15, imagem 1 %32 why! N240JU Replacement motherboard: passo 15, imagem 2 %32
    • Unscrew the four screws circled in red

    • Lift the motherboard by taking it through the radiator

  16. why! N240JU Replacement motherboard: passo 16, imagem 1 %32 why! N240JU Replacement motherboard: passo 16, imagem 2 %32 why! N240JU Replacement motherboard: passo 16, imagem 3 %32
    • Disconnect the two connectors circled in red

Conclusão

To reassemble your device, follow the instructions in reverse order.

Uma outra pessoa concluiu este guia.

Um agradecimento especial a esses tradutores:

fr en

100%

irlanda está nos ajudando a consertar o mundo! Quer contribuir?
Comece a traduzir ›

Felice Suglia

Membro desde: 06/15/13

31.100 Reputação

Autoria de 264 guias

0 comentários

Adicione um comentário

Exibir estatísticas:

Últimas 24 horas: 0

Últimos 7 dias: 1

Últimos 30 dias: 13

Duração total: 370