Ir para o conteúdo principal

iPod Nano 4th Generation Glass Panel Replacement

O que você precisa

  1. iPod Nano 4th Generation Glass Panel Replacement, Glass Panel: passo 1, imagem 1 %32 iPod Nano 4th Generation Glass Panel Replacement, Glass Panel: passo 1, imagem 2 %32
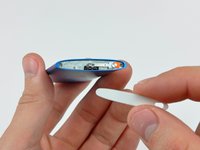
    • Insert the edge of an iPod opening tool into the gap between the outer case and the top bezel.

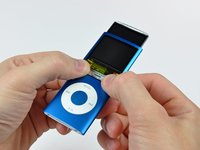
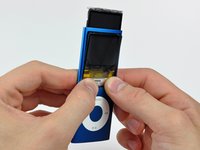
    • Pry the top bezel off the adhesive securing it to the display retainer.

    • At this point the hold switch slider is free and may fall. Be careful not to lose it.

  2. iPod Nano 4th Generation Glass Panel Replacement: passo 2, imagem 1 %32
    • Remove the hold switch slider from the top of the Nano.

  3. iPod Nano 4th Generation Glass Panel Replacement: passo 3, imagem 1 %32
    • Remove the two angled Phillips screws from the two corners of the display retainer.

    • These screw heads are extremely small and easily stripped.

  4. iPod Nano 4th Generation Glass Panel Replacement: passo 4, imagem 1 %32
    • Insert an iPod opening tool between the outer case and the display retainer.

    • Use the tool to slide the display assembly out of the case slightly.

    • Do not rotate the display retainer about the top edge of the display, as it is attached to a thin steel bracket that is easily broken.

    • Do not forcefully remove the display retainer, as the hold switch cable is liable to snap.

  5. iPod Nano 4th Generation Glass Panel Replacement: passo 5, imagem 1 %32
    • Slide the display out of the Nano. It will move about .5" until the display data cable limits its travel.

    • Do not put unnecessary tension on the very thin display data cable.

  6. iPod Nano 4th Generation Glass Panel Replacement: passo 6, imagem 1 %32 iPod Nano 4th Generation Glass Panel Replacement: passo 6, imagem 2 %32
    • With the display pulled out of the case as much as possible, gently press on the lower edge of the glass panel until it pops in slightly (~1 mm).

    • Use your thumbs on the lower edge of the glass panel to slide the glass down and into the case until the top edge pops up out of the case.

  7. iPod Nano 4th Generation Glass Panel Replacement: passo 7, imagem 1 %32
    • Lift the glass panel out of the Nano.

    • Before reinstalling the glass panel, be sure to clean the face of the display and the inside of the panel as any dust or fingerprints will be annoyingly visible when the Nano is turned on.

Conclusão

To reassemble your device, follow these instructions in reverse order.

29 outras pessoas executaram este guia.

0 comentários

Adicione um comentário

Exibir estatísticas:

Últimas 24 horas: 0

Últimos 7 dias: 8

Últimos 30 dias: 49

Duração total: 40,687