Introdução
No audio? Replace the headphone jack!
Unable to unlock? Replace the lock switch, which is an integral part of the headphone jack sub assembly.
O que você precisa
-
-
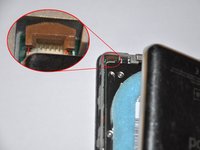
At an angle, carefully insert a putty knife about 1/8 inch into the seam between the two opening tools.
-
Once the putty knife has cleared the lip of the rear panel, pivot the putty knife so that it is vertical, and carefully (but firmly) wiggle it straight down into the gap between the opening tools.
-
-
-
-
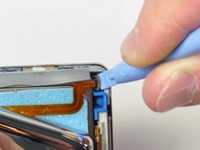
At an angle, carefully insert a putty knife about 1/8 inch into the seam between the two opening tools.
-
Once the putty knife has cleared the lip of the rear panel, angle the putty knife so that it is vertical, and carefully (but firmly) wiggle it straight down into the iPod via the gap between the plastic opening tools.
-
Push with your fingers on the rear panel behind the putty knife to minimize bending. Ever so slightly flex the putty knife to ensure that most of the metal tabs on this side of the iPod are disengaged.
-
-
-
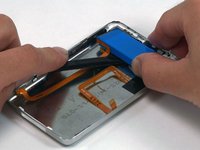
Grasp the front panel assembly with one hand and the rear panel with the other.
-
Gently (GENTLY) disengage the remaining clips on the rear panel by pulling the tops of the front and rear panels away from each other (think of the bottom of the iPod as a hinge), taking great care not to damage the ribbon cables holding the two halves together.
-
-
Ferramenta utilizada neste passo:Tweezers$3.99
-
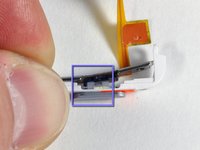
Use angled tweezers or an opening tool to lift the brown lock latch straight up by 1 mm. Make sure you pull from both sides of the latch.
-
Grasp the flex cable with your fingers or tweezers and pull it straight up to disconnect it.
-
-
-
Lift the hard drive up with one hand so you can access the headphone jack ribbon beneath.
-
Use a spudger to flip up the plastic tab holding the headphone jack ribbon in place. The tab will rotate up 90 degrees, releasing the ribbon cable.
-
Slide the orange headphone jack ribbon out of its connector.
-
The rear panel is now free from the iPod.
-
-
-
Use one hand to hold the orange ribbon cables in place, and peel up the black tape securing the cables to the rear panel with your other hand.
-
-
-
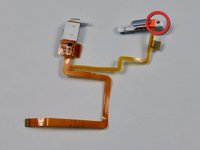
If your replacement part does not include the plastic hold switch, follow the next steps to transfer the plastic hold switch to your new headphone jack.
-
Remove the single Phillips screw nearest to the hold switch.
-
Lift the plastic portion of the Hold switch away from the orange ribbon cable.
-


Before you snap the case shut, be sure to test the device to ensure that it's working properly.
To reassemble your device, follow these instructions in reverse order.
Before you snap the case shut, be sure to test the device to ensure that it's working properly.
To reassemble your device, follow these instructions in reverse order.
Cancelar: não concluí este guia.
227 outras pessoas executaram este guia.

39 comentários
This worked a charm for me! If you take it slow and steady, and keep all the warnings in mind, you shouldn't have too much trouble :)
check this guy I used dollar store xacto blades you got to be careful you can easily cut yourself but this method wont damage the clips or anything,