Introdução
Battery not lasting long? Swap it out.
O que você precisa
-
-
Insert a plastic opening tool into the seam between the front and back of the iPod.
-
-
-
Insert another plastic opening tool into the seam between the front and back of the iPod, leaving at least 1.5 inches of space between the two tools.
-
-
-
At an angle, carefully insert a putty knife about 1/8 inch into the seam between the two opening tools.
-
Once the putty knife has cleared the lip of the rear panel, pivot the putty knife so that it is vertical, and carefully (but firmly) wiggle it straight down into the gap between the opening tools.
-
-
-
Push with your fingers on the rear panel behind the putty knife to minimize bending. Slowly flex the putty knife, as shown in the picture, to ensure that most of the metal tabs on this side of the iPod are disengaged.
-
-
-
Remove the putty knife from the iPod and reinsert it closer to the corner of the iPod, using the same wiggle method as before.
-
-
-
Between the lock slider and headphone jack, insert a plastic opening tool into the seam between the front and back of the iPod.
-
-
-
Near the center of the display, carefully insert a metal spudger into the gap created by the plastic opening tool.
-
Using the metal spudger, disengage the single clip on the top of the iPod.
-
-
-
-
Near the other top corner, insert an opening tool into the seam between the front and back of the iPod
-
-
-
On the other side, insert an opening tool into the seam between the front and back of the iPod.
-
-
-
Remove the plastic opening tool from the top corner and insert it into the seam between the front and back of the iPod, leaving at least 1.5 inches of space between the two tools (as done on the other side).
-
-
-
At an angle, carefully insert a putty knife about 1/8 inch into the seam between the two opening tools.
-
Once the putty knife has cleared the lip of the rear panel, angle the putty knife so that it is vertical, and carefully (but firmly) wiggle it straight down into the iPod via the gap between the plastic opening tools.
-
Push with your fingers on the rear panel behind the putty knife to minimize bending. Ever so slightly flex the putty knife to ensure that most of the metal tabs on this side of the iPod are disengaged.
-
-
-
Carefully insert a metal spudger into the area near the stubborn metal clip.
-
-
-
Gently wiggle the metal spudger down so that it is all the way in the rear panel.
-
-
-
Continue to push up on the front panel with the metal spudger until the metal clip releases.
-
-
-
Grasp the front panel assembly with one hand and the rear panel with the other.
-
Gently (GENTLY) disengage the remaining clips on the rear panel by pulling the tops of the front and rear panels away from each other (think of the bottom of the iPod as a hinge), taking great care not to damage the ribbon cables holding the two halves together.
-
-
Ferramenta utilizada neste passo:Tweezers$3.99
-
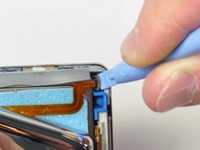
Use angled tweezers or an opening tool to lift the brown lock latch straight up by 1 mm. Make sure you pull from both sides of the latch.
-
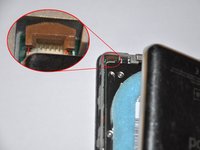
Grasp the flex cable with your fingers or tweezers and pull it straight up to disconnect it.
-
-
-
Place the rear panel next to the iPod, being careful not to strain the orange headphone jack cable.
-
-
-
Lift the hard drive up with one hand so you can access the headphone jack ribbon beneath.
-
Use a spudger to flip up the plastic tab holding the headphone jack ribbon in place. The tab will rotate up 90 degrees, releasing the ribbon cable.
-
Slide the orange headphone jack ribbon out of its connector.
-
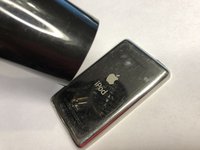
The rear panel is now free from the iPod.
-
-
-
Now to repair the damage caused by liberating the internal parts of the iPod Classic! It is highly likely that at least one of the metal clips in the rear panel has been bent upward. These clips must all be pointing downward in order to reinstall the rear panel.
-
-
-
Take the broad, flat side of the metal spudger and push the clip down, taking care not to tear the thin metal rail from the rear panel. Alternatively a pair of flat pin nosed pliers can be used to reduce risk of slipping and damaging the headphone jack.
-
-
-
On a clean, hard surface, lay the rear panel on its side. Carefully but firmly push down on it, rolling the entire lip side back into its proper spot.
-
-
-
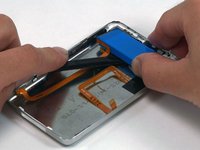
Use a spudger to lift the battery and the attached orange cable out of the iPod. If you have a 160 GB iPod, the battery will be thicker than the one pictured.
-


To reassemble your device, follow these instructions in reverse order.
Cancelar: não concluí este guia.
646 outras pessoas executaram este guia.

88Comentários do guia
Bought an extra pair of the blue opening tools ... they both broke trying to open the case. Guess this one was a bit more stubborn. What saved me was the mini-screwdriver on a Leatherman Micro multitool & the iFixIt Metal Spudger.
Insert a plastic opening tool into the seam between the front and back of the iPod.
This is not possible for ipod 6th gen, I think ifitit may did for 5th gen?
It IS possible and it's really REALLY tough. The plastic tool included in this set is enough to keep seams open where they show in steps 2 and 3 just wide enough for you to put something else in there. But to start them, I used an exacto like blade. When I did this job, I had 3 regular spudgers, the 2 tools provided here, 4 different style green spudgers from somewhere else, 5 large 'guitar picks' sold here to cut the glue holding new iMac screens to the case, the metal spudger, and an exacto type blade.
It was still an incredibly laborious job and although the iPod is back together and works perfectly, one of the seams is bent out a little.
Well, *that* was interesting!
Firstly, as a few have mentioned here, the 6th-generation classics are more tightly-sealed than their immediate forebears, so the otherwise-useful plastic tools included in the battery-replacement kit won't cut it all by themselves; artful (and careful!) application of the metal spudger tool was also required. Thankfully, years of freelance IT work on recalcitrant Macs of all stripes helped prepare me for this bit of improvisation, even though this was the first time I've taken a crack at an iPod (my own 120GB classic - thin version). Happily, other than twisting that one metal clip near the headphone jack - apparently impossible to avoid - and some very minor cosmetic damage, the balance of work went without a hitch. I speculate why Apple makes us go though this, but that's for another thread. Thanks for the kit and tools!
LOL! The reason they make it hard to service is that Apple Authorized repair wants $360.00 US to replace the battery!