O que você precisa
-
-
Power off your iPhone before beginning disassembly.
-
Remove the two 6.7 mm-long pentalobe screws at the bottom edge of the iPhone.
-
-
-
If your iPhone has a cracked screen, keep further breakage contained and prevent bodily harm during your repair by taping over the glass.
-
Lay overlapping strips of packing tape over the iPhone's display until the whole face is covered.
-
If the broken glass makes it difficult to get a suction cup to stick in the next few steps, try folding a strong piece of tape (such as duct tape) into a handle and lifting the display with that instead.
How to detect my Iphone what screen it is, OLED or LCD?
It’s OLED. You can find the specs here, https://support.apple.com/en-us/HT201296
When you find your phone, at the bottom of the description click on, See the tech specs…
mcr4u2 -
The included suction cups were stiff and worthless. They would not lift the screen. Also, I tried every type of tape on the screen to help the suction cups stick without success. Heavy duty suction cups were for my bathroom also failed. However, I had an old GoPro mount with some preapplied double sided 3M VSB tape and stuck that on the screen near the bottom. Magic! This method had the added bonus of being able to use a GoPro attachment as a handle to lift the screen, and propped up the screen like a kickstand in step 12.
Very cool! Thanks
Antonio -
My screen was pretty stuck… would not budge. Heated, super glued the suction cup, tried gorilla tape. Ended up doing the GoPro mount with 3M VSB tape method mentioned. Worked great. That 3M tape is the bomb.
If you have flat feeler gauges (for adjusting engine valve tappet clearance, ignition points … old school) the .003 thick goes right in. Work your way up until you can get the pick or supplied pry tool in.
where can I buy 3M VSB plis!!
3M VHB tape is at auto stores and other big box stores, or online.
nicO -
I used the tweezers that came with the replacement screen and jammed one of them into the glass and that eventually worked. Heating with a blow dryer is also important. The suction cup was helpful in loosening the adhesive for sure, but just not enough to get the display to come out.
-
-
-
Lay overlapping strips of clear packing tape over the iPhone's screen until the whole face is covered.
-
If you can't get the suction cup to stick in the next few steps, fold a strong piece of tape (such as duct tape) into a handle and lift the screen with that instead.
-
-
-
Pull the blue handle backwards to unlock the Anti-Clamp's arms.
-
Slide the arms over either the left or right edge of your iPhone.
-
Position the suction cups near the bottom edge of the iPhone—one on the front, and one on the back.
-
Squeeze the cups together to apply suction to the desired area.
-
-
-
Heat an iOpener and thread it through the arms of the Anti-Clamp.
-
Fold the iOpener so it lays on the bottom edge of the iPhone.
-
Wait one minute to give the adhesive a chance to release and present an opening gap.
-
Insert an opening pick under the screen and the plastic bezel, not the screen itself.
-
Skip the next three steps.
Please UPDATE THIS STEP to say 'insert the opening pick underneath the PLASTIC FRAME OF THE SCREEN' and not the screen. Way too many people are taking this as the way to do it then posting their screen looks different when it's open when they've actually removed the screen leaving the frame in place. It's not rocket science.
Thanks for the suggestion! We updated this step to clarify that.
-
-
-
Use a hairdryer or heat gun, or prepare an iOpener and apply it to the lower edge of the iPhone for about a minute in order to soften up the adhesive underneath.
An alternative to the Iopener or heat gun is to heat water to EXACTLY 80 degrees F (cooking thermometer is great for this) and pour into a reinforced ziplock type bag. Leave the bag on the screen, but be sure that none of the hot water rests on the zipper portion, as the water is hot enough to soften that seal and leak out on to your device! This meat had is my personal favorite as the heat is distributed very equally and precisely as compared to a heat gun, but is more accessible than the Iopener.
-
-
-
Pull up on the suction cup with firm, constant pressure to create a slight gap between the front panel and rear case.
-
Insert an opening pick under the screen and the plastic bezel, not the screen itself.
-
-
-
Slide the opening pick around the lower left corner and up the left edge of the iPhone, slicing through the adhesive holding the display in place.
I think it's important to note that depending on how a screen was damaged, make sure to insert the pic under the black bezel directly under the actual screen. This bezel is a frame around the digitizer. I unknowingly inserted the pic between the bezel and the screen, and separated them both. I did this all the way around the phone. So I basically had to struggle to keep together two different sections of the display assembly because of this mishap, until I removed all the ribbon connectors. It made things much more difficult.
-
-
-
-
Re-insert your pick at the bottom edge of the iPhone, and slide it up the right side to continue separating the adhesive.
My replacement screen for the XR has a black rim but it looks pink. Is that normal?
Step 11 says not to insert your pick around the right side to avoid damaging cables, then Step 12 says to insert it on the right side. Help, I'm confused!
Hi there!
Thank you for the feedback! The wording in step 11 was definitely ambiguous, so we have changed it! You only need to avoid the marked spots rather than the right edge.
-
-
-
Open the iPhone by swinging the display up from the left side, like the back cover of a book.
-
Lean the display against something to keep it propped up while you're working on the phone.
sure looks like the "hinge" is on the right hand side to me.. not left...!
If you leave the suction cup attached to the screen during the “hinging” process, it makes for a very handy holder for the screen until it’s completely detached.
-
-
-
Remove three 1.2 mm Y000 screws securing the battery connector cover bracket.
-
Remove the bracket.
Definitely make sure all three lobes of your tool are aligned before use (it’s a little harder to tell with this style of bit) and apply even and adequate pressure to ensure it grabs as you spin the driver to prevent disfiguring the lobes/slot of the screw head.
Unfortunately my Y000 tool was perhaps not the best fit (tolerance a bit off) in these screws and I ended up stripping out the heads of all three of these. I started to panic but after I sanded the tip of my Y000 bit down a little with super fine grit (1000CW-C) sand paper to flatten the domed tip (visible with macro lens) and give it a bit more bite I was able to remove and reinstall without issue—in fact I had to remove and install them twice since I forgot my adhesive tape during reassembly, so the screws survived and the sanded bit worked.
+1 to above comment. I bought a cheap kit from Amazon and the Y000 screw driver is not good for this job. I’m concerned that I may have disfigured the heads and i type this comment in the midst of my fix :D Be gentle and assess if you can remove at least one screw with your driver before rummaging through all three and other similar screws holding display connector as well.
Update to above comment. I got hold of a Y0.8 screw driver bit (lucky to find an ORIA screw driver kit in my office) and it works like wonders :) Now back to work…
-
-
-
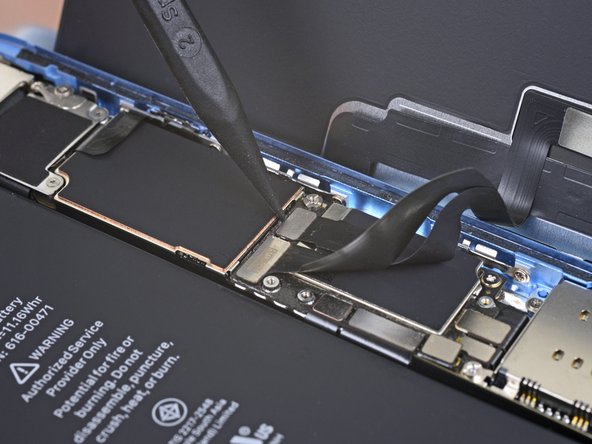
Use the point of a spudger to pry the battery connector straight up out of its socket.
-
Bend the connector slightly away from the logic board to prevent it from accidentally making contact with the socket and providing power to the phone during your repair.
-
-
-
Remove the two 1.2 mm Y000 screws securing the display connector bracket.
-
Remove the bracket.
-
-
-
Use the tip of a spudger to pry up and disconnect the digitizer cable.
-
-
-
Use the tip of a spudger to disconnect the display cable connector.
The new display cable isn’t snapping in but I was just able to snap in the old one. Did I break the new one somehow?
Same it is really frustrating, just keeps slipping up and its bound to get damaged
-
-
-
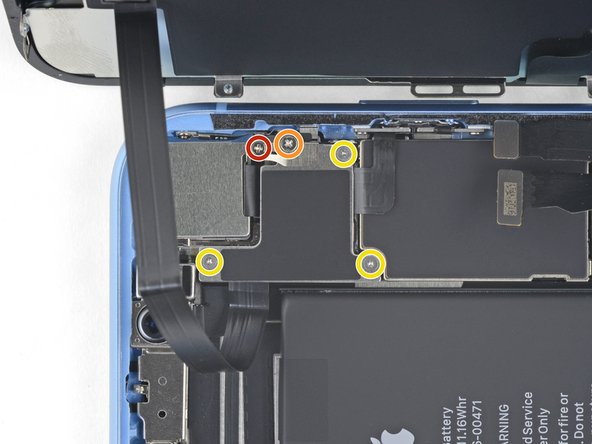
Remove the five screws securing the logic board connector bracket to the rear case:
-
One 1.3 mm Phillips #000 screw
-
One 1.5 mm Phillips #000 screw
-
Three 1.2 mm Y000 screws
-
Remove the bracket.
I’m not sure it makes much if any difference, but we went ahead and swapped the order for you guys. Thanks for your comments!
I just repaired another XR, and you are right! It doesn’t make any differnerce in the order these screws come out. I still damaged this fragile piece. As I work on more of these, I’ll figure out a way to remove this screw without damaging the clip. For now everyone, just use extra caution when removing the 1.3mm phillips screw! Thanks Jeff
I’ve now done at least 6 of these so far and I have fairly consistent good results by taking the 2 Philips head screws out first, then doing the Y screws.
Stow -
Is this piece important for the repair if broken? I have broken it on a home repair. What is it used for? Is it a grounding connection or is it completely unimportant. More information needed please
I’m wondering that too. Is this piece important?
I can confirm that taking out the 1.3 mm screw first then the 1.5 mm screw works the best. If done correctly, you should be able to to remove the rest of the screws and pull the panel off with the clip still attached to the panel. For reassembly, start with the 1.5 mm screw then the 1.3 mm screw.
I don’t remove the small screw at all. I just slide out the metal cover plate and slide back in to reassemble.
this is what i have done as well. Care is still needed to avoid damaging this part. However, it is seemingly far less prone to damage or loss and thus less risky for this repair process.
I too broke this shield. In looking over this problem I believe it’s best to loosen, but not remove, either screw first then the other. To be clear, loosen the red or yellow screw but only just to break it free, then the second screw. Then remove both and the others and the shield should remain in one piece. I put it back with the broken part (on the red screw) and made sure the two are in contact so there’s conductivity as these shields serve a purpose other than just holding in connectors. My phone works fine with this fix.
Is this small bracket important if broken??
Mine is broken
Mine is broken and my apple pay doesn’t work. Something to do with NFC antenna this little clip??
I'm guessing so. I replaced a screen on a phone I bought from a friend. I noticed this bracket was broken when I disassembled the phone but didn't think much of it. When I reassembled it my NFC also does not work. Bummer. A lot of people in these comments have asked if it is crucial that this bracket be connected. Can someone from iFixit or other please reply to those comments?
Kyaw-Zin is right because the shield contains of two tin parts. But there is another option:
1. Unscrew the yellow and orange screws first.
2. Lift the shield gently that it can turn about 20° anticlockwise.
3. Open the red screw and let the shield turn with it the first degrees.
The first time I did this repair, I didn’t see the comments ahead of time and broke the bracket, even removing the 1.3mm screws first. The second time I did the repair, I was prepared and being extra careful, but the simple act of turning the 1.3mm screw head was enough to break it. If I ever have to do this repair again, I’ll just leave the screw in and try to slide the plate out with the screw (and bracket, hopefully) still in tact, as per Kyaw-Zin Win.
None of the screw driver bits I got fits the 1.3mm and 1.5mm screws. How do I remove them?
Same issue as above. The bits provided in the kit do not work with the 1.3mm and 1.5mm screws
Further to above comment about bit not working. Had to go and purchase another PH000 from Home Depot and that worked
I’ve broken that little bracket attached to the red screw. Is it important and can I get a replacement????? Thanks all
Broken the clip. Is this important??
Don't remove the 1.3 Phillips screw! Twisting this screw will break the smaller bracket that is clipped to the larger. Remove all the other screws. Block the smaller bracket from moving as you gently slide the larger bracket horizontally toward the battery until free. The smaller bracket can stay in place while the screen is replaced. When reassembling, support the small bracket by backing with a spudger or similar tool.
I just broke the smaller bracket also :( I didn´t notice these comments until now :(
It looks like part of the antenna for NFC, as all except NFC works on my iPhone now.
It should be repairable using some wire wrap wire, either twisted around the two screws that connected that part of the bracket (or soldered in place). I will try and report back if it works.
Success!! I managed to re-construct the small arm of the bracket by screwing the 1.3mm screw back in with some 0.3mm enamel wire soldered into what was left of the small bracket arm on the screw, then the other end of the enamel wire I wrapped under the 1.5 wire screw's head (enamel exposed to bare metal), then screwed both screws down. also I lifted up the small metal arm with a screw driver (to make sure it reconnects with the display grounding square) ..and NFC worked again (slightly different antenna pattern mind (need to place cards slightly higher up the rear of the phone). Anyway works again :)
-
-
-
Use the tip of a spudger to pry the front sensor assembly connector up from its socket.
During testing, make sure your proximity sensor is not on upside down, as it’s easy to connect upside down. Your phone will boot loop if it’s on incorrectly.
-
-
-
Remove the display assembly.
unclear if this is where screen removal ends
I had the same question, but the answer is yes. Steps 21-30 are removing parts from the original screen that need to be reattached onto the new screen. You are no longer working inside the frame, but on the back of the screen itself.
I apologize for missing these comments initially, but yes that’s correct, the screen is removed now and the rest of the guide goes on to other parts, either in the phone or on the back of the screen. Good luck with the repair!
The alternate method of removing the battery should be highlighted as a standard option. There is so much more work and potential to damage the parts than if you left them in place and carefully with plenty of heat remove the battery. I so wish I had seen this before!
-
-
-
Remove the two screws securing the rear camera cover:
-
One 1.6 mm Phillips screw
-
One 2.4 mm standoff screw
-
-
-
Disconnect the remaining Front Panel Connectors
-
There are 5 FPC's near the iSight camera.
-
There are 4 FPC's near the SIM reader.
-
-
-
Remove the following screws:
-
2.9mm standoff screw
-
1.5mm Phillips #000
-
1.6mm Phillips #000
-
Remove the grounding bracket
-
Pull the SIM reader
-
-
-
Remove the following screws:
-
2.9mm Standoff screw
-
2.8mm Standoff screw
-
1.8mm Phillips #000
-


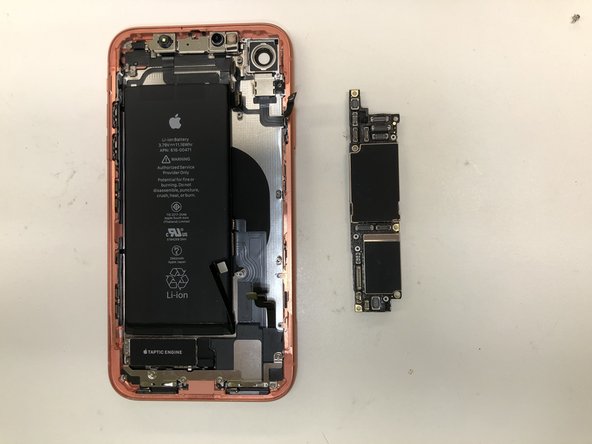
To reassemble your device, follow these instructions in reverse order.
To reassemble your device, follow these instructions in reverse order.
Cancelar: não concluí este guia.
58 outras pessoas executaram este guia.

Equipe

19 comentários
if I replace the logic board will it remove a iCloud lock??????
TL;DR: Yes, it should but…
All of the phone’s memory is stored on the NAND flash memory with is soldered to the logic board. Replacing the iCloud-locked logic board with a logic board from a phone that does not have an iCloud lock will technically remove the lock.
A terrible analogy would be like if you had had a tumor (iCloud lock) in your brain (MLB) so your surgeon (you, the technician) performed a brain transplant. Replacing the brain would indeed get rid of the tumor. However, your body (The phone’s housing) would just become the person of whose brain was transplanted into your body.
The only true way to remove an iCloud lock is to obtain the Apple ID & Apple ID password of the original owner.
You just have to try to find a good logic board and trust that the seller is legit. (Easier said than done)
This guide was more intended for those that are attempting micro-soldering repairs. However, you can use the guide for whatever you need. :-)
If i chanfe the logic board do i also have to swap the facial scan like the fingerprints on the prior iphone or all i gotta do is swap the boards
Great question! From what I’ve experienced, the Face ID hardware is similar to touch ID hardware in that it is tied to the phone’s logic board. However, FaceID does seem a little more forgiving. The phone I’m currently using is an iPhone X that was severely damaged. I bought it off a customer and installed a new screen but Face ID did not work. A couple months later, I was using an app that made use of face ID hardware for facial recognition and mapping. I thought it wouldn’t work since FaceID wasn’t working on my phone. To my surprise, it worked just fine. I then tried setting up FaceID and it was able to activate and capture my face.
If you’re looking to refurbish a phone, assume FaceId won’t work without the original hardware. However, your milage may vary.
Does the camera work even the face I'd doesn't work ?
From what I’ve seen, yes it does. However, your milage may vary. Make sure you check to see if your cameras are good before you replacing/repairing the logic board. I’ve already had an iPhone XS where the cameras and flashlight stopped working. Replacing the iSight camera seemed to do the trick.
Front camera will function as normal, but no Face ID
Richard -
Hello.. I have a question,
I have been done replace the logicboard, when I test camera with potrait mode front camera doesn’t working properly, the picture is very dark and when I move my body or face the my picture in camera it’s very slow and lagy. It’s is normal issue sir if we swap the logicboard ???
And I found one issue again with the battery it show “Important Battery Message” and unable to verify, the battery health show service.
How to solve this issue sir? Many Thanks Before
Article regarding the battery: https://www.ifixit.com/News/apple-is-loc...
Have you tried reinstalling iOS? Be sure to backup your data first, as you will probably have to erase the phone. Let me know if that helps.
What could be the issue on my XR the restarts randomly… It takes several attempts to boot normally. But when I opened any app, the phone shuts down again. There are panic-full logs in the data analytics logs. Factory reset, IOS restoration and DFU did not help. Any idea? TIA
Unfortunately, it would be a shorter list if I told you what was unlikely to cause the iPhone XR to randomly reboot. Hopefully you have a computer or iCloud backup of the phone because I would suggest getting a different phone or talking to Apple. If data is needed, talk to a data recovery specialist like iPad Rehab. (Don’t expect Apple to even attempt to save your data).
Hello, thanks for this helpful guide! Where can I get a replacement logic board?
I’m glad you found the guide helpful! There’s no magic shop to order a replacement logic board. If you can’t find one pre-vetted from a site like iFixit, you’ll have to try your luck with a resale site like eBay. I wish Apple was more open to repair and sold parts direct to consumers and shops. Then again, I also wish I had a pile of gold lol.
The different types of screws are denoted by color for each step. The size in millimeters give you the length of the screw measured by a digital caliper. Screw type is distinguished by the head of the screw. (Phillips #000)
@ipoint The guide was made to show how to remove the logic board, in which is accomplishes. It was mainly intended as a reference for anyone wanting to fix the board itself via micro soldering. Feel free to use this guide to make your own guide on swapping FaceID hardware. It seems like you could use the reputation points anyways.
These guides are awesome! Just a little comment on terminology…
In step 27 - “Disconnect the remaining Front Panel Connectors.” The front panel has already been removed. FPC stands for Flexible Plastic Connectors. An alternative acronym is FFC which stands for Flat Flexible Connectors.
where i can get logic board trusted quality
Do you Have motherboard for iphone xr and iphone 7 and iphone xs
One of my gaskets was as shown in your second photo, the other had been worked into the threads (as if smeared) probably from the factory and was completely unusable.
In place of replacements (unsure of where to purchase) I just used a clear silicone caulking on both screws upon reassembly to offer at least some water seal. I wish these gaskets were included with the gasket waterproofing sealant kit!
Erica - Responder
Is there any place to buy these screw gaskets? I haven’t seen it mentioned anywhere but one of mine was pretty much chewed up. Silicone should work but I’d prefer the oem solution.
Chilinh Nguyen - Responder
I found a place on Amazon that sells them. It's cheapest to get a full set of screws than to get just these. $5-$6 USD.
J Olin -
Can it be dead?
Lulu navarro - Responder
If I transfer the data from the old to the new battery with an icopy, don't I get an error message?
David Julian Krause - Responder
how am i supposed to know if the battery is below 25% if the screen won't turn on?
Beth Jackson - Responder