Ir para o conteúdo principal

Esta versão pode conter edições incorretas. Mude para o último instantâneo verificado.

Pré-requisito somente
Este guia destina-se apenas a ser usado como pré-requisito para outros guias. É incompleto por si só.

O que você precisa

  1. Este passo não foi traduzido. Ajude a traduzi-lo

    : passo 1, imagem 1 %32
    • Before you begin, discharge your iPhone battery below 25%. A charged lithium-ion battery can catch fire and/or explode if accidentally punctured.

    • Power off your iPhone before beginning disassembly.

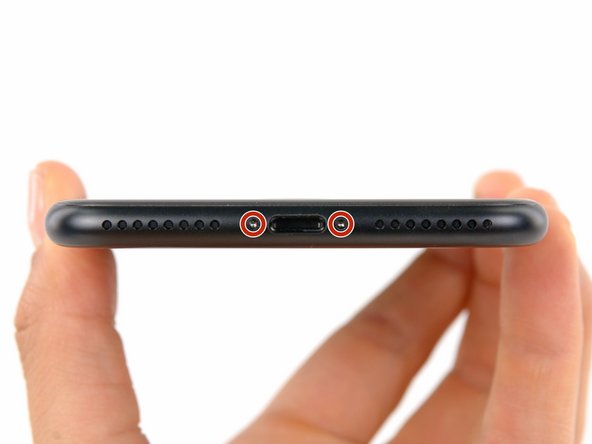
    • Remove the two 3.4 mm pentalobe screws at the bottom edge of the iPhone.

    • Opening the iPhone's display will compromise its waterproof seals. Have replacement seals ready before you proceed past this step, or take care to avoid liquid exposure if you reassemble your iPhone without replacing the seals.

  2. , Aquecimento da bolsa térmica iOpener: passo 2, imagem 1 %32 , Aquecimento da bolsa térmica iOpener: passo 2, imagem 2 %32
    • Recomendamos que você limpe o micro-ondas antes de prosseguir, pois qualquer sujeira desagradável na parte inferior pode acabar grudando no iOpener.

    • Coloque o iOpener no centro do micro-ondas.

    • Para microondas com prato giratório: certifique-se de que o prato esteja girando livremente. Se o iOpener ficar preso, ele poderá superaquecer e queimar.

  3. : passo 3, imagem 1 %32
    • Aqueça o iOpener por trinta segundos.

    • Durante o procedimento de reparo, à medida que o iOpener esfriar, reaqueça-o no micro-ondas por mais 30 segundos de cada vez.

    • Tenha cuidado para não superaquecer o iOpener durante o reparo. O superaquecimento pode fazer com que o iOpener se rompa.

    • Nunca toque no iOpener se ele parecer inchado.

    • Se o centro do iOpener ainda estiver muito quente para ser tocado, continue a usá-lo enquanto espera que ele esfrie um pouco mais antes de reaquecê-lo. Um iOpener aquecido adequadamente deve permanecer quente por até 10 minutos.

  4. : passo 4, imagem 1 %32
    • Remova o iOpener do micro-ondas, segurando-o em uma das duas pontas finas, evitando o centro dele, que está quente.

    • O iOpener estará muito quente, portanto tenha cuidado ao manuseá-lo. Use uma luva de forno, se necessário.

  5. , Método de aquecimento alternativo do iOpener: passo 5, imagem 1 %32 , Método de aquecimento alternativo do iOpener: passo 5, imagem 2 %32
    • Se você não tiver um micro-ondas, siga este passo para aquecer o iOpener em água fervida.

    • Encha uma panela ou frigideira com água suficiente para submergir completamente um iOpener.

    • Aqueça a água até ferver. Desligue o fogo.

    • Coloque um iOpener na água quente por 2 a 3 minutos. Certifique-se de que o iOpener esteja totalmente submerso na água.

    • Use um pegador para retirar o iOpener aquecido da água quente.

    • Seque bem o iOpener com uma toalha.

    • O iOpener estará muito quente, portanto, tenha cuidado para segurá-lo apenas pelas abas das extremidades.

    • Sua bolsa térmica iOpener está pronta para o uso! Se precisar reaquecer o iOpener, aqueça a água até ferver, desligue o fogo e coloque o iOpener na água por 2 a 3 minutos.

  6. Este passo não foi traduzido. Ajude a traduzi-lo

    : passo 6, imagem 1 %32
    • Heating the lower edge of the iPhone will help soften the adhesive securing the display, making it easier to open.

    • Use a hairdryer or prepare an iOpener and apply it to the lower edge of the iPhone for about a minute in order to soften up the adhesive underneath.

  7. Este passo não foi traduzido. Ajude a traduzi-lo

    : passo 7, imagem 1 %32 : passo 7, imagem 2 %32
    • Apply a suction cup to the lower half of the front panel, just above the home button.

    • Be sure the suction cup does not overlap with the home button, as this will prevent a seal from forming between the suction cup and front glass.

    • If your display is badly cracked, covering it with a layer of clear packing tape may allow the suction cup to adhere. Alternatively, very strong tape may be used instead of the suction cup. If all else fails, you can superglue the suction cup to the broken screen.

  8. Este passo não foi traduzido. Ajude a traduzi-lo

    : passo 8, imagem 1 %32 : passo 8, imagem 2 %32 : passo 8, imagem 3 %32
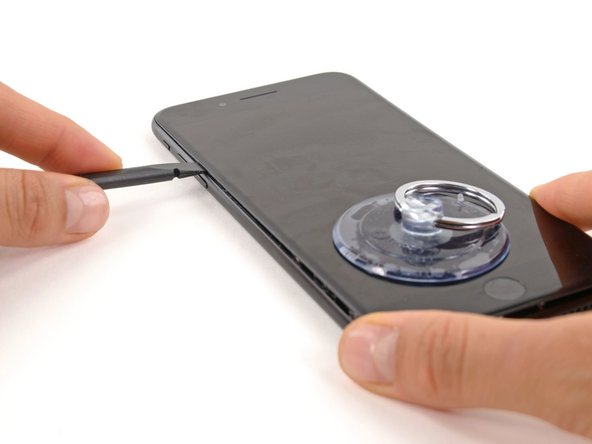
    • Pull up on the suction cup with firm, constant pressure to create a slight gap between the front panel and rear case.

    • Insert the flat end of a spudger into the gap.

    • The watertight adhesive holding the display in place is very strong; creating this initial gap takes a significant amount of force. If you're having a hard time opening a gap, rock the screen up and down to weaken the adhesive until you can fit a spudger inside.

    • While pulling up on the suction cup, twist the spudger to widen the opening between the screen and rear case.

  9. Este passo não foi traduzido. Ajude a traduzi-lo

    : passo 9, imagem 1 %32 : passo 9, imagem 2 %32 : passo 9, imagem 3 %32
    • Insert the flat end of the spudger between the front panel and the rear case at the lower left edge of the iPhone.

    • Slide the spudger up the left edge of the phone starting at the lower edge and moving towards the volume control buttons and silent switch, breaking up the adhesive holding the display in place.

    • Do not try to pry the top edge of the display away from the rear case, as it is held in place by plastic clips that may break.

  10. Este passo não foi traduzido. Ajude a traduzi-lo

    : passo 10, imagem 1 %32 : passo 10, imagem 2 %32
    • Remove the spudger from the left side of the phone and insert the flat end into the bottom right corner.

    • Slide the spudger up the right edge of the phone to the top corner, breaking up the adhesive holding the display in place.

  11. Este passo não foi traduzido. Ajude a traduzi-lo

    : passo 11, imagem 1 %32 : passo 11, imagem 2 %32
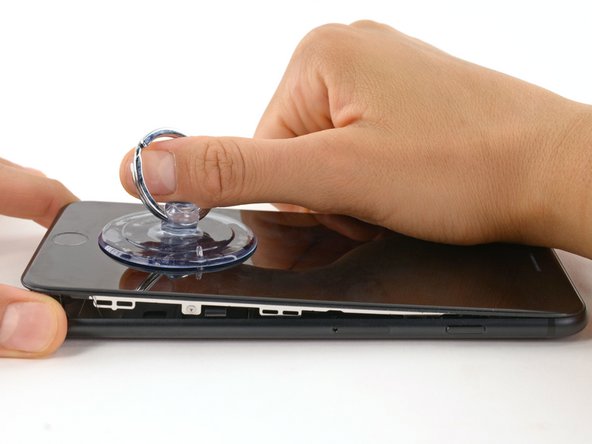
    • Pull up on the suction cup to lift up the display and open the iPhone.

    • Do not raise the display more than 10º as there are delicate ribbon cables along the right edge of the device connecting the display to the logic board.

  12. Este passo não foi traduzido. Ajude a traduzi-lo

    : passo 12, imagem 1 %32 : passo 12, imagem 2 %32
    • Pull up on the small nub on the suction cup to remove it from the front panel.

  13. Este passo não foi traduzido. Ajude a traduzi-lo

    : passo 13, imagem 1 %32 : passo 13, imagem 2 %32
    • Slide an opening pick underneath the display along the top edge of the phone to loosen the last of the adhesive.

  14. Este passo não foi traduzido. Ajude a traduzi-lo

    : passo 14, imagem 1 %32 : passo 14, imagem 2 %32 : passo 14, imagem 3 %32
    • Pull the display assembly slightly away from the top edge of the phone to disengage the clips holding it to the rear case.

    • Open the iPhone by swinging the display up from the left side, like the back cover of a book.

    • Don't try to fully separate the display yet, as several fragile ribbon cables still connect it to the iPhone's logic board.

  15. Este passo não foi traduzido. Ajude a traduzi-lo

    : passo 15, imagem 1 %32
    • Remove the following four tri-point Y000 screws securing the lower display cable bracket to the logic board:

    • Three 1.2 mm screws

    • One 2.6 mm screw

  16. Este passo não foi traduzido. Ajude a traduzi-lo

    : passo 16, imagem 1 %32 : passo 16, imagem 2 %32
    • Remove the lower display cable bracket.

  17. Este passo não foi traduzido. Ajude a traduzi-lo

    : passo 17, imagem 1 %32 : passo 17, imagem 2 %32 : passo 17, imagem 3 %32
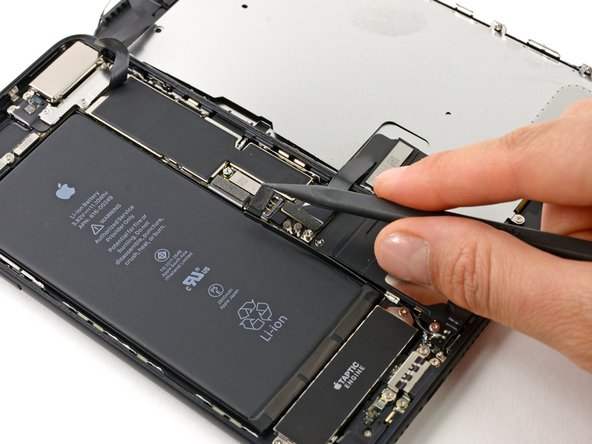
    • Use the point of a spudger to lift the battery connector out of its socket on the logic board.

    • Bend the connector cable up slightly to prevent it from making contact with the socket and providing power to the phone.

Linha de Chegada

Scott Havard

Membro desde: 06/27/16

49.633 Reputação

Autoria de 31 guias

Um comentário

after I replaced my battery and tried to turn on my phone it would just stay on the apple logo and nothing would happen. I know I did everything right but… help
Heberto Moreira - Responder

Adicione um comentário

Exibir estatísticas:

Últimas 24 horas: 1

Últimos 7 dias: 3

Últimos 30 dias: 5

Duração total: 978