Esta versão pode conter edições incorretas. Mude para o último instantâneo verificado.
O que você precisa
Vídeo de Apresentação
-
Este passo não foi traduzido. Ajude a traduzi-lo
-
Power off your iPhone before beginning disassembly.
-
Remove the two 3.4 mm pentalobe screws on the bottom edge of the iPhone.
-
-
-
Meça 3 mm a partir da ponta e marque a palheta com um marcador permanente.
-
-
-
Puxe a pega azul para trás para destravar os braços do Anti-Clamp.
-
Deslize os braços pela borda esquerda ou direita do seu iPhone.
-
Posicione as ventosas próximo à borda inferior do iPhone, diretamente acima do botão home - uma pela dianteira e a outra pela traseira.
-
Aperte as ventosas uma contra a outra para aplicar sucção na área desejada.
-
-
-
Puxe a pega azul para a frente para travar os braços.
-
Gire a pega 360 graus no sentido horário até que as ventosas comecem a se esticar.
-
Certifique-se de que as ventosas permaneçam alinhadas uma com a outra. Se elas começarem a ficar desalinhadas, solte um pouco as ventosas e realinhe os braços.
-
-
-
Aqueça uma bolsa térmica iOpener e passe-a pelos braços do Anti-Clamp.
-
Dobre a bolsa térmica iOpener de modo que ela fique sobre a borda inferior do iPhone.
-
Aguarde um minuto para que o adesivo tenha a chance de se soltar e apresentar um vão para a abertura.
-
Insira uma palheta de abertura no vão.
-
Pule as próximas três etapas.
-
-
-
O aquecimento da borda inferior do iPhone ajudará a amolecer o adesivo que prende a tela, facilitando a abertura.
-
Use um secador de cabelo ou prepare uma bolsa térmica iOpener e aplique-o(a) na borda inferior do iPhone por cerca de 90 segundos para amolecer o adesivo que se encontra por baixo.
-
-
-
Aplique uma ventosa de sucção na metade inferior do painel dianteiro, imediatamente acima do botão home.
-
-
-
Este passo não foi traduzido. Ajude a traduzi-lo
-
Remove four tri-point Y000 screws securing the lower connector bracket, of the following lengths:
-
Three 1.2 mm screws
-
One 2.4 mm screw
-
-
Este passo não foi traduzido. Ajude a traduzi-lo
-
Use the point of a spudger to lift the battery connector out of its socket on the logic board.
-
-
Este passo não foi traduzido. Ajude a traduzi-lo
-
Use a spudger or a fingernail to disconnect the two lower display connectors by prying them straight up from their sockets on the logic board.
-
-
Este passo não foi traduzido. Ajude a traduzi-lo
-
Remove the two 1.3 mm Phillips #000 screws securing the bracket over the front panel sensor assembly connector.
-
-
Este passo não foi traduzido. Ajude a traduzi-lo
-
Disconnect the front panel sensor assembly connector from its socket on the logic board.
-
-
Este passo não foi traduzido. Ajude a traduzi-lo
-
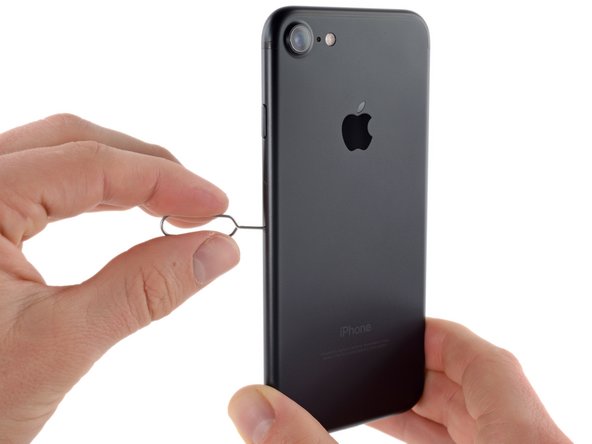
Insert a SIM card eject tool or a paperclip into the small hole in the SIM card tray.
-
Press to eject the tray.
-
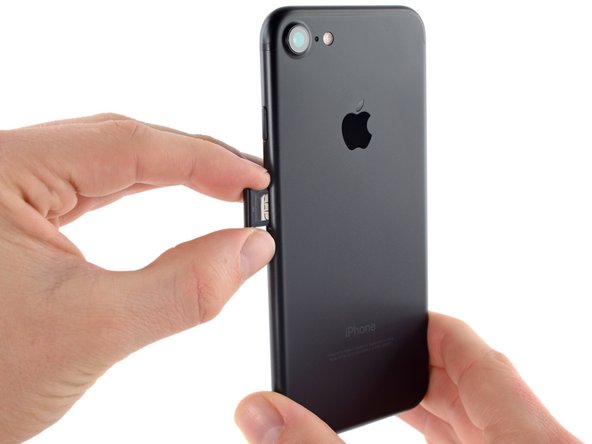
Remove the SIM card tray assembly from the iPhone.
-
-
Este passo não foi traduzido. Ajude a traduzi-lo
-
Use the flat end of a spudger to disconnect the rear-facing camera connector.
-
-
Este passo não foi traduzido. Ajude a traduzi-lo
-
Remove the following Phillips screws securing the rear camera bracket to the rear case:
-
One 1.3 mm screw
-
One 2.5 mm screw
-
-
Este passo não foi traduzido. Ajude a traduzi-lo
-
Use the pointed end of a spudger to pry up and disconnect the antenna bus connector, just left of the rear camera module.
-
-
Este passo não foi traduzido. Ajude a traduzi-lo
-
Remove the two 1.2 mm tri-point screws securing the upper cable bracket.
-
-
Este passo não foi traduzido. Ajude a traduzi-lo
-
Use the flat end of a spudger to disconnect the upper cable connector.
-
-
Este passo não foi traduzido. Ajude a traduzi-lo
-
Remove the four Phillips screws securing the Wi-Fi antenna:
-
Three 1.2 mm screws
-
One 1.7 mm screw
-
-
Este passo não foi traduzido. Ajude a traduzi-lo
-
Remove the following Phillips screws:
-
One 1.3 mm screw
-
One 2.2 mm screw
-
-
Este passo não foi traduzido. Ajude a traduzi-lo
-
Remove the 2.2 mm standoff screw from the grounding bracket.
-
-
Este passo não foi traduzido. Ajude a traduzi-lo
-
Use tweezers to gently bend the logic board grounding bracket out of the way.
-
-
Este passo não foi traduzido. Ajude a traduzi-lo
-
Use the point of a spudger to lift the two antenna cable connectors up off of the sockets on the logic board.
-
-
Este passo não foi traduzido. Ajude a traduzi-lo
-
Use tweezers to gently derout the antenna cables from the metal bracket on the logic board.
-
-
Este passo não foi traduzido. Ajude a traduzi-lo
-
Use the point of a spudger to disconnect the lower cable connector.
-
-
Este passo não foi traduzido. Ajude a traduzi-lo
-
Remove the following screws:
-
One 1.4 mm Phillips screw
-
Three 2.2 mm standoff screws
-
-
Este passo não foi traduzido. Ajude a traduzi-lo
-
Use the point of a spudger to move the SIM card eject plunger out of the logic board's way.
-
-
Este passo não foi traduzido. Ajude a traduzi-lo
-
Use the flat end of a spudger to gently lift the battery connector end of the logic board up.
-
-
Este passo não foi traduzido. Ajude a traduzi-lo
-
Lift the battery connector end of the logic board and pull it up and out of the rear case.
-


Cancelar: não concluí este guia.
158 outras pessoas executaram este guia.

13 comentários
I had an accident where my iphone has got some damage (cracked screen, metal frame slightly bent).. I can see a lot of iCloud locked devices for sale, some of them for a cheap price. Would replacing the logic board and home button give me a non-damaged working phone? Or what parts would need to be moved for this? Sure I can buy a brand new phone but I like a bit of a challenge :)
the logic board holds the OS, so yes if you were to replace the mother board of the iPhone it should work like a new phone but without touch id
I have the same idea and i found to buy this one
https://www.aliexpress.com/item/For-iPho...
You think it will work?
Hi,
I’ve got a problem with my iphone7. I just took some videos under the water using my iphone. But later it’s finger id has gone and it’s fully damaged. Now the phone is not working. Is there any option to repair this ….?
Hi Muhammed, sounds like some water got inside your phone. Check out our iPhone liquid damage guide for some basic troubleshooting you can do on your own. When you have the phone open check connectors and pins on the board for any corrosion. If the damage is serious enough that cleaning won’t fix it, you can take your phone to a local repair shop for more extensive repairs.