Esta versão pode conter edições incorretas. Mude para o último instantâneo verificado.
O que você precisa
-
-
Remova os dois parafusos Pentalobe de 3,4 mm dispostos em ambos os lados do conector Lightning.
-
-
-
Puxe a pega azul para trás para destravar os braços do Anti-Clamp.
-
Deslize os braços pela borda esquerda ou direita do seu iPhone.
-
Posicione as ventosas próximo à borda inferior do iPhone, diretamente acima do botão home - uma pela dianteira e a outra pela traseira.
-
Aperte as ventosas uma contra a outra para aplicar sucção na área desejada.
-
-
Este passo não foi traduzido. Ajude a traduzi-lo
-
If you don't have an Anti-Clamp, follow the next three steps to use a suction handle.
-
Apply mild heat to the lower edge of the iPhone using an iOpener or hair dryer for about a minute.
-
-
-
-
Segure com cuidado o conjunto do display e eleve-o para abrir o telefone, usando os clipes na parte superior do painel dianteiro como uma dobradiça.
-
Abra o display a um ângulo de cerca de 90º e apoie-o em algo que o sustente enquanto você está trabalhando no telefone.
-
Engate uma faixa de elástico para fixar seguramente o display enquanto você trabalha. Isso previne uma tensão indevida nos cabos do display.
-
-
-
Remova os seguintes parafusos Phillips que seguram o suporte do conector da bateria à placa lógica:
-
Um parafuso de 2,9 mm
-
Um parafuso de 2,3 mm
-
-
-
Remova os seguintes parafusos Phillips:
-
Três parafusos de 1,3 mm
-
Um parafuso de 1,6 mm
-
Um parafuso de 3,0 mm
-
-
Este passo não foi traduzido. Ajude a traduzi-lo
-
Peel up any tape covering the iSight camera bracket screws.
-
-
Este passo não foi traduzido. Ajude a traduzi-lo
-
Remove the following Phillips screws over the camera bracket:
-
One 1.9 mm screw
-
One 2.4 mm screw
-
-
Este passo não foi traduzido. Ajude a traduzi-lo
-
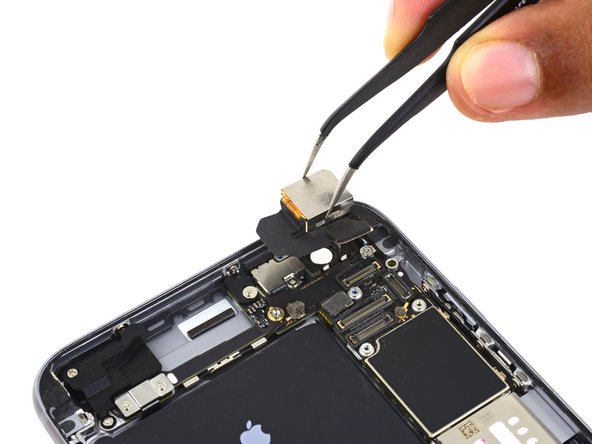
Disconnect the iSight camera connector from its socket on the logic board.
-
-
Este passo não foi traduzido. Ajude a traduzi-lo
-
Insert the flat end of the spudger between the iSight camera and rear casing.
-
Gently pry the camera out from its housing.
-


Cancelar: não concluí este guia.
127 outras pessoas executaram este guia.

35 comentários
really useful.
Great instructional video which saw me through the entire disassembly of my phone, and then clear and concise enough steps on the page to help me put it back together after installing the new camera. Thank you!!!!
I completed this repair at the same time as replacing my battery and headphone/lightening jack assembly. The problem I was experiencing with my camera was jittery video and unusable photos. The stabilization gimbal had died, though I am not sure that is the right word for it. It's more like it had an overdose. Anytime I would come to use the camera you could hear a tiny clicking noise as the lens armature shot itself about within its tolerances. Photos were out of focus and jittery, even when taken with the phone completely stable and untouched. I could most of the time just manage to make it take photos to deposit checks by holding the phone horizontally and in very bright sunlight, sometimes tapping the phone until the clicking noise stopped. Videos would hunt for focus and look as though I was actively shaking the camera, no matter what. Sometimes it was worse than others. Replacing this assembly completely fixed all issues.
Michael, you might have been interested to know that the focusing problems you experienced are chronic in the iPhone 6 Plus and Apple has created a repair program. You might have found this page useful if your serial number was eligible. https://www.apple.com/support/iphone6plu...
Micheal, I am having that same problem as well! Good to know that replacing it fixes it!
Talon, the repair program Apple has is only for the 6 plus not the 6s plus.